
DIY Hair Clip Guide for Creative Parents: Step-by-Step Tutorial
Welcome, creative parents and craft enthusiasts! If you’re looking for a fun and engaging craft activity to share with your little ones, you’ve stumbled upon the perfect resource. Today, we’re excited to dive into the whimsical world of DIY hair clips. Not only are homemade hair clips a fabulous way to add a personal touch to your child’s accessories, but they’re also incredibly easy and affordable to make!
With a sprinkle of creativity, a dash of patience, and a few basic materials, you’ll be on your way to crafting unique hair clips that are sure to turn heads at the playground. So let’s get started!
Why Making Hair Clips Can Be a Special Activity
Making hair clips at home is a fantastic way to bond with your kids while encouraging their creativity. It’s an activity that can help improve their fine motor skills, teaches them the value of DIY projects, and gives you the perfect opportunity to discuss colors, patterns, and designs. Plus, these little projects make delightful gifts for friends and family!
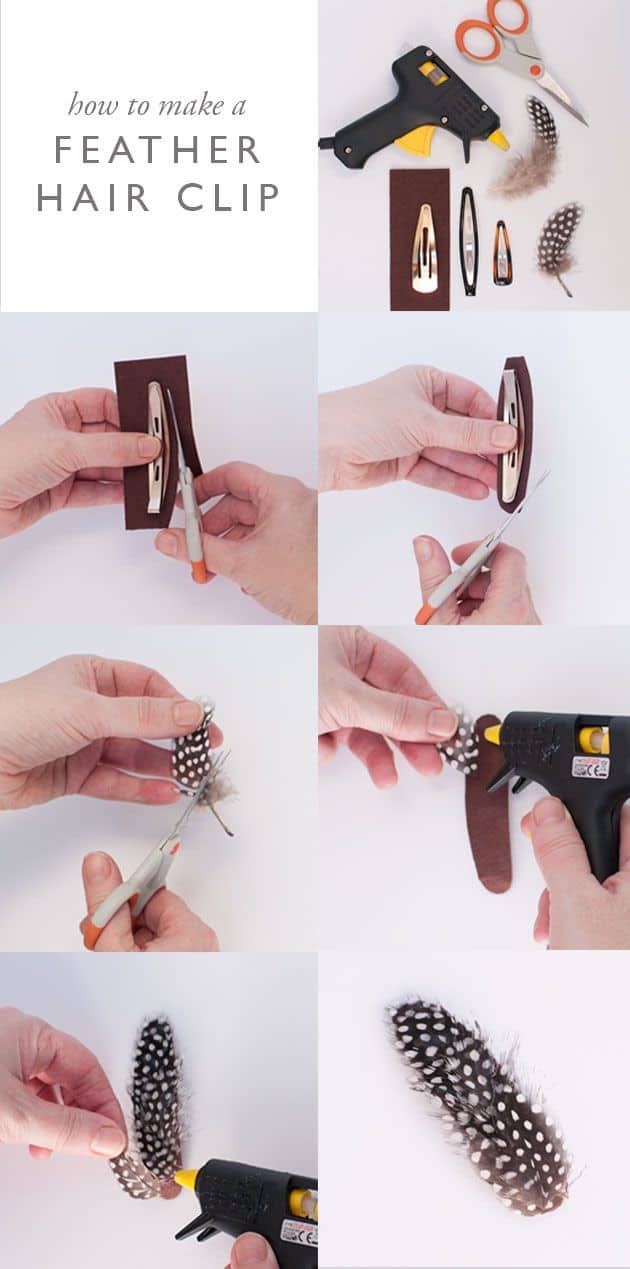
What You’ll Need
- Felt fabric or ribbon of various colors and designs
- Plain hair clip bases (metal or plastic)
- Glue gun or strong adhesive
- Scissors
- Decorative elements like beads, buttons, or sequins
- Pencil and ruler for precise measurement and lines
- Optional: fabric paint, glitter glue for additional decoration
Before we get crafting, ensure your workspace is tidy and all your materials are within reach. Crafting with kids can sometimes get a bit messy, so consider laying down newspapers or a tablecloth to protect your surface. Safety first: when using a glue gun or scissors, keep an eye on your little ones to prevent accidents.
Exciting Hair Clip Ideas to Inspire You
Feeling a bit unsure about what type of hair clips to make? Here are a few ideas to get your creative juices flowing:
- Bow-shaped clips for a classic and chic look
- Flower designs for a fresh, springtime feel
- Cartoon characters or animal shapes for a playful touch
- Geometric patterns for a modern twist
- Seasonal themes like snowflakes or pumpkins for holiday excitement
Remember, the key to a successful DIY craft is to let your imagination run wild. You can mix and match these ideas, play with different textures and materials, and create something that reflects your child’s personality!
Step-by-Step Tutorial to Make Your First Hair Clip
1. Choosing Your Design
Begin by deciding on a design. If your child wants to be part of the process, ask them about their favorite colors, shapes, or characters. Sketch out a few ideas on paper to find the perfect template for your hair clip.
2. Preparing the Materials
Cut the felt or ribbon according to the design you’ve chosen. If you’re making a bow, you might need to fold and trim the fabric to get the right shape. For more intricate designs, detailed cutting will have to be precise – patience is key!
3. Assembling the Hair Clip
Once you have all the pieces ready, it’s time to put them together. Using the glue gun or adhesive, carefully attach each piece of your design to the hair clip base. Add your decorative elements like beads or buttons at this stage to embellish your creation.
And there you have it – you’re well on your way to creating delightful DIY hair clips with your children! Be sure to let everything dry thoroughly before wearing or testing out your new accessory. In our next section, we’ll provide detailed instructions for various hair clip designs, tips to ensure durability, and how to make this crafting activity educational as well as fun.
Stay tuned, because we’ve barely scratched the surface of this DIY adventure. There’s a whole array of designs waiting to be discovered, skills to be honed, and smiles to be won!
Five Things Parents Should Know Before Crafting Hair Clips
Before you jump into the world of DIY hair clips, take note of these handy tips to ensure a smooth crafting experience:
1. Choosing the Right Materials
Pick materials that are not only attractive but also durable. Consider the hair type and age of the child when selecting bases and decorations. For example, softer materials are better for younger children to avoid any accidental pokes or prods.
2. Safety Considerations
Always prioritize safety, especially when crafting with kids. Use non-toxic adhesives and make sure any small decorative pieces are securely attached to prevent choking hazards. Supervise children during the crafting process, particularly when using sharp tools or a hot glue gun.
3. Simplify Complex Designs
If you’re working on a more intricate design, consider preparing the more complex elements beforehand. This allows children to enjoy the assembly process without getting frustrated by difficult steps.
4. Allow for Personal Expression
Encourage your child to express their individuality through their hair clip designs. Let them choose their colors and decorations to foster a sense of ownership and pride in their handmade accessory.
5. Time Management
DIY crafts are not a race, especially when enjoying them with your children. Set aside enough time to enjoy the process without rushing. This will make crafting a relaxing and bonding activity, rather than a source of stress.
Now that we’ve covered the basics and shared some essential tips for your crafting journey, you’re all prepped up. It’s time to let those creative ideas transform into charming hair accessories that will jazz up any outfit!
Detailed Instructions for Various Hair Clip Designs
Dive deeper into the crafting world with these detailed instructions for various hair clip designs. Whether you’re aiming for elegant, playful, or seasonal, we’ve got you covered with these step-by-step guides.
Elegant Bow-Shaped Clips
Fashion a posh bow using your fabric of choice. Cut a strip long enough to form a loop that can be pinched in the middle to resemble a bowtie. Using a smaller strip of fabric, wrap it around the center pinch and secure it to the hair clip base with glue.
Whimsical Flower Designs
Create blooming flowers by cutting petal shapes out of felt and layering them around a central bead or button. Alternate the petal colors and shapes for a more dynamic look. Use a dab of glue to finalize the flower onto the clip.
Playful Character Clips
Bring your child’s favorite character to life by outlining its silhouette on felt. Cut out the design and add necessary details with smaller pieces of felt or fabric paint. Stick the character onto the clip base for a playful accessory that’s sure to be a hit.
Geometric Twists
For a modern vibe, choose geometric designs like triangles, circles, or rectangles. Layer different shapes in various fabrics onto the clip, using contrasting colors for a bold statement. Simple yet stylish, these designs are great for older kids.
Seasonal Charm
Get into the festive spirit by selecting seasonal themes. Think felt snowflakes dabbed with glitter for winter, or orange pumpkin faces for fall. These designs are perfect for getting into the holiday mood and can also serve as cute gifts for your child’s friends.
As you continue to explore different designs, remember that experimentation is key. Some projects may turn out perfectly on the first try, while others might require a bit of tweaking. Most importantly, have fun and cherish the quality time spent with your little ones. Each hair clip you create together is more than an accessory — it’s a memory made tangible.
See more great Things to Do with Kids in New Zealand here. For more information see here
Disclaimer
The articles available via our website provide general information only and we strongly urge readers to exercise caution and conduct their own thorough research and fact-checking. The information presented should not be taken as absolute truth, and, to the maximum extent permitted by law, we will not be held liable for any inaccuracies or errors in the content. It is essential for individuals to independently verify and validate the information before making any decisions or taking any actions based on the articles.
