
Fly Into Fun: The Ultimate Guide to Making the Perfect Paper Plane with Your Kids
Hey there, awesome parents! Are you ready to dive into the delightful world of paper planes? Not only is this an incredibly fun activity to share with your children, but it’s also a fantastic way to teach them about basic aerodynamics, fine-tune their motor skills, and spend quality time creating something together. Whether it’s a rainy day or you’re just looking for a simple and enjoyable craft, making paper planes is a surefire way to engage those little hands and minds. Plus, who doesn’t love watching a freshly folded plane soar across the room?
In this comprehensive guide, we’ll take you from a flat sheet of paper to a flying marvel in a jiffy. And don’t you worry; we’ve ensured every step of the process is covered in detail, so you and your kiddos can follow along easily. Let’s get those papers ready and embark on a flight journey from the comfort of your own home!
Choosing the Right Paper for Your Plane
First things first, choosing the right paper is crucial to your paper plane’s performance. You might be tempted to grab any old sheet, but not all paper is created equal when it comes to aerodynamics. Standard printer paper, around 20-24lb (or 80gsm if you’re across the pond), is your best bet as it provides enough weight and stiffness for a good glide. You can opt for colored or patterned paper to add some extra flair to your plane, but ensure it’s the same weight and texture as regular printer paper.
Basic Folding Techniques
Before we get into the nitty-gritty of folding, let’s cover some basic folding techniques:
- Crisp Creases: Make sure each fold is sharp. Run your finger or a ruler along each crease to make it crisp. This helps the plane maintain its shape in flight.
- Alignment: Accuracy is key! Align edges and corners as precisely as possible. Misaligned edges can lead to a wonky flight path.
- Practice Patience: Don’t rush the process. Take your time and ensure each fold is perfect before moving on to the next step.
With these basic principles in mind, you’re all set to start your first paper plane. For this guide, we’ll begin with the classic dart design, known for its simplicity and excellent flying capabilities.
The Classic Dart Paper Plane
This timeless design is a great starting point for beginners. It’s quick to make and flies like a dream, offering a great mix of stability and distance. Here’s what to do:
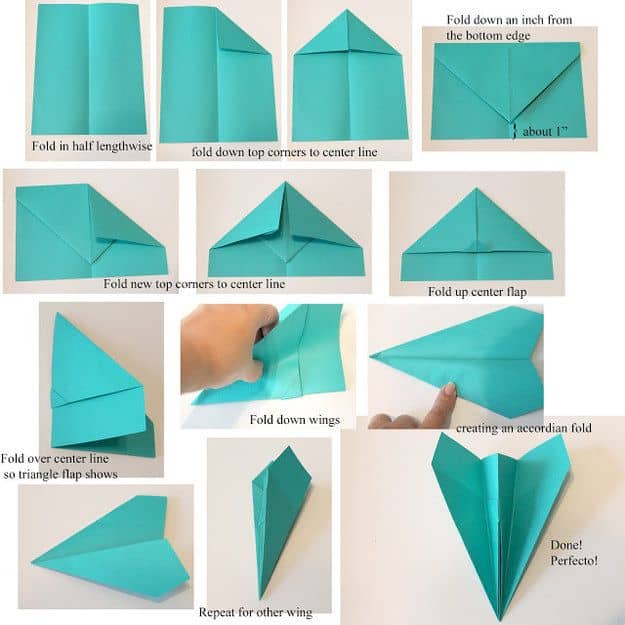
- Lay your paper on a flat surface, in portrait orientation.
- Fold the paper in half vertically, creating a crease down the middle. Open the fold so the crease is visible.
- Take the top left corner and fold it diagonally into the center crease. Repeat this step on the top right corner. Now you should have two triangular flaps meeting in the middle along the crease.
- Next, fold these triangular flaps down along the crease one more time, so their edges align with the middle crease. They will now look longer and more slender.
- Fold the tip of the paper down so that it touches the bottom of where the two triangles meet, creating a small triangle shape at the top of the paper.
- Finally, fold the plane in half away from you, along the existing center crease, so your new small triangular flap is on the outside.
- Create wings by folding each side down separately to meet the bottom edge of the plane. Ensure that the wings are even and align perfectly with each other.
Now, hold the plane from the bottom edge to keep the wings level and let it glide through the air with a medium force throw. Adjust the wings or add small folds at the end of the wings for more stability if needed. Try different throws and release angles to see how your plane performs best. Remember, it’s all about trial and error, finding that sweet spot.
The beauty of paper planes doesn’t stop at just one design, so don’t hesitate to experiment. There are countless other styles to fold and fly, each with unique characteristics. Just like the numerous plane designs, the sky’s the limit when it comes to the creative ways you and your kids can enjoy crafting these simple yet fascinating flyers.
Stay tuned for the rest of our guide, where we will explore more advanced paper plane designs that promise even more fun and learning opportunities. You’ll discover how to tweak your creations for speed, distance, and acrobatics, ensuring your family’s flight time is packed with excitement. So keep those papers and folding skills ready; the adventure through the stratosphere of creativity is just beginning!
5 Things Parents Should Know in Preparing to Make Paper Planes
Before you jump into folding, here are five valuable tips for parents to ensure a smooth takeoff into paper plane making:
1. Create an Ideal Workspace
Set up a clean and flat surface in a well-lit area. A solid table or a smooth, hard floor will work perfectly. The right environment will help you and your kids focus on the task and reduce frustration from trying to fold on an unsuitable surface.
2. Encourage Creativity and Personalization
After you’ve mastered the basic designs, encourage your children to personalize their planes with coloring, stickers, or markers. This fosters creativity and gives a personal touch to their flying creations. Just remember, keep decorations light to not affect the plane’s performance.
3. Highlight the Importance of Symmetry
Explain to your kids why symmetry is important in airplane design. A symmetrically folded plane will have better balance and is more likely to fly straight. This can be a fun way to introduce concepts of geometry and balance.
4. Prepare for Trial and Error
Let your kids know that not every plane will fly perfectly on the first try, and that’s okay! Encourage them to think like scientists and experiment by altering their planes and testing different throwing techniques.
5. Safety First
While paper planes are safe, ensure kids understand to avoid throwing them at people or fragile items. Set up a ‘flight zone’ where they can safely test their planes without risk of injury or damage.
With these key preparations out of the way, you’re all set to embark on an aerodynamic adventure with your budding aviators. As you guide them through the folds, turns, and launches, you’re not just building paper planes, but also memories that will last a lifetime. Enjoy the voyage!
Learning and Fun with Paper Planes
Making paper planes is more than just a playful pastime—it’s an educational experience too. As your kids fold each paper into a plane, they’re developing hand-eye coordination, honing their fine motor skills, and understanding the basic principles of physics that make a plane fly.
Here are some topics you can lightly touch upon while building and flying your paper airplanes:
- Aerodynamics: Talk about how the shape of the plane can affect the way air moves over the wings and influences the flight.
- Gravity and Lift: Explain how gravity pulls the plane toward the ground, while the air under the wings provides lift, allowing the plane to stay up for longer.
- Angles and Trajectories: Show how throwing the plane at different angles can change the distance and path it flies.
The joy of paper plane making lies not just in the final product but in the process itself. The laughter, the learning, and the bright-eyed excitement of your little ones as their paper planes take to the air—these are the true treasures of this simple, humble craft.
So, gear up for a day filled with joyful chuckles, a sprinkle of learning, and lots of flying paper—and remember, it’s not just about the destination, but the joy of the flight. Fold, fly, and have fun!
For more great fun click here. For more information see here
Disclaimer
The articles available via our website provide general information only and we strongly urge readers to exercise caution and conduct their own thorough research and fact-checking. The information presented should not be taken as absolute truth, and, to the maximum extent permitted by law, we will not be held liable for any inaccuracies or errors in the content. It is essential for individuals to independently verify and validate the information before making any decisions or taking any actions based on the articles.


