
How to Make a Pompom: A Fun and Easy Guide for Parents and Kids!
Hey there, crafty parents and creative kiddos! Get ready to dive into a world of fluffiness and color because today, we’re all about pompoms! These delightful little balls of joy can brighten up any day, and guess what? They’re super easy and fun to make. Perfect for all kinds of decorations, accessories, and even teaching tools, pompoms are not only versatile but also a fantastic way to engage in a cozy bonding activity with your littles. So let’s grab some yarn and get rolling!
Materials Needed to Craft Your Pompom Masterpiece
Before we start weaving magic with our hands, let’s make sure we have all the necessary items on deck. Here’s what you’ll need:
- Yarn: Pick your favorite colors! The fluffier, the better.
- Pompom Maker: These handy tools come in various sizes and are available at craft stores or online. Don’t worry, if you don’t have one, we’ve got a DIY solution for you too!
- Scissors: Sharp ones work best for a cleaner cut.
Now that we have our crafting kit assembled, it’s time to unleash our imagination!
Step-by-Step Instructions: Crafting Your Pompom
Whether you’ve got a pompom maker or are going old school with the cardboard method, we’ve got you covered. Here’s the simple and sweet breakdown:
Using a Pompom Maker
- Open one side of your pompom maker and start wrapping the yarn around it. Don’t be shy—go for an abundance of wraps to guarantee a lush and full pompom.
- Once you’ve achieved a satisfyingly thick layer, cut the yarn and close the wrapped section.
- Repeat this wrapping process on the other side of the pompom maker.
- With your scissors, cut along the middle groove of the pompom maker, right between the two yarn-wrapped halves.
- Take a separate piece of yarn and tie it tightly around the middle of your cut yarn layers. This will hold your pompom together.
- Now for the big reveal! Gently pull apart your pompom maker to release your newly crafted pompom.
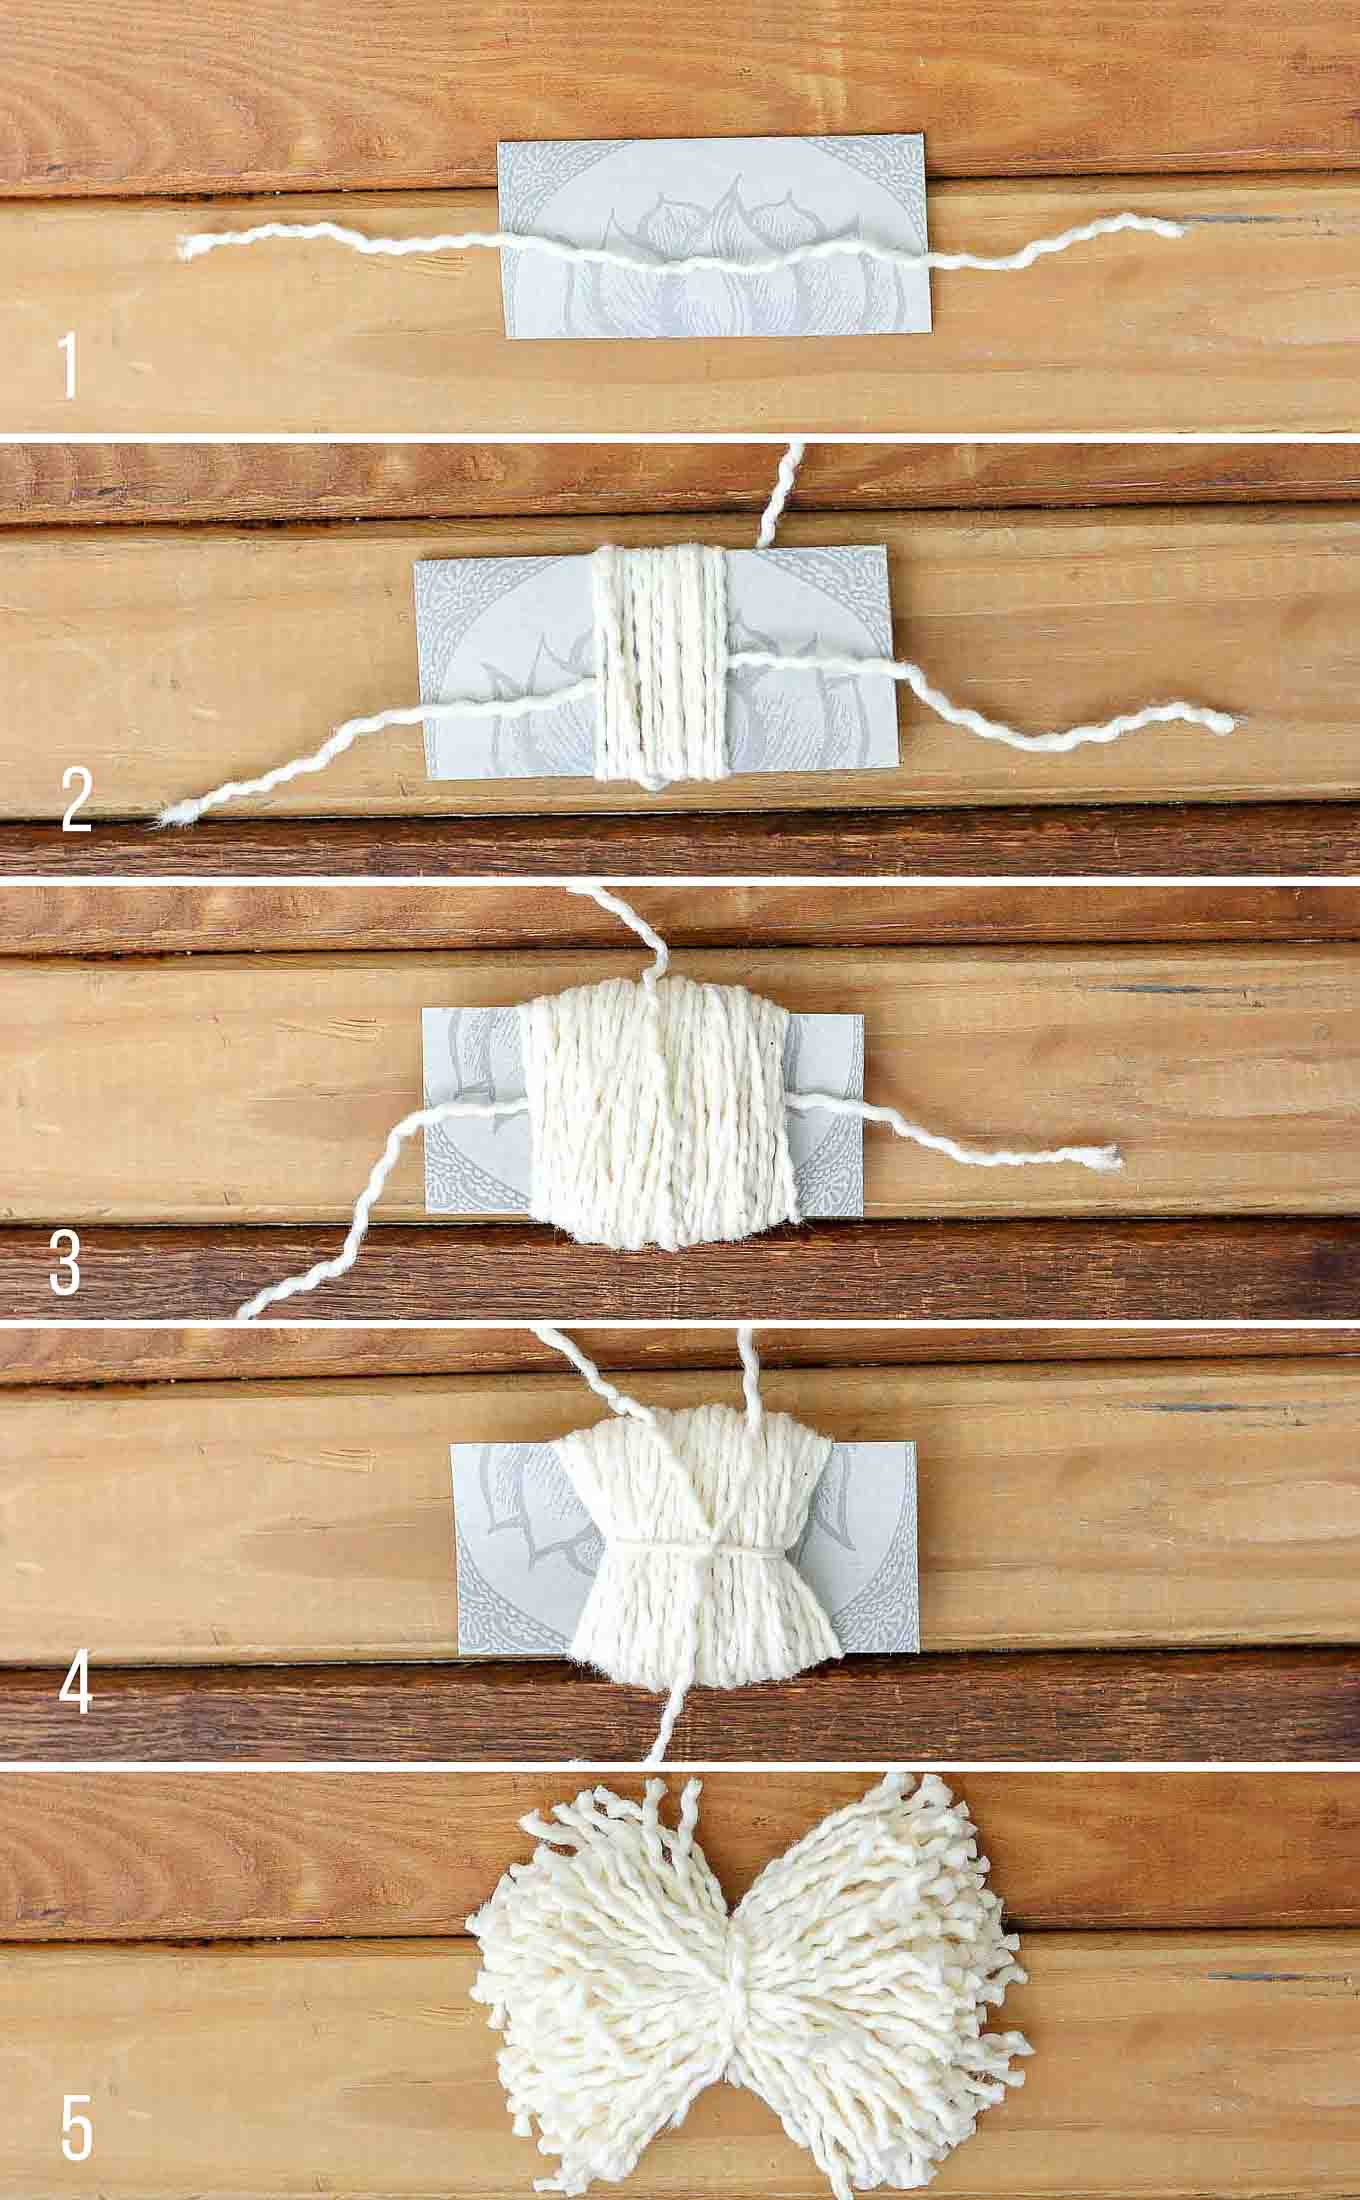
DIY Cardboard Pompom Maker
No pompom maker? No problem! You can easily make one with some cardboard from a recycling bin:
- Cut out two doughnut-shaped pieces of cardboard. Make sure they’re identical in size, as this will shape your pompom.
- Place the two cardboard pieces together and start wrapping the yarn through the center and around the ring. Keep wrapping until you can hardly squeeze any more yarn through the hole.
- Carefully insert the scissors between the two pieces of cardboard and start cutting the yarn around the outer edge.
- Slip a piece of yarn between the two cardboard pieces, wrapping it all around the center of the cut yarn and tying it tight with a knot.
- Remove the cardboard rings to reveal your pompom, and give it a good fluff by rolling it between your palms.
Tips and Tricks for Pompom Perfection
Making pompoms is as easy as pie, but a few insider tips can make the process even smoother and your pompoms even more fabulous:
- Yarn Choice: The type of yarn can make a big difference. Wool or acrylic provides a good fluff factor.
- Wrap Evenly: A uniform wrap ensures a spherical and even pompom; lumpy pompoms have their charm but let’s aim for round perfection!
- Secure Tying: A tight knot in the middle is crucial—it’s the heart of the pompom, holding all that cozy chaos together.
- Fluff and Trim: Don’t be afraid to give your pompom a little haircut. Trimming any uneven strands can turn a good pompom into a great one.
Stay tuned for more detailed styling tips, project ideas, and creative ways to use your newly minted pompoms!
Congrats, you’re now a pompom-making champion! With your new skills, the pompom possibilities are truly endless. So start spreading the cheer with all the color and whimsy these adorable yarn balls can bring. Have fun experimenting, and remember, when it comes to pompoms, the more, the merrier!

Preparing to Make a Pompom: 5 Things Parents Should Know
While making pompoms is an entertaining and easy craft, it is essential to lay a little groundwork to ensure the experience is seamless and enjoyable. Here are five things parents should know before introducing their kids to pompom-making:
- Set Up a Crafting Space: Pompom-making can get messy, with yarn bits and fluff here and there. Select an area that’s easy to clean and give yourself plenty of room to work. A kitchen table or a hardwood floor can be a perfect spot.
- Yarn Selection is Key: The type of yarn you choose affects not only the look but also the ease with which you’ll craft the pompoms. For beginners, avoid yarns with too much texture or ones that are too fine and can be tricky to handle.
- Have a Patience and Praise Ready: If your kids are making pompoms for the first time, they may need encouragement and positive reinforcement. Celebrate their efforts, regardless of how their first pompoms turn out.
- Safety First: Scissors are an integral part of making pompoms. Ensure you have scissors that are age-appropriate for your children and supervise their use, especially for younger crafters.
- Plan for Time and Breaks: Depending on the age and attention span of your children, pompom-making might need to be divided into sessions. Plan your crafting time with short breaks to keep everyone engaged and happy.
Crafting Techniques: Beyond the Basics
Gained confidence with your pompom-making skills? It’s time to take things up a notch! Experimenting with different colors, patterns, and sizes can turn simple pompoms into works of art. Get creative with stripes, polka dots, or even multicolored pompoms. Incorporating different yarn textures can add another level of flair to your creations. Remember, there is no right or wrong way to personalize your pompoms – it’s all about having fun with the process.
Pompom Projects and Ideas
Now that you’ve mastered the art of pompom-making, let’s sprinkle some pompom magic around! Pompoms can be used to make keychains, garlands, rug accents, or even to jazz up household items like pillows and throws. They can also be a cute way to wrap gifts with an extra personal touch. Get your kids involved in brainstorming project ideas—this can be a beautiful way to harness their creativity.
Styling and Utilizing Your Pompoms
Think beyond the craft itself to how you’ll display or use your pompoms. Pompoms can be attached to hats, bags, and clothing for an added pop of color. They can also serve as charming tactile elements in a sensory play box for toddlers. Explain to kids how colors and texture can impact design, making this an educational experience as well!
Cleaning Up and Storing Craft Materials
After the pompom fun is over, it’s crucial to pack away your crafting materials properly. Clear up any scraps of yarn and store sharp tools safely out of reach of little ones. By keeping your crafting space tidy, you’ll be all set for your next creative adventure in no time!
Congrats, you’re now a pompom-making champion! With your new skills, the pompom possibilities are truly endless. So start spreading the cheer with all the color and whimsy these adorable yarn balls can bring. Have fun experimenting, and remember, when it comes to pompoms, the more, the merrier!
See more great Things to Do with Kids in New Zealand here. For more information see here
Disclaimer
The articles available via our website provide general information only and we strongly urge readers to exercise caution and conduct their own thorough research and fact-checking. The information presented should not be taken as absolute truth, and, to the maximum extent permitted by law, we will not be held liable for any inaccuracies or errors in the content. It is essential for individuals to independently verify and validate the information before making any decisions or taking any actions based on the articles.


