
Fly High with Fun: A Simple Kite-Making Guide for Parents and Kids
Hey there, awesome parents! Are you looking for a delightful activity that blends creativity, learning, and outdoor fun? Well, you’ve found it! Making a kite is not only a blast, but it’s also a fabulous way to spend some quality family time. Today, we’re going to walk you through the process of making a simple kite that you can proudly see soaring in the sky. Don’t worry, it’s easier than you think, and you probably have most of the materials at home already!
What You’ll Need:
- Dowels or bamboo sticks: These will serve as the frame for your kite. They should be lightweight and sturdy.
- Kite paper or a plastic garbage bag: For the kite’s surface, you can go for the classic kite paper or repurpose a plastic bag.
- String: You’ll need this for the bridle (the part that controls the kite) and the flying line.
- Ribbon or fabric strips: These are for the tail, which helps stabilize the kite in the air.
- Glue, tape, or stapler: Any of these will work for securing your kite’s components together.
- Scissors: To cut the paper, bag, or fabric to the right size.
- Ruler and marker: To measure and mark out your kite’s dimensions.
Step-by-Step Guide:
Step 1: Build the Frame
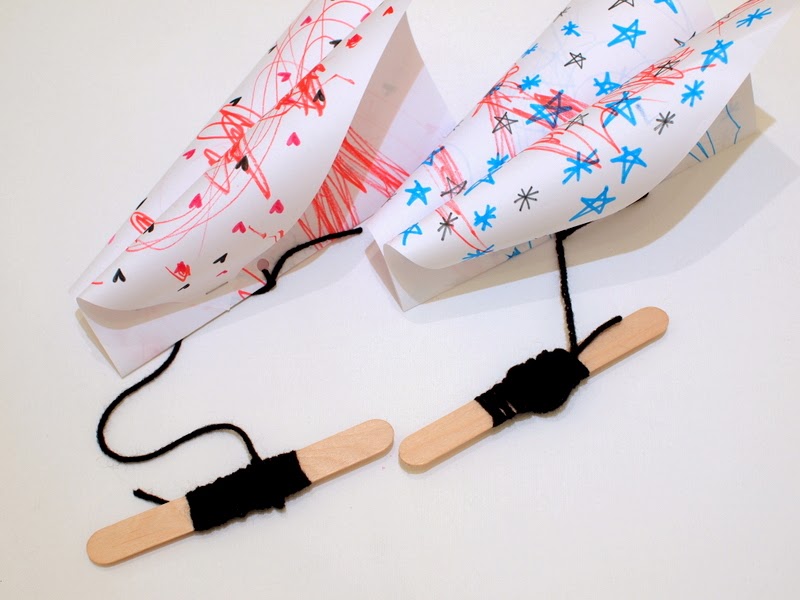
Start by measuring and cutting your dowels. For a traditional diamond-shaped kite, cut one dowel to be the spine (the longer vertical piece) and the other to be the crosspiece (the shorter horizontal piece). Lay the longer dowel down and mark the center. Next, take the shorter dowel and align it at the marked center perpendicularly so you have a cross shape. Secure the crosspiece to the spine using string, glue, or tape, making sure that they are at right angles to each other.
Step 2: Cut the Sail
Lay your kite paper or plastic bag flat on the ground and place the frame on top of it. Cut around the frame, leaving about 2-3 centimeters for a margin, which you’ll fold over the frame to secure it. This extra allows you to glue or tape the edges down over the dowels to create the kite’s sail.
Step 3: Attach the Sail to the Frame
Now, take the edges of your kite’s sail you’ve left from cutting and fold them over the frame. Securely glue, tape, or staple the edges down, ensuring that the sail is taut but not so tight that it warps the frame. A nicely stretched sail will catch the wind better and make your kite more responsive.
Remember, this project is not just about making a kite that flies; it’s about bonding and creating lasting memories. So take your time, enjoy the process, and soon you’ll have a beautiful, homemade kite ready for its maiden flight. Stay tuned for the next steps where we’ll add the finishing touches to our kite and learn about flying techniques – because a kite-flying adventure awaits!

5 Things Parents Should Know in Preparing for How to Make a Kite Simple
1. Safety First
Before embarking on your kite-making journey, it’s important to ensure a safe environment for your children. Choose a large, open space away from power lines, trees, and roads when you’re ready to fly. During the construction phase, supervise your kids when they’re using scissors or other potentially sharp tools.
2. The Learning Experience
Kite making is an excellent educational opportunity. You can teach your kids about the physics of flight, weather conditions, and the importance of craftsmanship. Let them be involved in every step, from measuring and cutting to decorating, to make the learning process engaging and hands-on.
3. Quality Time
Building a kite is not a race—it’s a journey. Turn off distractions and focus on the time you’re spending with your kids. Use this activity to strengthen communication and collaboration. Encourage their ideas, creativity, and most importantly, make it fun!
4. Customization is Key
Such a project invites personalization. Whether it’s choosing the colors, adding patterns, or writing messages on the kite’s surface, your children’s involvement in these choices will make the kite truly theirs. Moreover, these little touches will make the kite-flying experience even more special.
5. Patience is a Virtue
Like any creative endeavor, kite making might involve some trial and error. If the first attempt doesn’t work out as planned, don’t fret! Use any setbacks as learning experiences. Patience and perseverance will show your kids that resilience is part of the process—and the results can be incredibly rewarding.
Next Steps: Finessing Your Kite
Step 4: Making the Bridle
Now, it’s time for the bridle—the control system of your kite. Attach a length of string to both ends of the crosspiece. This string shouldn’t be taut; a small amount of give allows the kite to angle into the wind. Where this bridle string intersects with the spine will be where you attach your flying line. You may need to adjust this after some test flights for optimal flying.
Step 5: Adding the Tail
Attach your ribbon or fabric strips to the bottom of the spine to form a tail. The tail isn’t just decorative; it adds stability to your kite by adding drag at the rear. Extend the tail until your kite can fly steadily. If it wobbles, try lengthening the tail.
Step 6: Attach the Flying Line
Make a small loop in the bridle at the intersection point and attach your flying line here. This line is what you’ll hold onto when you fly the kite, so ensure it’s strong and securely attached.
Step 7: Decorate
Before you head out to fly, why not add some flair to your kite? Let your kids decorate with markers, stickers, or streamers—just be careful not to add too much weight.
Step 8: The Maiden Voyage
Choose a windy day and find an open field for your kite’s first flight. Demonstrate how to let out line slowly and watch together as your creation takes to the skies!
Making a kite simple can be an enriching and exciting activity for families. It weaves together craftsmanship and outdoor activity, leaving you with something tangible to show for your efforts. Enjoy the smiles, the laughter, and the sense of achievement as your family-made kite takes flight!
See more great Things to Do with Kids in New Zealand here. For more information see here
Disclaimer
The articles available via our website provide general information only and we strongly urge readers to exercise caution and conduct their own thorough research and fact-checking. The information presented should not be taken as absolute truth, and, to the maximum extent permitted by law, we will not be held liable for any inaccuracies or errors in the content. It is essential for individuals to independently verify and validate the information before making any decisions or taking any actions based on the articles.


