
? The Ultimate Guide to Making Slime at Home: Fun & Easy Recipes for Kids!
Hey there, awesome parents! Ready to dive into a world of gooey fun with your little ones? ? Slime-making is the trend that just won’t quit, and it’s no wonder—it’s stretchy, squishy, and downright mesmerizing. Plus, creating these delightful blobs of joy is not just fun; it’s also a fabulous way to introduce basic science concepts to your kiddos in an engaging and hands-on manner. Let’s start our slippery journey into the enchanted land of slime, shall we? ??
Why Your Kids Will Absolutely Adore Making Slime!
- Creativity Booster: Making slime lets your children express their creativity by mixing in colors, glitter, and various add-ins that can make their slime unique.
- Sensory Play: It’s squishy! It’s oozy! Playing with slime provides excellent sensory stimulation, which is important for children’s development.
- Educational Fun: Without even realizing it, your kids will be learning about science – from chemical reactions to measurements!
Ingredients for Our Basic Slime Recipe ?
Before we jump into the world of slime making, let’s make sure you have everything you need. The beauty of slime making is that you can start with a simple recipe and then jazz it up however you’d like. So, ready to get your hands gooey? Here’s what you’ll need for your basic slime:
- 1 cup of white or clear PVA school glue
- 1/2 teaspoon baking soda
- 2-3 tablespoons of contact lens solution (containing boric acid)
- Food coloring or paint (optional for color)
- Glitter or confetti (optional for sparkle and pizazz)
Now, keep in mind, the contact lens solution is what’s going to turn your gluey mixture into proper slime. It contains boric acid which reacts with the baking soda, creating our slime-tastic texture. Make sure to check the ingredients label for boric acid, or your slime might not form!
Step-by-Step Slime Making: Your Mess-free Methodology! ???
Alright, let’s get into making some slime! Remember, it’s important to follow the steps in order, especially if you’ve got eager mini scientists ready to mix and muddle. Here’s how you make your basic slime:
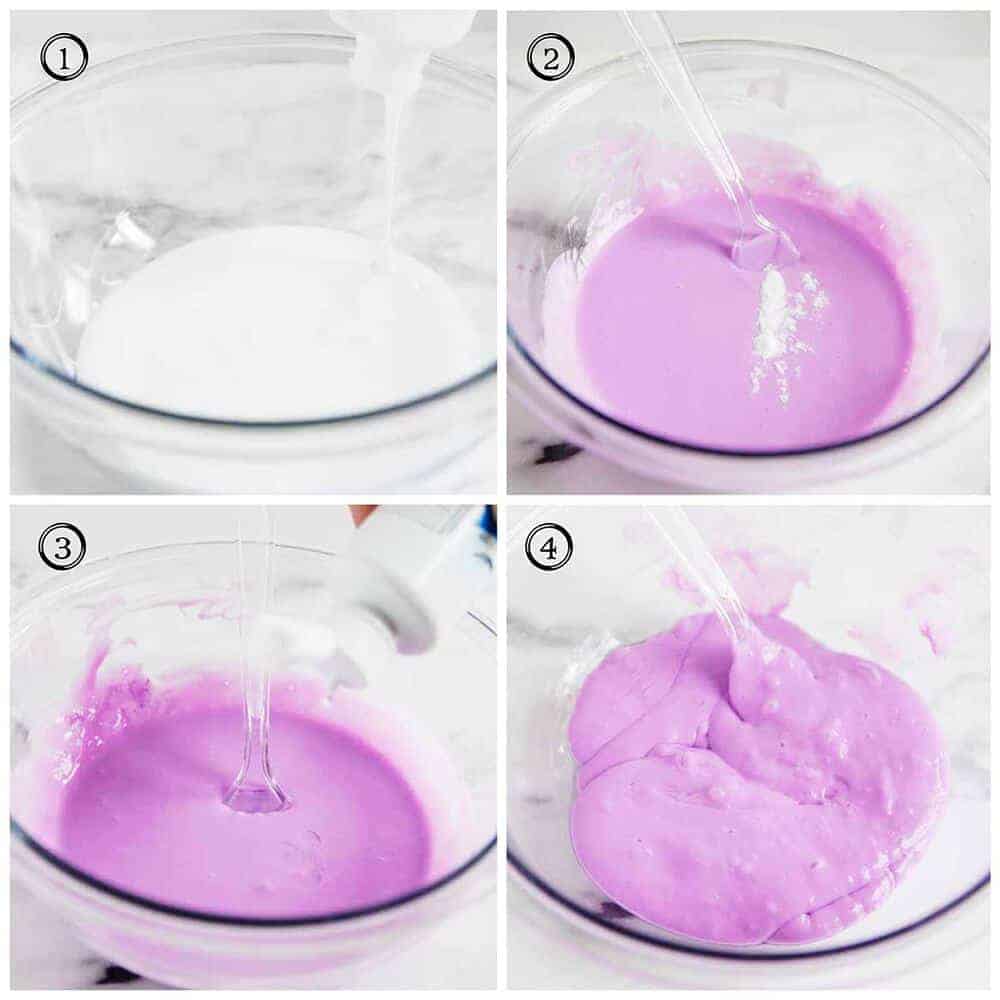
- First, find a clean, flat surface where the magic will happen, and grab a mixing bowl. Add 1 cup of PVA school glue into the bowl.
- Next, stir in 1/2 teaspoon of baking soda. This will help thicken the slime. Mix thoroughly until the baking soda is completely dissolved.
- Now, if you’re adding color or sparkle, this is the moment! Drop in your food coloring or paint and any glitter or confetti. Mix it all up until you have a uniform color.
- Lastly, it’s time for the transformation! Start adding in your contact lens solution. Begin with 2 tablespoons, and thoroughly mix. If the slime is too sticky, add another tablespoon. The slime will start coming away from the sides of the bowl and begin to clump together.
- When the mixture becomes less sticky and starts to form into a slime texture, take it out of the bowl and knead it with your hands on a clean surface. Don’t worry if it’s a little sticky at first; just keep kneading, and add a tiny bit more contact lens solution if necessary.
Pro Tips for Perfect Slime Every Time ?
Even if you’re following the recipe to a T, sometimes slime can be a bit of a tricky beast. Here are some pro tips to make sure you get great results:
- Patience is Key: The slime may not seem like it’s forming right away, but give it time and keep kneading.
- Less is More: When adding in colors or add-ins, start small. You can always add more, but you can’t take it out if you’ve put too much in.
- Consistency Check: If the slime is too sticky, a little contact solution can help. If it’s too rubbery, a bit more glue can bring it back to a stretchier state.
There you have it—the inside scoop on crafting the perfect batch of homemade slime! Remember, making slime is not just a passing trend; it’s a fantastical adventure into creativity and learning that awaits you and your kids. So, roll up your sleeves and get ready to feel like a kid again because it’s slime time!

Five Slimessential Things Parents Should Know Before Making Slime ????
- Safety First: Always supervise your kids during slime making, and make sure they know not to eat any slime or ingredients. Ingredients like boric acid, found in contact lens solution, are safe for contact with skin, but should not be ingested.
- Prepare for the Mess: Choose an appropriate area that’s easy to clean and cover surfaces with newspaper or a plastic tablecloth. Have your kids wear old clothes or an apron to protect their outfits from any slime splashes.
- Ingredient Check: Make sure you have the right ingredients on hand before you start. Always use PVA school glue for the best results, as it contains polyvinyl acetate that’s key for slime-making. Also, ensure your contact lens solution contains boric acid and sodium borate.
- Allergy Awareness: If your child has sensitive skin or is allergic to any of the ingredients, consider wearing disposable gloves or looking for hypoallergenic slime recipes without boric acid. You can use alternative slime activators like baking soda and saline solution without boric acid.
- Storage Solutions: After making the slime, store it in an airtight container to keep it from drying out. This will prolong your slime’s life, making sure the fun lasts!
Equipped with these savvy tips, you’re now all set to make slime safely and enjoyably. Slime sessions are about to become a favorite activity in your household, bringing both laughter and learning to your family’s day!
Let’s Start Sliming: Your A-to-Z Safety Checklist for Kids ??
- Keep slime ingredients out of reach until ready to use.
- Wash hands before and after playing with slime.
- Avoid direct eye contact with slime and wash hands thoroughly after touching it.
- Red flag ingredients: ensure you aren’t using products like laundry detergent unless stated safe in specific recipes.
- Have a first-aid kit handy, just in case of any accidental splashes or spills.
Getting these practicalities in check means you can focus on the fun part – mixing, moulding, and marveling at the wonders of slime! Let’s embrace the sticky fingers and the squeals of delight, as making slime isn’t just about the end product, it’s about the joyful memories you’re creating along the way! Happy Sliming! ??
And don’t forget, our guide is a springboard into the endless possibilities of slime. Once you’ve mastered the basics, venture out into the universe of textures and colors. Make fluffy slime, butter slime, glow-in-the-dark slime and more because, in the universe of slime, the possibilities are infinite. Engage your children’s curiosity and encourage them to experiment with their concoctions. Who knows what fantastic slimey creations are waiting to be discovered?
Keep your eyes peeled for our next hidden slime gems, as this Ultimate Guide to Making Slime at Home is your passport to a world where fun and learning come together in the most elastic and delightful ways imaginable! So, what are you waiting for? Gather your supplies, and let’s get sliming! ???????
See more great Things to Do with Kids in New Zealand here. For more information see here
Disclaimer
The articles available via our website provide general information only and we strongly urge readers to exercise caution and conduct their own thorough research and fact-checking. The information presented should not be taken as absolute truth, and, to the maximum extent permitted by law, we will not be held liable for any inaccuracies or errors in the content. It is essential for individuals to independently verify and validate the information before making any decisions or taking any actions based on the articles.


