Ultimate Parent’s Guide to Making Slime: Fun with Chemistry at Home!
Hey there, awesome parents! Are you ready to embark on a squishy, squelchy adventure right in your kitchen with the little ones? Making slime is not only a fantastic way to have some family fun, but it’s also a sneaky learning opportunity that introduces basic chemistry concepts to your curious kiddos. So roll up those sleeves, because we’re about to dive into the Ultimate Parent’s Guide to Making Slime!
What You Need to Know Before Getting Slimy
Before we get into the nitty-gritty of slime production, let’s get some important tidbits out of the way:
- Safety first: Always supervise your children during slime-making. Use non-toxic ingredients, and keep small objects and edibles away to prevent any slime-related snacking mishaps.
- The science scoop: Chat with your kids about the science of slime! Explain how certain ingredients mix together to create polymers, which are long, repeating chains of molecules that give slime its unique texture.
- Customization is key: Slime is infinitely customizable. You can add colors, glitter, beads, and even scents! Encourage your children to unleash their creativity.
Getting Your Slime Ingredients
Most slime recipes call for simple household items. Here’s a list to get you prepped:
- White glue or clear glue (non-toxic, PVA-based)
- Baking soda
- Contact lens solution (containing boric acid as an activator)
- Food coloring (optional for color)
- Glitter or additional mix-ins (optional for texture and fun)
- Measuring cups and spoons
- A mixing bowl
- A spatula or spoon for stirring
Your Basic Slime Recipe
Now, let’s get to the star of the show – the slime recipe! Here’s a simple, foolproof way to make basic slime:
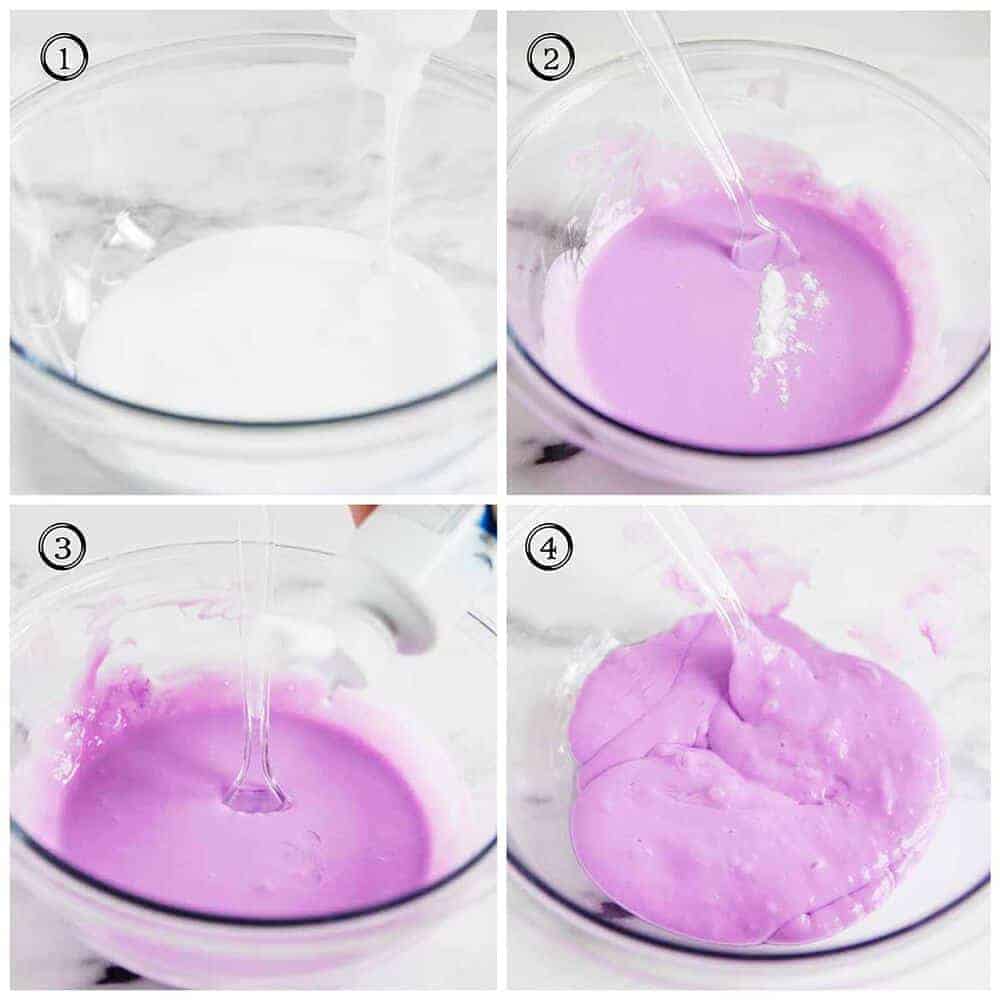
- Start by pouring 1/2 cup of PVA-based glue into your mixing bowl.
- Add a few drops of food coloring (if desired) and mix until you’ve achieved your perfect shade of slimy goodness.
- Stir in 1/2 teaspoon of baking soda. This will help firm up your slime.
- Now, add 1 tablespoon of contact lens solution to the mix. This is your magical activator that transforms the glue into slime. Start stirring!
- Keep mixing until the slime begins to pull away from the sides of the bowl and starts to clump together.
- If it’s still too sticky, add a bit more contact lens solution, just a few drops at a time, until you reach the desired consistency.
- Once it’s ready, take the slime out of the bowl and knead it with your hands for a few minutes to make sure it’s perfectly slimy.
Congratulations! You’ve just created your very own batch of homemade slime. Now it’s time to play with it, experiment with it, and maybe even learn from it.
Take Your Slime to the Next Level
But why stop there? Every batch of slime is a blank canvas ready for your unique twist!
- Add glitter for a sparkly effect.
- Throw in some beads or foam balls for a crunchy texture.
- Mix in fragrance oils for scented slime (make sure they’re safe for skin contact).
- Use glow-in-the-dark paint or powder for slime that lights up the night.
- Experiment with magnetic powder for slime that moves in mysterious ways.
The possibilities are truly endless! With a dash of creativity and a pinch of imagination, you and your kids can spend hours making memories and masterpieces.
Stay tuned, because in our next section, we’ll dive deeper into advanced slime-making techniques, troublesh
ooting common slime fails, and exploring exciting activities you can do with your newly crafted goo. Get ready to elevate your slime game to epic proportions!

Five Things Parents Should Know in Preparing for Slime-Making
As you gear up for your slime-making session, there are essential things every parent should keep in mind to ensure a successful and enjoyable experience. Here’s what you need to know:
1. Prep Your Workspace
Slime-making can get messy, and that’s part of the fun! To keep the mess under control, cover your work surface with newspapers or a plastic tablecloth. Keep paper towels or wet wipes handy for quick clean-ups. Designate an area that’s comfortable for the kids and easy for you to supervise.
2. Allergy Check
Before you begin, check the ingredients of each product to ensure your child isn’t allergic to any of them. Slime-making involves direct skin contact, so it’s important to use hypoallergenic materials when possible.
3. Ingredient Proportions
Measuring correctly can make or break your slime. Make sure to follow the recipe’s specified amounts of each ingredient. Too much of one thing can result in a consistency that is either too runny or too stiff. It can be helpful to pre-measure ingredients, especially if you’re making slime with younger children.
4. Slime-Making is a Process
Patience is key during slime-making. It might not come together immediately, and that’s okay! Encourage your children to be patient and keep stirring. Sometimes the slime needs a few extra minutes of kneading to reach the perfect consistency.
5. Storage Solutions
Once you’ve made the perfect batch of slime, you’ll want to store it properly to keep it fresh. Have an airtight container ready to store your slime if you’re not using it right away. This will prevent it from drying out and ensure that the fun lasts longer.
Advanced Slime-Making Techniques
Ready to step up your slime game? Here are some advanced techniques to try once you’ve mastered the basics:
- Create a slime swirl by making two or more different colors of slime and twisting them together.
- Introduce a little science by making heat-sensitive slime that changes color with temperature shifts.
- For tactile fun, try making fluffy slime with shaving cream or ‘butter slime’ with clay mixed in.
- Get festive by creating slimes that match upcoming holidays, complete with thematic colors, scents, and mix-ins.
Troubleshooting Common Slime Fails
Despite your best efforts, sometimes slime doesn’t turn out as planned. Here’s how to fix the most common slime fails:
- If your slime is too sticky: Gradually add more activator (contact lens solution) until it’s no longer sticky, but be careful not to add too much or the slime will become stiff and rubbery.
- If your slime is too runny: Add a pinch more of baking soda to help thicken it up. If that doesn’t help, you may need to start over and reduce the amount of liquid in your recipe.
- If your slime is too stiff: Knead in a little bit of warm water until it softens to the desired texture.
Slime-making can be a wonderfully fun activity, combining creativity, science, and sensory play. With these tips, tricks, and techniques, you’re all set to make slime an enjoyable, educational experience for your whole family. Let the slimy fun begin!
See more great Things to Do with Kids in New Zealand here. For more information see here
Disclaimer
The articles available via our website provide general information only and we strongly urge readers to exercise caution and conduct their own thorough research and fact-checking. The information presented should not be taken as absolute truth, and, to the maximum extent permitted by law, we will not be held liable for any inaccuracies or errors in the content. It is essential for individuals to independently verify and validate the information before making any decisions or taking any actions based on the articles.


