
Create Your Own Stress Ball: A Balloon, Some Flour, and Loads of Fun!
Hey there, wonderful parents! Are you on the hunt for a fun, interactive, and soothing activity to share with your kids? Well, guess what? You’ve hit the DIY jackpot because today we’re going to dive into how to make a stress ball with a balloon—yes, it’s as exciting and easy as it sounds! Not only are stress balls fantastic for fidgeting fingers, but they also help with concentration and can provide a sense of calm. Plus, making them can be a delightful bonding experience.
Ready to kick those stress levels to the curb? Let’s get this balloon party started!
Why Make a Balloon Stress Ball?
Before we jump into the nitty-gritty of stress ball creation, let’s talk about why this project is a winner. First, it’s incredibly cost-effective. No need to splurge on fancy gadgets or toys when you can create magic with everyday items. Second, it’s a green choice—upcycle those leftover party balloons and give them a new life. Lastly, it’s a chance to customize to your heart’s content. Choose your balloon color, filling, and even draw on some creative faces!
Gather Your Supplies
- Balloons: You’ll want high-quality latex balloons for durability.
- Filling material: Flour is a popular choice, but you can also use rice, cornstarch, or fine sand.
- Funnel or DIY paper cone: To easily transfer your filling into the balloon.
- Empty bottle: To act as a holder for the balloon while filling.
- Scissors: For trimming the balloon if necessary.
Everything gathered? You’re a rockstar! Let’s move on to making some stress-relieving goodness!
Step-by-Step Guide to Your Homemade Stress Ball
Step 1: Prep Your Balloon
First, take a deep breath (because it’s all about stress relief, right?) and stretch out your balloon a bit. This makes the balloon more flexible and easier to fill. Next, place the mouth of the balloon over the neck of the empty bottle, ensuring it’s snug and secure. Now, give your kid a high-five because you’re doing awesome!
Step 2: Choose Your Filling
Now comes the part where you can let your imagination run wild. Choosing your filling can be as much fun as making the stress ball itself! Flour gives a softer feel, while rice adds a bit more texture. Want your stress ball to double as a sensory ball? Opt for fine sand. No matter what you choose, be sure to fill enough material to get the desired size for your stress ball.
Step 3: Fill ‘er Up!
Insert your funnel or homemade paper cone into the mouth of the balloon (still attached to the bottle). Slowly pour your chosen filling material into the balloon. This is a great time to practice those fine motor skills, and be sure to go slow to avoid a mini flour blizzard! If the filling stops flowing, gently shake or tap the funnel.
Making your own stress ball with a balloon isn’t just a path to relaxation; it’s an opportunity to unleash creativity, practice dexterity, and maybe even have a few giggles along the way. And the best part? The stress relief doesn’t end once you’re done crafting, because then you get to squeeze away any residual tension with your very own, personalized stress buster!
Now that we’ve got the basics down, stay tuned for the next steps where we’ll seal the deal and add some personal flair to our stress balls. Because let’s face it, there’s nothing quite like squishing a stress ball that you’ve made with your own two hands. Keep on crafting, and watch the stress just melt away!

5 Things Parents Should Know Before Making a Stress Ball with a Balloon
Before we continue to our filling extravaganza, here are five golden nuggets of wisdom for parents preparing to embark on the stress ball journey:
- Safety First: Balloons can be a choking hazard, especially for the little munchkins. Always supervise children during this craft and keep deflated balloons away from young children who might be tempted to put them in their mouths.
- The Mess Factor: Depending on your choice of filling, things might get a bit messy. Lay down some newspaper or a plastic sheet to catch any spills. Embrace the mess—after all, it’s part of the fun!
- Patience is a Virtue: Filling a balloon evenly can take time and might test your patience. Remind your kiddos (and yourself!) that good things come to those who wait. Plus, it’s a fabulous lesson in perseverance.
- Storage Matters: If you’re not using your flurry-filled balloons right away, store them in a cool, dry place. Heat and moisture aren’t the best friends of latex, and you want these stress busters to last!
- Customization Station: Have markers, stickers, and other decorative items on hand. Once your stress ball is filled and sealed, decorating becomes the cherry on top of this fun-filled project.
Step 4: Tie It Up Tight
Once you’ve got the right amount of filling inside, carefully remove the balloon from the bottle (don’t let the filling escape!). Squeeze out any excess air and carefully tie a knot at the end of the balloon. If it feels too tricky, don’t stress—take a deep breath and try again, or ask another pair of hands for help.
Step 5: Double Up for Durability
To make your stress ball extra durable, consider placing it inside another balloon. Cut the rolled neck off another balloon and wrap it around the filled balloon, covering the knot. This double-ballooning method adds an extra layer of protection against bursts and leaks.
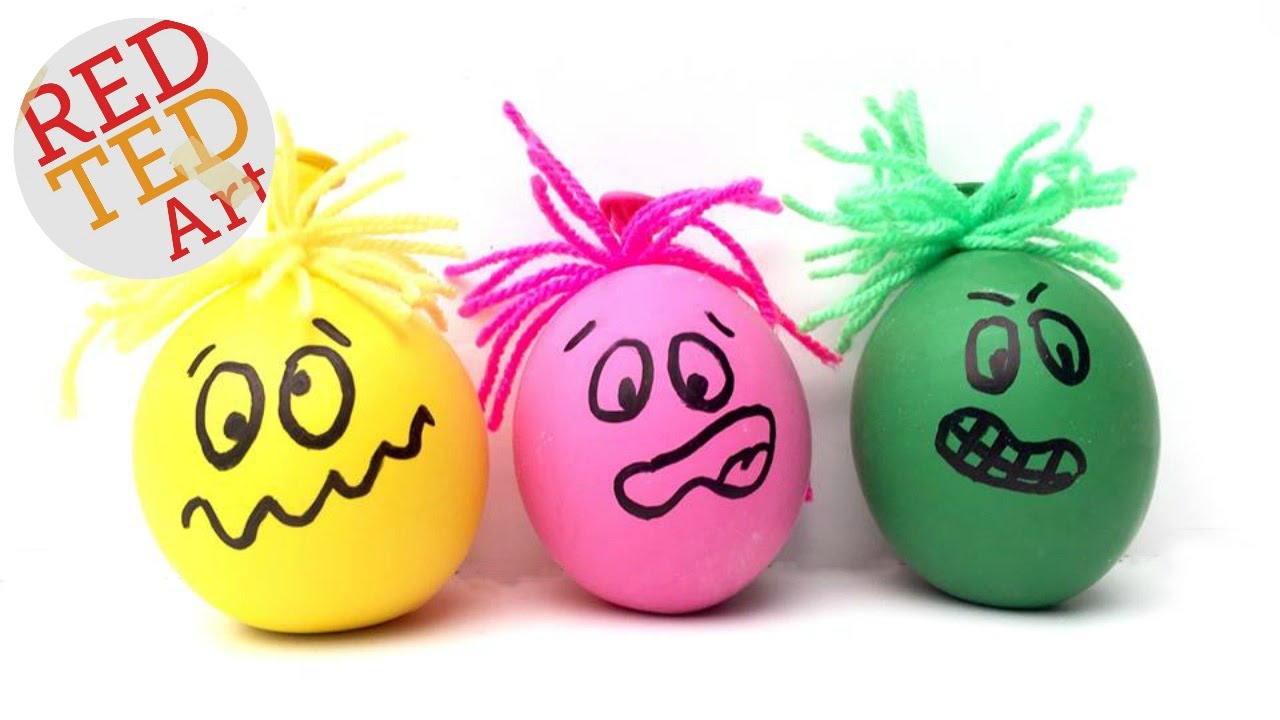
Step 6: Bring on the Personality
Finally, it’s time to give your stress ball some pizzazz. Use permanent markers to draw faces, patterns, or write inspirational quotes. Add yarn for hair, or glue on googly eyes—whatever tickles your family’s fancy. This is where your stress ball gets its soul! Just remember to let any ink or glue dry completely before playtime.
Voilà! You now have a squishy, squeezable homemade stress ball that’s perfect for busy hands and creative minds. By taking a simple balloon, a sprinkle of craftiness, and a dash of laughter, you’ve created not just a toy but a memory that’s as resilient as the stress balls themselves.
Oh, the power of DIY—the fun has just begun! Keep those fabulous stress balls close, and squeeze them whenever life throws a curveball. Remember, there’s nothing like the triumph of making something from scratch, especially when it’s a tool that helps keep the whole family centered and content.
See more great Things to Do with Kids in New Zealand here. For more information see here
Disclaimer
The articles available via our website provide general information only and we strongly urge readers to exercise caution and conduct their own thorough research and fact-checking. The information presented should not be taken as absolute truth, and, to the maximum extent permitted by law, we will not be held liable for any inaccuracies or errors in the content. It is essential for individuals to independently verify and validate the information before making any decisions or taking any actions based on the articles.


