
How to Make a Window Seat: A Cheerful Guide for Parents
Hello, crafty parents! Are you looking to add a magical touch to your child’s room or your family living space? A charming window seat is just the ticket to cozy cuddles, reading adventures, and daydreaming with a view! In this hands-on guide, we’ll lead you through the enchanting journey of creating a delightful window seat that’s sure to be your family’s new favorite spot. ?
Step 1: Design Your Dream Window Seat
Let’s start with a splash of creativity! Designing your dream window seat is as much fun as it is practical. ? Ask your kiddos for their input—maybe they want a fairy-tale theme or a space to blast off to the stars. Keep in mind the size of your window, the room decor, and the functionality you desire. Decide if you want added features like storage, bookshelves, or simply a plush place to lounge.
- Tools and Materials: Sketch pad, pencil, measuring tape, inspiration (think Pinterest boards and home decor magazines!)
- Tip: Measure twice, design once! Accurate window dimensions are crucial for a snug fit.
Step 2: Gather Your Supplies
Now that we’ve sketched our dreamy designs, let’s gather the supplies that will turn our window seat fantasy into a reality. You’ll need various tools and materials, depending on the complexity of your design. For a standard bench-style seat with storage, here’s a list to get you started on your merry making:
- Wood panels (size will vary based on design)
- Wood screws and brackets
- Drill and bits
- Saw (hand saw or power saw, depending on your comfort level)
- Screwdriver
- Sandpaper or a sander
- Wood filler and putty knife
- Primer and paint or wood stain
- High-density foam for cushioning
- Fabric for seat cover (choose a cozy and durable fabric that invites your little ones to snuggle up!)
- Staple gun
- Hinges (for any lids or doors)
- Fun and fancy additions: pillows, throws, and décor to suit your theme.
Tip: Don’t forget to involve your kids in selecting materials. They’ll love choosing colors and helping pick out fabrics that they find snuggly and warm.
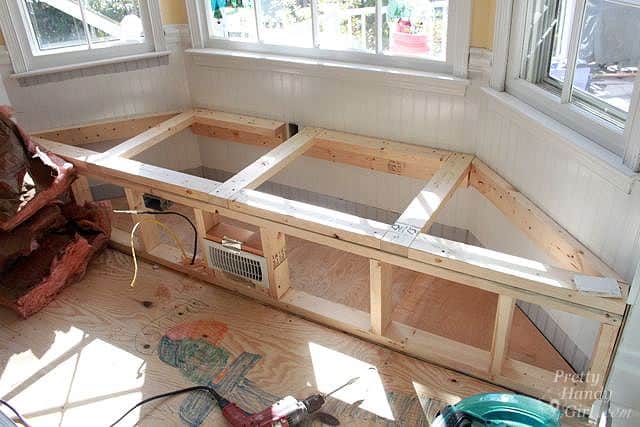
Step 3: Building the Base
Alrighty, DIY dynamos! ?? It’s time to roll up our sleeves and start the construction phase. Safety first—ensure you’re using protective gear like gloves and goggles if needed. If you’re building the seat from scratch (not using pre-made cabinets), here’s how you can create a sturdy base that will hold up to all the giggles and wiggles of your little ones:
- Measure and cut the wood panels according to your design specs.
- Assemble the frame using wood screws and brackets. A square or level can help ensure corners are at right angles.
- Attach a top panel that will serve as the seat’s base. If you’re including storage, leave this top piece off until the storage compartments are built.
- Sand down any rough edges to keep the space splinter-free and child-friendly.
- Apply wood filler to screw holes or gaps, then sand smooth once it dries.
Tip: If you’re adding drawers or doors, now’s the time to construct those, before you attach the seat top and move on to painting or staining.
Step 4: Make It Your Own
Parents, remember that every fairy tale needs a dash of magic! Here’s where you can let your heart sing and customize that window seat. Paint it in your child’s favorite hues, add stencil designs, or even create a collage of family photos on the side for a personal touch. Let this be a reflection of your family’s personality and a testament to the joy of creating something together.
- Prime the wood (if you’re painting it) to ensure a smooth, even coat.
- Apply your chosen paint or stain. You may need several coats for a vibrant, even finish.
- While waiting for it to dry, you can cut the foam to size for seat cushioning.
- Cover the foam with your selected fabric, attaching it securely with a staple gun.
- Add decorative pillows and throws to make the space extra-huggable.
Tip: This part of the project is perfect for those little hands eager to help—let them be your assistants in adding joyful details to the window seat.
Stay tuned, as we’ll soon dive into the finishing touches that will make your window seat not just a place to sit, but a special destination in your home. From selecting the coziest cushions to fun, functional tips for organizing your new space—you and your little ones are on your way to enjoying the best spot in the house!
How to Make a Window Seat: A Cheerful Guide for Parents
Greetings, joyful creators! Embarking on a DIY window seat project is an enchanting way to sprinkle some extra charm into your home. Not only does it provide a cozy nook for your children, but it also adds aesthetic appeal and functionality. Get ready to transform a mundane window into a snug sanctuary where memories are made and imaginations soar! ?
Before You Begin: 5 Important Considerations
Before we dive into the nuts and bolts of building your window seat, let’s cover five essential bits of know-how that will set the stage for a smooth-sailing project.
- Assess the Space: Take a good look at where this seat will live. Is it a sunny spot perfect for plants, or a quiet corner just right for reading? Knowing the space’s potential will guide your design choices.
- Safety First: Check the window area for any hazards – like radiators or outlets. It’s important that this cozy corner is not just comfy, but also safe for your little ones.
- Storage Needs: Consider the practicalities. Do you need extra storage? Window seats with built-in compartments are great for hiding toys and treasures.
- Comfort is Key: Your window seat should be an inviting place. Opt for high-density foam and soft, durable fabrics that will endure countless hours of lounging and play.
- Involve the Kids: This project is an exciting opportunity for family bonding! Let your children’s ideas and preferences shine through, giving them a sense of ownership and pride in the finished product.
Our guide continues as we delve into building the base, making your window seat uniquely yours, and putting on those finishing touches. Stay tuned as we ensure your journey to creating a whimsical window seat is filled with laughter, creativity, and heaps of family fun. This spot won’t just be somewhere to sit—it will become a cherished destination within your home!
See more great Things to Do with Kids in New Zealand here. For more information see here
Disclaimer
The articles available via our website provide general information only and we strongly urge readers to exercise caution and conduct their own thorough research and fact-checking. The information presented should not be taken as absolute truth, and, to the maximum extent permitted by law, we will not be held liable for any inaccuracies or errors in the content. It is essential for individuals to independently verify and validate the information before making any decisions or taking any actions based on the articles.


