
Soar into Fun: Paper Plane Crafting with Kids!
Greetings, creative flight captains and little aviators! Are you looking for a delightful activity to share with your children that’s both entertaining and educational? You’ve navigated to the perfect runway! Making paper planes is a timeless pastime that sparks joy, ignites imaginations, and even sneaks in a little lesson on physics. So, grab your pilot hats, and let’s fold our way to an aerial adventure!
Why Paper Planes Are More Than Just Child’s Play
Paper planes are not just a playful whisk through the air; they are catalysts for learning and development. When you craft paper airplanes with your kids, you’re helping them improve their fine motor skills, understanding of aerodynamics, and even patience and problem-solving abilities. Let’s not forget the most important part – the quality time spent together building memories that will last much longer than the flight of any airplane.
Ready, Set, Fold: Preparing Your Paper Plane Materials
Before we start our engines, you’ll want to make sure you have the right materials for our flight. Don’t worry; you won’t need to make a trip to the craft store. You likely already have everything you need:
- Standard A4 printer paper: The cornerstone of any paper plane. A nice 80 gsm paper works well, but feel free to experiment with different weights and textures as you become a more experienced paper plane engineer.
- Flat surface: Any table or hard floor where you can smooth out the paper and make precise folds.
- Decoration supplies (optional): Markers, stickers, or crayons for personalizing your fleet.
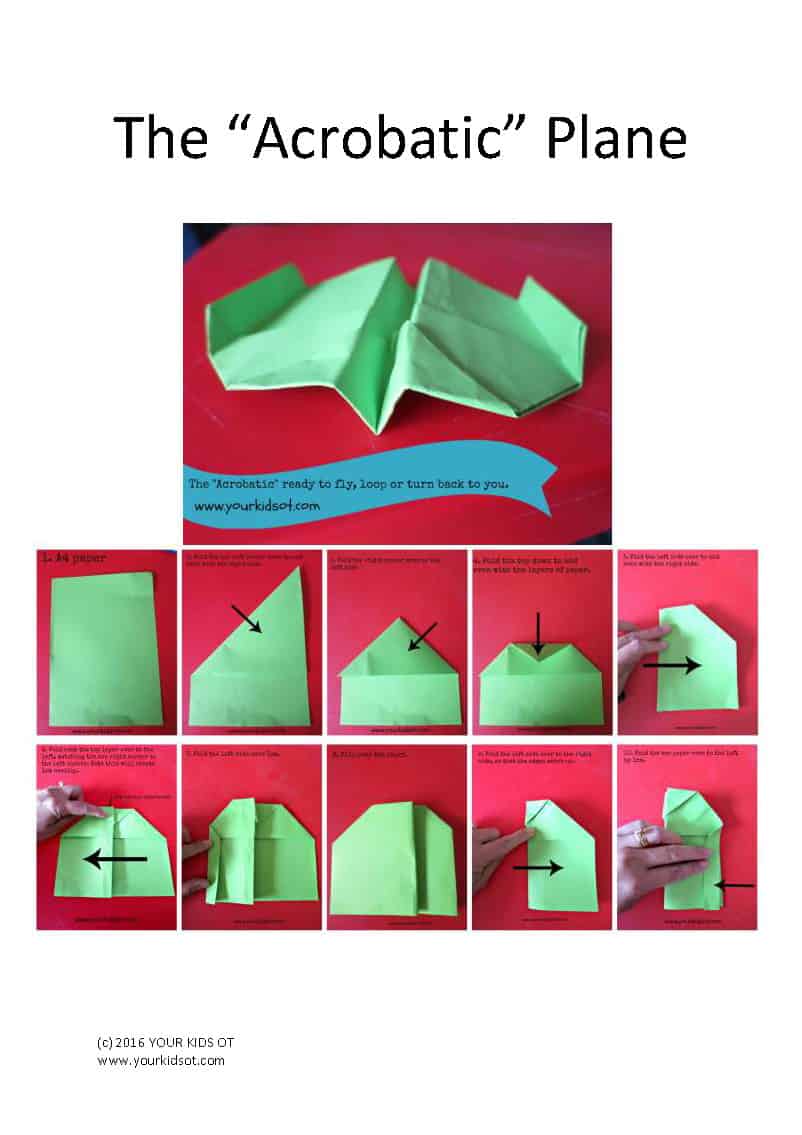
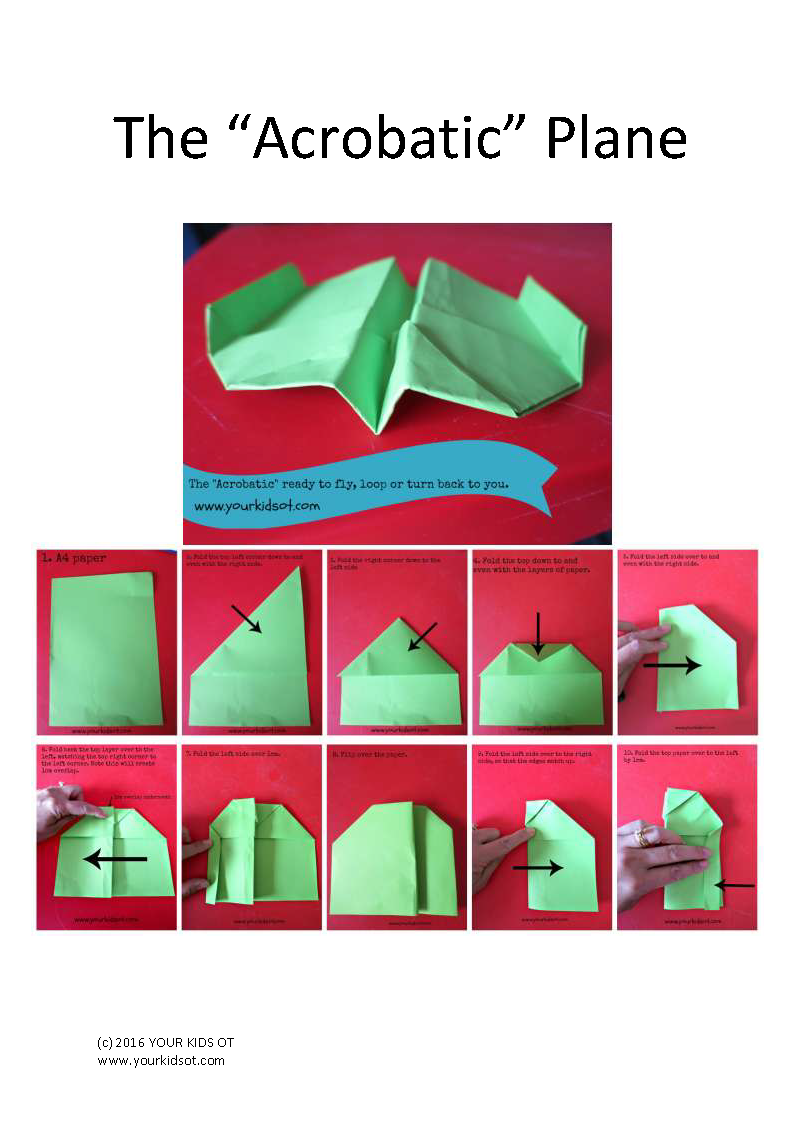
The Basic Dart: Your First Paper Plane Design
Every pilot needs to start somewhere, and the Basic Dart is the classic design that has made countless childhoods soar. It’s simple, sturdy, and an excellent introduction to the fundamentals of paper plane construction. Follow these steps, and you’ll have your Basic Dart ready for takeoff in no time:
- Starting Point: Place your A4 paper on a flat surface in a portrait orientation.
- The First Fold: Fold the paper in half lengthwise, creating a long, narrow rectangle. Run a finger or a ruler along the fold to make it sharp and crisp. This will become the central body of the plane.
- The Tip: Open the paper up and fold the top two corners into the center line, forming a point at the top of the paper.
- The Wing Flaps: Fold these new diagonal edges into the center line again, reinforcing the point and narrowing the shape of the plane.
- The Body: Re-fold the paper in half along the original central fold.
- Wing Creation: Fold the wings down from the top of the plane towards the bottom edge, creating a flat surface on the top of the plane that’s parallel to the bottom.
- The Finishing Touches: Now, you can adjust the wings, ensuring they’re level and even for balance. And voila! Your Basic Dart is ready to take to the skies.
Take it outside or test it in an open area and watch your paper creation glide through the air! Remember, every paper plane behaves differently based on its folds and the force used to throw it. Encourage your kids to experiment – sometimes small adjustments can make a huge difference in how the plane flies.
Making Memories and Messes: A Note on the Joy of Imperfection
As you guide your little ones through the creation of their paper planes, it’s important to emphasize that perfection is not the goal – it’s all about the experience. Each misfold or crumpled wing is an opportunity to learn and laugh together. Getting overly focused on creating the ‘perfect’ paper plane can overshadow the fun of simply making and flying them.
You’re all set to start your journey into the world of paper planes with your children! As the chuckles erupt and the paper planes take flight, you’ll find that this simple activity is a gateway to shared joy and creativity. In the next section of our guide, we’ll be exploring more advanced plane models, experimenting with different types of paper, and discovering how to host the ultimate paper plane flying contest. Strap in, because our adventure is only just beginning!
Five Things Every Parent Should Know When Making Paper Planes
Making paper planes isn’t just an activity; it’s an adventure in learning and joy. But before your family’s squadron takes off, here are five essential tips to prepare for a smooth flight and happy landing:
- Choose the Right Paper: While any paper can technically be used, not all papers are created equal when it comes to making paper planes. Lighter weight paper, such as standard printer paper, is ideal for beginners. As you and your little aces get more practiced, you can experiment with heavier papers to see how different weights impact the plane’s performance.
- Practice Patience: Folding paper planes is a great way to teach kids about patience and precision. Each fold needs to be crisp and clean to ensure the plane’s aerodynamic shape. If a fold is slightly off, don’t worry! It’s a learning moment. Remind kiddos that practice makes perfect!
- Environment Matters: Make sure to have a clear workspace. A kitchen table or a smooth floor space are perfect for folding planes. Also, consider where your child’s paper plane will take flight. A calm day without wind is best for outdoor flying, while a spacious, clutter-free indoor area works well when the weather doesn’t cooperate.
- Flying is Learning: Throwing a paper plane is more than just fun; it’s a hands-on physics lesson. When throwing their planes, encourage children to adjust their launch technique. They’ll develop a natural sense of how force and angle affect the plane’s trajectory and distance.
- Customization is Key: Encourage your kiddos to personalize their planes with color, designs, or even a name. This not only makes the activity more creative but also helps distinguish each child’s plane when flying in a group. Plus, it’s tons more fun to fly a plane with shark teeth or racing stripes!
Advanced Paper Plane Patterns: Elevate your Aeronautics
Once you and your aviators have mastered the Basic Dart, you may find yourselves craving a bit more challenge. Here’s a sneak peek at what comes next in our paper plane workshop:
- The Glider: This design focuses on sustained flight and can ride the air currents elegantly across a room.
- The Bulldog Dart: Known for its durability and straight flight path, this model is a crowd-pleaser and perfect for competitions.
- The Hammer: With a blunt nose and sturdy wings, this plane withstands the inevitable crashes and excels in distance.
Get ready to transform ordinary paper into extraordinary planes. There’s a whole world of folding, flying fun just waiting to be discovered!
The Science of Flight: Learning with Paper Planes
Flying paper planes is also a fantastic way for kids to get a grasp on basic scientific principles. Here are just a couple of the concepts you can explore with your young pilots:
- Aerodynamics: Discuss how the shape of a plane affects the way air moves over and under the wings, impacting flight.
- Gravity: It’s not just a rule for dropping apples! See how gravity affects how quickly a plane begins to descend after the thrust of the throw is gone.
Always remember, fellow aviators – the journey is as important as the destination. So embarking on the grand flight of making and flying paper planes with your children promises not just an afternoon of fun, but a sky full of memories. Keep your spirits high, and let the paper planes sail!
For more great fun click here. For more information see here
Disclaimer
The articles available via our website provide general information only and we strongly urge readers to exercise caution and conduct their own thorough research and fact-checking. The information presented should not be taken as absolute truth, and, to the maximum extent permitted by law, we will not be held liable for any inaccuracies or errors in the content. It is essential for individuals to independently verify and validate the information before making any decisions or taking any actions based on the articles.

