
Create Beautiful Cement Plant Pots with This Simple DIY Guide!
Hey there, crafty parents and green-thumbed gardeners! Are you ready to dive into the world of DIY and add a touch of modern, rustic charm to your home or garden? Making your own cement plant pots is not only surprisingly easy, but it’s also a delightful way to get creative and bond with your family. So, grab your gloves, and let’s get molding some trendy cement pots that your plants will absolutely love!
Why Choose Cement Plant Pots?
Cement plant pots have soared in popularity due to their minimalist aesthetic, durability, and versatility. They’re perfect for both indoor plants and outdoor greenery. Plus, they’re incredibly long-lasting and can withstand the elements, making them ideal for any gardening aficionado!
What You’ll Need:
- Portland cement
- Sand (optional, but recommended for texture)
- Water
- A pair of rubber gloves
- Two different-sized molds (like old containers or buckets)
- Cooking oil or non-stick spray (for easy pot removal)
- Mixing tools (a spade or stick will do)
- Sandpaper (for smoothing edges)
- Your creativity and enthusiasm!
Step-by-Step Instructions to Make Your Cement Pots
Step 1: Prepare Your Workspace
Before we start, it’s important to choose an appropriate workspace. Cement work can get messy, so an outdoor area or a well-ventilated garage would be ideal. Cover your surface with plastic sheets or newspaper to make clean-up a breeze.
Step 2: Mixing the Cement
Mixing the cement is a crucial step. If you’re a newbie, don’t fret—the process is simple. Combine one part Portland cement and one part sand into a mixing bucket. Gradually add water while stirring until you achieve a consistency similar to thick pancake batter. An expert tip: Add water slowly to avoid making your mix too runny.
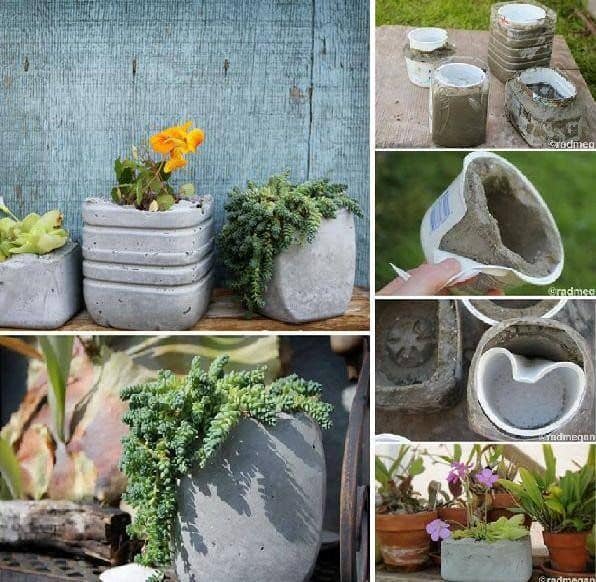
Step 3: Prepare Your Molds
Find two containers, one larger than the other, that will shape your plant pot. Apply a thin coat of cooking oil or non-stick spray to the insides of the larger mold and the outside of the smaller one—this trick will help you demold your cement pot with ease once it’s set.
Step 4: Pouring the Cement
Here’s where the real fun begins! Pour the cement mixture into the larger mold until it’s about two-thirds full. Then, gently press the smaller container into the center to create your pot’s hollow. Ensure the inner mold is weighed down—stones or sand work well—to prevent it from floating up. Tap the sides lightly to remove any air bubbles, which can create holes in the final product.
Step 5: Let It Set
Patience is key! Allow your new creation to harden. The pot will need at least 24 to 48 hours to set properly. Resist the temptation to peek; ensuring a strong cure now means a sturdier pot later. You’ll be thanking yourself when you see the result!
As we wait for the cement to set, it’s a great time to start imagining the possibilities. These pots are a blank canvas for your creativity—feel free to think about paint colors, patterns, or even mosaic designs to embellish your pots!
To Be Continued…
At this point, you’ve made great progress, but there’s still more to do. In the next section of this guide, you’ll discover how to unmold, cure, and customize your cement plant pots to showcase your plants in style. Stay tuned!
Five Essential Tips for Parents Preparing to Make Cement Plant Pots
1. Safety First
Tackling any DIY project means putting safety first, especially when working with materials like cement. Here’s what you need to remember:
- Always wear protective gloves when handling cement as it can cause skin irritation.
- Despite its kid-friendly simplicity, this project is best for older children under adult supervision, because cement is a powdery substance and should not be inhaled.
- Keep a first aid kit handy, just in case of any small cuts or scrapes.
2. Preparing Is Key
Preparation goes a long way in making any DIY project smoother and more enjoyable. Here are some prep tips:
- Gather all materials before starting and ensure you have enough space to work comfortably.
- Involve your kids in the preparation process—let them pick the molds or assist you in mixing, if appropriate.
- Take a few minutes to explain each step to the kids, so they feel included and can learn something new!
3. Customizing Your Pots for Family Fun
Turning this craft into a family activity is all about customization:
- Each family member can personalize their pot with paint, stencils, or handprints, once the pots are cured and safe to handle.
- Consider using the project to teach about color mixing, design, or even plant science! Pick plants or seeds together for the new pots.
- Take this opportunity to make each pot unique—family mementos like shells or pebbles can be pressed into the wet cement for a personal touch.
4. Patience and Timing
One of the trickiest parts of DIY is the waiting:
- Explain to the kids that cement takes time to dry and it’s important to wait, otherwise the pots might not hold their shape.
- Plan other short activities or breaks while the cement is setting so everyone stays entertained.
- Use the waiting time to research plants or decorations for the pots, keeping everyone engaged with the project.
5. Cleanliness and Maintenance
Lastly, keeping clean and tidy will reduce stress:
- Line your workspace with plastic or newspaper and have a dedicated spot for dirty tools.
- Keep a bucket of water and some rags nearby for quick cleanups of spills or cement-covered hands.
- After the project is complete, have everyone help with the cleanup—it’s an excellent lesson in responsibility and team effort.
Making cement plant pots is a perfect weekend project that can bring the family together and allow everyone to contribute their unique touch to your home garden. With these tips and your complete guide to making cement pots, you’re all set to create lasting memories—and gorgeous pots—together!
See more great Things to Do with Kids in New Zealand here. For more information see here
Disclaimer
The articles available via our website provide general information only and we strongly urge readers to exercise caution and conduct their own thorough research and fact-checking. The information presented should not be taken as absolute truth, and, to the maximum extent permitted by law, we will not be held liable for any inaccuracies or errors in the content. It is essential for individuals to independently verify and validate the information before making any decisions or taking any actions based on the articles.


