
Get Crafty: Your Ultimate Guide to Crafting Chatterboxes with Your Kids
Welcome, crafty parents! ? Are you looking for a simple yet delightful activity to share with your little ones? Look no further! Making chatterboxes, also known as fortune tellers or cootie catchers, is a timeless paper folding craft that promises loads of fun and sparks creativity for all ages. Not only are they super simple to create, but they also encourage interactive play and can be used in educational games. Get ready to fold your way to a fantastic time with our easy-to-follow guide!
What You’ll Need
Before diving into this enchanting world of paper folding, make sure you have everything on hand to start your chatterbox-making adventure. Here’s what you’ll need:
- A square piece of paper (origami paper is perfect, but any paper will do!)
- Markers, crayons, or colored pens for decorating
- Scissors (if starting with a rectangular piece of paper)
- A flat surface to work on
Step-by-Step Instructions to Creating Your Chatterbox
Roll up your sleeves, it’s time to dive into the folding fun! Follow these simple steps to make your very own chatterbox:
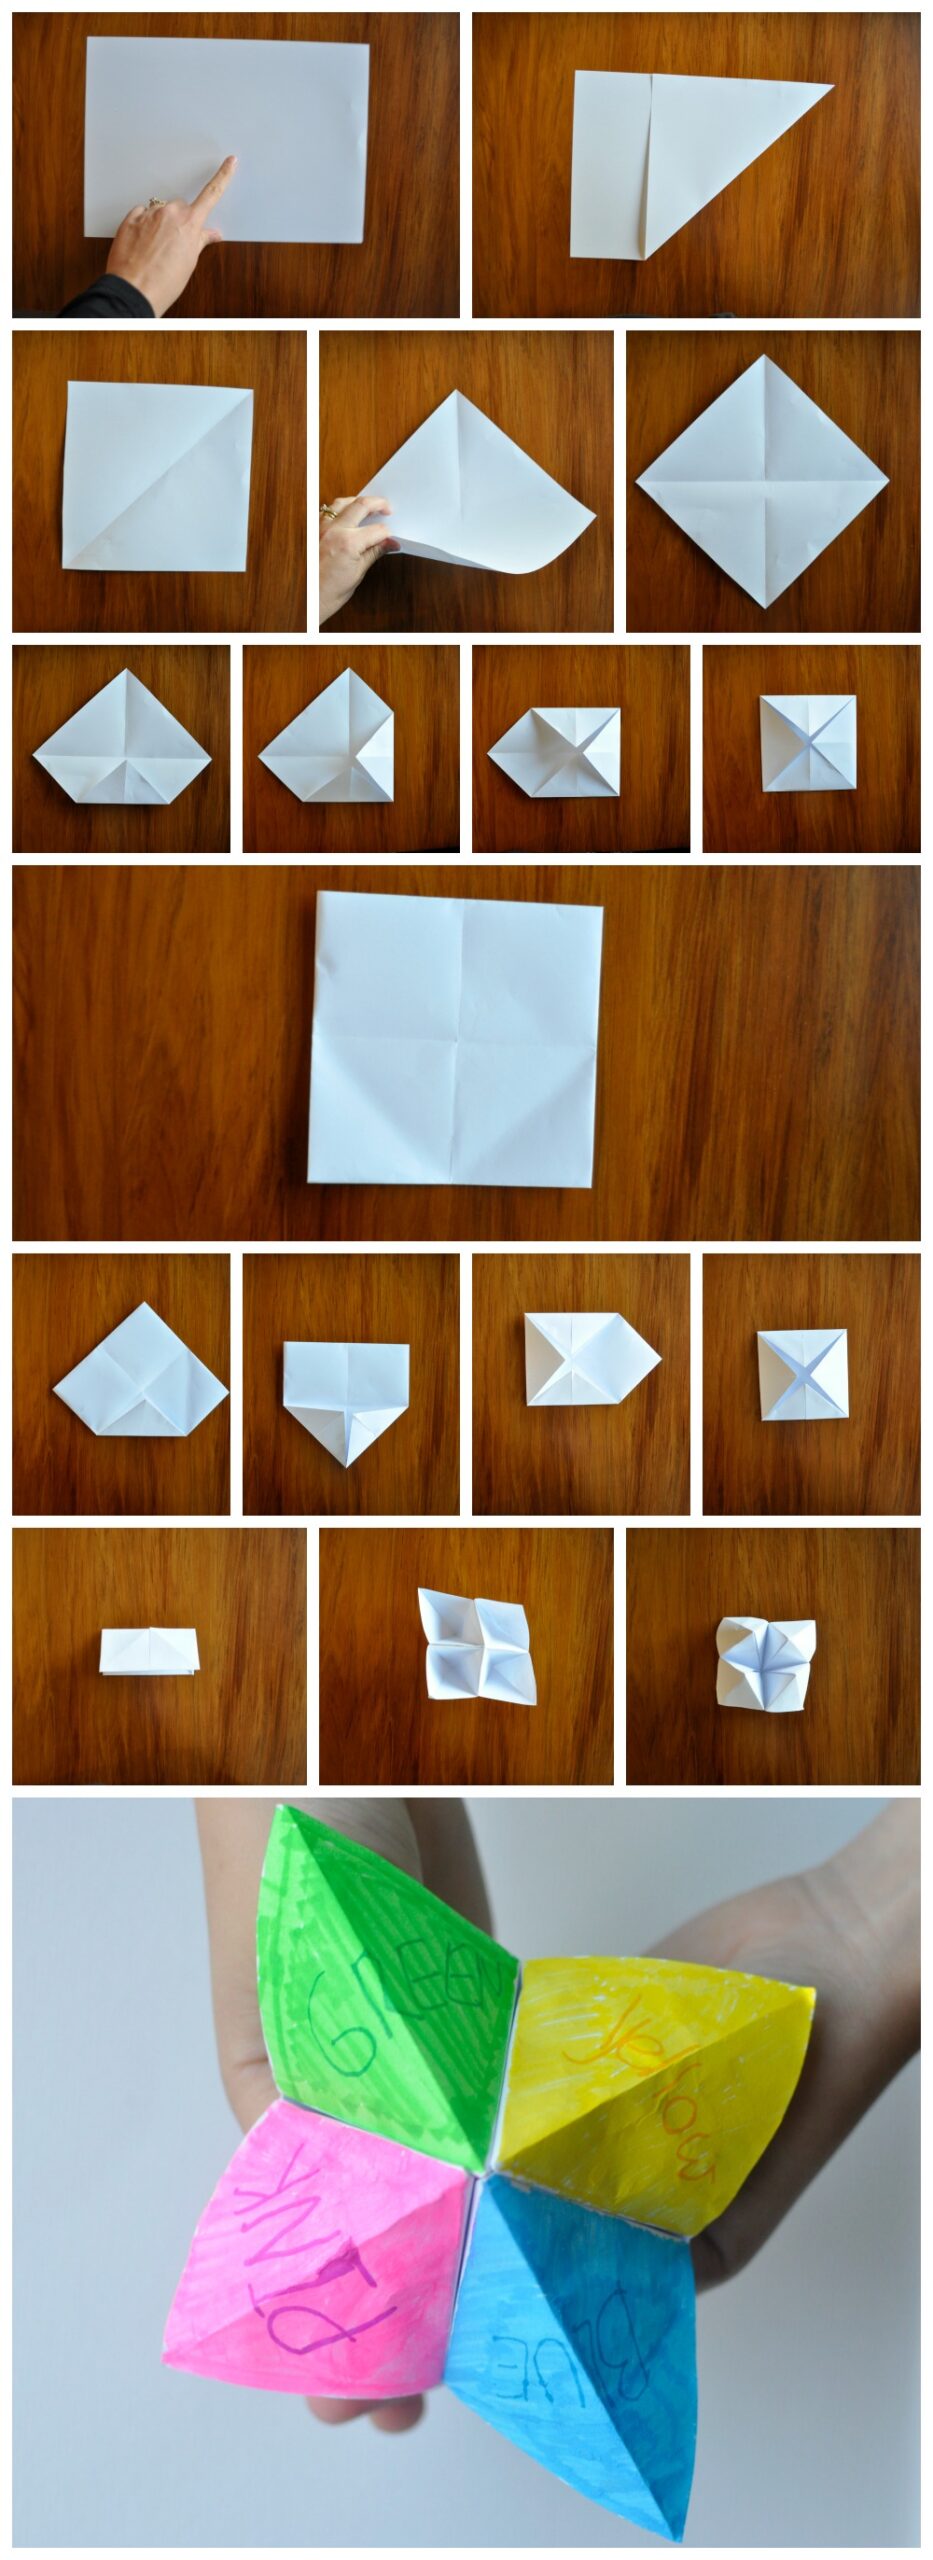
- Start with a square piece of paper. If your paper is rectangular, fold one corner to the opposite side to create a triangle and cut off the excess strip. Unfold the triangle to reveal your perfect square.
- Place the square flat on your surface with one of the corners pointing towards you. Fold it in half diagonally, crease well, and then unfold. Repeat with the opposite corners.
- Turn the paper over to the opposite side. Fold each corner point into the center, using the creases you’ve just made as guides, to create a smaller square.
- Flip the paper over again. Once more, fold each corner into the center to form an even smaller square.
- Fold the paper in half to create a rectangle, pinch the sides to pop the chatterbox into shape, and then carefully open it back to a square.
- Slip your fingers underneath the square flaps to prep your chatterbox for action. Your simple yet fascinating paper craft is now ready!
Making It Personal: Fun Decorating Ideas
Now, this is where you can let your imagination fly! Transform your chatterbox into a personalized work of art. Here are some clever decorating ideas:
- Use bright markers to fill each outer flap with colors and numbers. This will be the initial choice for the person playing with the chatterbox.
- Decorate the inner flaps with fun commands, fortunes, or silly jokes to make every pick a delightful surprise.
- Go thematic by creating chatterboxes for special occasions, such as holidays, birthdays, or seasonal activities!
Remember, the sky’s the limit when it comes to decor, so encourage your kids to be bold and imaginative with their designs.
Playing with Your Chatterbox
Once your creation comes to life, it’s playtime! Teaching your child how to use it is a piece of cake:
- Ask a friend to pick a color spelled out on the outer flaps.
- Spell the color while alternating the opening direction of the chatterbox with each letter.
- Next, ask your friend to pick a number from the inside. Count out the number, again alternating the opening direction with each count.
- Finally, have them choose a final number, lift the flap, and reveal the hidden message underneath!
It’s a fun game that can also be educational—use it to incorporate math challenges, word games, or storytelling prompts within each flap. The possibilities are endless!
Chatterboxes have been bringing joy to children and parents alike for generations, offering a blend of craft, learning, and entertainment. By following this guide, you and your family will be well on your way to becoming chatterbox connoisseurs!
5 Things Parents Should Know Before Making Chatterboxes
Preparation is key when it comes to crafting with kids. Here are five essential tips to make your chatterbox-making experience as smooth and enjoyable as possible:
- Choose the Right Paper: While you can technically use any kind of paper, lighter paper (like origami paper) makes folding easier, which is ideal for little hands. If you only have printer paper, that’s okay too—just cut it into a square before starting.
- Practice Patience: If this is the first time your kids are making chatterboxes, they might not get it right on the first try. Be patient and guide them through the steps, making sure they have fun in the process.
- Create a Spacious Work Area: Ensure you have a clean and flat surface to work on. Space is important not just for crafting, but also for spreading out your materials and avoiding spills or creases.
- Incorporate Learning Elements: Use this opportunity to incorporate educational elements into the chatterbox game. For example, use it to practice colors, numbers, spelling, or even math problems!
- Emphasize Creativity Over Perfection: The goal is to have fun and be creative, not to make a perfect chatterbox. Encourage your kids to get creative with colors and content, and remind them that it’s okay if their chatterbox is unique.
Advanced Chatterbox Tips and Tricks
Once you’ve mastered the basics, it’s time to take your chatterbox skills to the next level with these exciting tips and tricks:
- Interactive Storytelling: Turn chatterboxes into a storytelling tool. Write the names of characters, settings, and plot elements on the flaps and use them to devise stories on the fly!
- Chatterbox Puppets: Attach your chatterboxes to a stick and use them as puppets, giving voice and personality to your child’s creation.
- Learning Challenges: Write challenges or questions inside the chatterbox that encourage kids to perform a task or answer trivia, turning it into an interactive learning game.
- Language Learning: For multilingual families or those learning a new language, use chatterboxes to practice vocabulary by writing words and their translations inside the flaps.
- Eco-Friendly Crafting: Teach your kids about recycling by using old magazines or newspapers to make chatterboxes, discussing how recycled materials can be repurposed into something new and fun.
Conclusion
Chatterboxes are more than just a paper craft; they’re a gateway to quality family time, learning, and creativity. With this comprehensive guide, you’re now equipped to create and enjoy chatterboxes with your kids, building memories that will last far beyond the paper folds. Whether for playtime, education, or simply a creative afternoon, chatterboxes are a splendid way to engage with your children and spark their imaginations.
Happy folding and sharing those wonderful chatterbox moments with your family! Remember, the joy is in the journey, and each fold brings you closer together. Let the chatter begin!
For more great articles please see here. For more information see here
Disclaimer
The articles available via our website provide general information only and we strongly urge readers to exercise caution and conduct their own thorough research and fact-checking. The information presented should not be taken as absolute truth, and, to the maximum extent permitted by law, we will not be held liable for any inaccuracies or errors in the content. It is essential for individuals to independently verify and validate the information before making any decisions or taking any actions based on the articles.


