
Magical Stained Glass Cookies: A Colorful Treat for Parents and Children Alike!
Hey there, baking enthusiasts! Ready to add a splash of color and fun to your kitchen activities with the kiddos? Well, buckle up because you’re about to embark on a whimsical culinary adventure with our stained glass cookies guide! These sparkling gems are not only gorgeous to look at but also delectable to munch on. So, let’s gather the family, roll up your sleeves, and get ready to create some edible art that’s perfect for any occasion — whether it’s a festive holiday, a birthday bash, or just a cozy Sunday afternoon.
What Are Stained Glass Cookies?
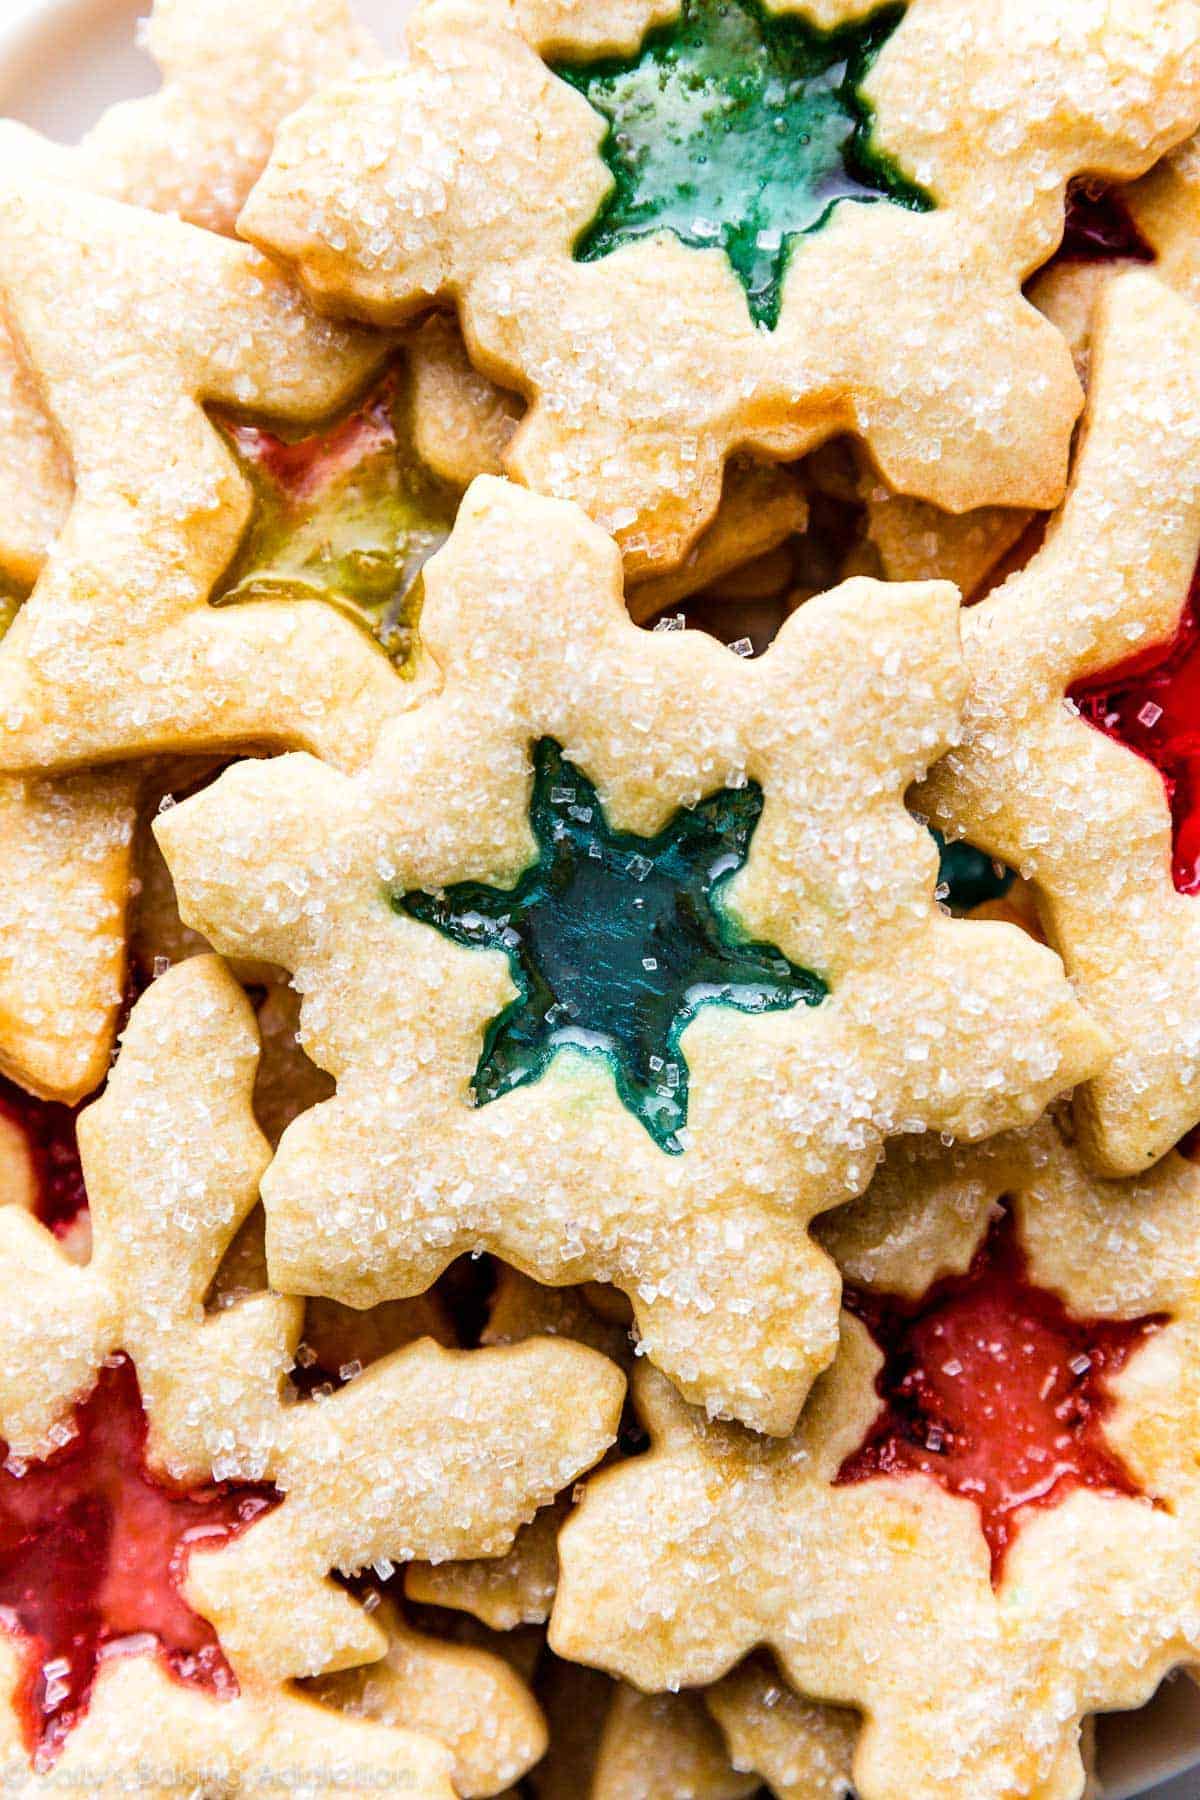
Stained glass cookies are a form of sugar or butter cookies that feature a colorful, translucent center made of crushed hard candy. When baked, the candy melts to resemble the beautiful effect of stained glass, making these cookies an absolute delight to both bake and eat.
Gather Your Materials and Ingredients
Step 1: Assemble Your Baking Tools
Before you dive into the mixing and rolling, let’s make sure you’ve got all your baking tools on deck for a smooth baking experience. You’ll need:
- Rolling pin
- Cookie cutters (Choose fun shapes that the kids will love!)
- Non-stick baking sheet
- Parchment paper or a silicone baking mat
- Plastic bag and a rolling pin or hammer (for crushing the candies)
- A cooling rack (for those hot-out-of-the-oven treats!)
Step 2: Ingredient Checklist
Time to raid that pantry! Here’s what you’ll need to whip up your own batch of stained glass cookies:
- All-purpose flour
- Granulated sugar
- Unsalted butter (softened to room temperature)
- An egg
- Vanilla extract (for that classic cookie flavor)
- A pinch of salt
- Assorted colored hard candies (such as Jolly Ranchers or Life Savers)
Let’s Get Baking!
Step 3: Make Your Cookie Dough
The foundation of any great cookie starts with the dough. You’ll be making a standard sugar cookie dough as the canvas for your stained glass art. Cream together butter and sugar until it’s light and fluffy. Beat in the egg and vanilla extract, then gently stir in the flour and salt. Once you’ve got a cohesive dough coming together, it’s time for the most fun part – rolling and shaping!
Shaping Your Masterpieces
Step 4: Cookie Cutter Magic
After your dough has chilled in the fridge (which helps with handling), roll it out on a floured surface to about a ¼ inch thickness. Now let the kids take the reins! Use those cookie cutters to cut out your favorite shapes. Pro tip: Shapes with large open areas work best to showcase the stained glass effect — think hearts, stars, or circles!
Step 5: Creating the Stained Glass Effect
After you’ve cut out your cookies, remove the inner sections where you want the candy to go. Place the cookies on your lined baking sheet, then fill those spaces with crushed hard candies. Bake in a preheated oven and watch as the magic happens — the candy melts into a gorgeous, glass-like pane that’s simply mesmerizing!
Step 6: The Grand Finale – Baking and Cooling
Slide your cookie sheet into the oven and bake your cookies until they’re golden brown and the candy is bubbling away. Those few minutes might test your patience, but the result is absolutely worth the wait. Once done, allow your stained glass cookies to cool before transferring them to a rack. Now comes the hardest part — trying not to eat them all in one sitting!
Stained Glass Cookies: Tips and Tricks
Here are a few insider tips to help you ensure your stained glass cookies turn out splendid every single time. Choose the right candy: ideally, you want something that will melt easily and smoothly. If you’re baking with little ones, supervise closely during the candy-crushing and oven steps to ensure safety. If you’d like to hang your cookies as decorations, remember to make a hole in the top before baking.
Don’t worry, we’ve just scratched the surface of creating these delightful treats! Stay tuned for more detailed tips, the full recipe, and creative variations to explore with your family. Remember, the true magic of stained glass cookies isn’t just in their vibrant appearance, but in the shared moments of joy they bring to both the young and the young at heart. Happy baking and stay sweet!
5 Essential Tips for Perfect Stained Glass Cookies
Hello, lovely parents! Are you searching for a fun baking activity that’s perfect for creating special memories with your kids? Stained glass cookies are your delicious ticket to an afternoon filled with laughter, creativity, and bonding. These cookies are not just a treat to the taste buds but also a feast for the eyes. Before we jump into the how-to, let’s explore five things you should know to make sure your stained glass cookies turn out perfectly every time.
Preparation is Key
The art of stained glass cookie-making is both fun and educational for children. However, certain preparatory steps are important to ensure a smooth process. Here’s what to keep in mind:
1. Choose the Right Candy
The centerpiece of these cookies is the candy “glass.” Choose candies that are vibrant in color and known for melting well, such as Jolly Ranchers or Life Savers. Make sure to have a variety of colors to let the creativity flow and to make the most beautiful cookies you can imagine.
2. Candy Crushing Safety
While crushing the candies can be a blast, please remember to supervise your children during this step. You can place the candies in a sturdy plastic bag and let your kids gently tap them with a rolling pin or a hammer, but take over when necessary to prevent any slips or too much pressure that could cause tears in the bag — leading to a colorful, yet unwanted, sprinkle of candy shards across your kitchen!
3. Dough Consistency Matters
The dough for stained glass cookies should be firm enough to hold the candy in place while baking. If the dough is too sticky, add a bit more flour. If it’s too dry and crumbly, add a touch of milk or water. The perfect dough will be easy to roll out and cut into shapes.
4. Keeping the Candy Contained
During baking, melted candy can be quite the escape artist, seeping out beyond the dough’s boundaries. Prevent this by ensuring your cookie cutouts have well-defined edges and that the candy pieces don’t overfill the spaces. A little gap between the candy and the dough’s edge goes a long way in crafting that flawless, glassy center.
5. Timing Your Bakes
Each oven is different, and so timing your bake is crucial. Keep a close eye on your cookies as they bake, looking for that sweet spot when the dough turns golden and the candy bubbles. Overbaking can lead to browned candy centers that lose their transparency, while underbaking might give you a gummy texture instead of a crisp, glassy snap.
Getting Your Bake On!
Step 3: Perfecting Your Dough
Cream your butter and sugar until the mixture is light and fluffy, then blend in your egg and a dash of vanilla for that aromatic flavor. Mixing in your dry ingredients gradually helps form a smooth, pliable dough. Chill it in the fridge to make handling and shaping a breeze.
Step 4: Rolling and Cutting
Lightly flour your surface and roll out the chilled dough. Encourage your kids to use their favorite cookie cutters to make shapes with big open areas ideal for the stained glass effect. Circles, hearts, or stars, let your imagination soar!
Step 5: Filling Your Cookies
Transfer the cutouts to a baking sheet, and it’s time to fill them with your crushed candy! A fun tip — you can mix candy colors in the center for a galaxy effect or keep it simple with a single color for classic elegance. Oven time is next, and as the candy melts, watch the magic unfold.
Step 6: The Grand Bake
Into the oven they go. This is where the real transformation happens. Your kitchen will soon fill with sweet aromas, and the sight of those cookies, fresh and slightly cooled, will be a moment to cherish. The cooling rack is the final destination before these delights can be enjoyed.
Unveiling the Magic
There you have it, parents! Five key insights to keep your stained glass cookie-making experience as delightful as the cookies themselves. It’s not just about choosing the right candy or getting your timings exact; it’s the joy of doing something truly unique with your children that makes this such a special activity.
Remember, the deeper magic of stained glass cookies lies not in their vibrant appearance alone, but in the wholesome fun and love packed into every single bite. Embrace the warmth of these moments, and here’s to many happy bakes ahead — may you find joy in every batch of these stained glass beauties!
See more great Things to Do with Kids in New Zealand here. For more information see here
Disclaimer
The articles available via our website provide general information only and we strongly urge readers to exercise caution and conduct their own thorough research and fact-checking. The information presented should not be taken as absolute truth, and, to the maximum extent permitted by law, we will not be held liable for any inaccuracies or errors in the content. It is essential for individuals to independently verify and validate the information before making any decisions or taking any actions based on the articles.


