
Ultimate Guide to Making Homemade Slime for Endless Fun!
Hello amazing parents, caretakers, and slime aficionados! Are you ready to dive into the ooey-gooey world of homemade slime? Making slime at home is not only a blast for the kiddos but also super easy and affordable. Plus, it’s a fantastic way to encourage your children to explore their creativity and learn a bit about science along the way. Let’s get started on our slippery slime journey with a simple recipe that will guarantee smiles and hours of fun!
What You Will Need for Your Homemade Slime Adventure!
Before we get our hands sticky, let’s make sure we’ve got all our slime ingredients and tools ready. Here’s what you’ll need:
- Glue: Plain white PVA glue is the base of our slime. It’s readily available and the key to perfect slime consistency.
- Baking Soda: This common household ingredient will help thicken your slime.
- Contact Lens Solution: Be sure it contains boric acid and sodium borate, as these are essential to slime formation.
- Food Coloring: This is optional, but who doesn’t love colorful slime? Let your imagination run wild!
- Bowls and Spoons: Use separate bowls for mixing and spoons for stirring. Plastic or disposable ones can make cleanup easier.
- Measuring Spoons: To measure out your ingredients accurately.
Once you’ve gathered all your materials, we’ll move onto the magical process of making the slime!
Step-by-Step Guide to Creating Perfect Slime
Are we ready? Here’s the basic recipe to create that perfect batch of homemade slime!
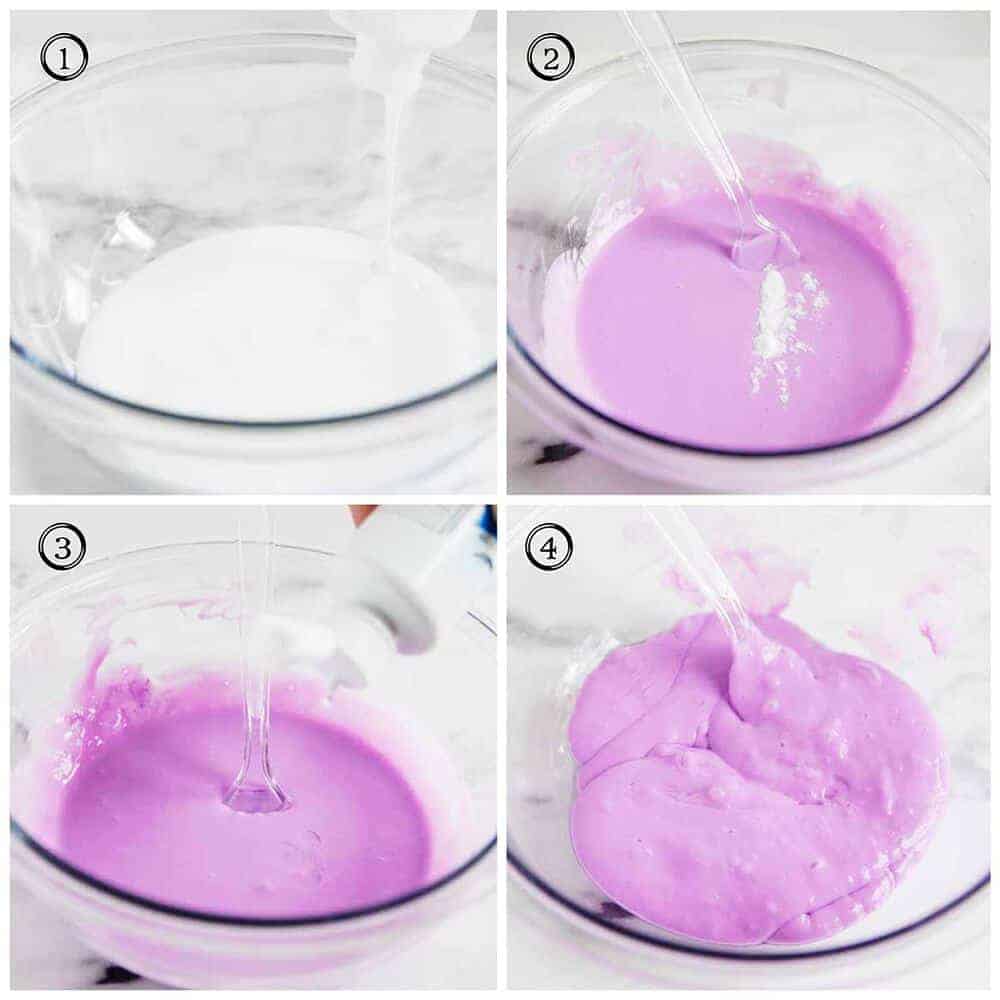
Step 1: Glue Extravaganza
Begin by pouring 1/2 cup of PVA glue into a bowl. If you want to add some pizzazz to your slime, mix in a few drops of food coloring until you’re happy with the hue. Make it as vibrant or as pastel as your heart desires!
Step 2: Baking Soda Boost
Next, sprinkle in 1/2 teaspoon of baking soda and stir until it’s fully incorporated into the glue. You’ll notice the mixture starting to thicken just a tad – that’s exactly what we’re looking for!
Step 3: Slime Activator Time
Now for the part that brings our slime to life: the activator! Slowly add in 1 tablespoon of contact lens solution to the mixture. As soon as you start stirring, the magic begins! The slime will start forming before your eyes. Keep on mixing until the slime begins to pull away from the sides of the bowl.
Step 4: Kneading is Key
When the slime has formed, take it out and begin kneading with your hands. Don’t worry if it’s a bit sticky in the beginning; as you knead, it will become less so. If the slime is still too sticky after a few minutes, add a little more contact lens solution, but be careful not to add too much, or your slime may become stiff.
Now, wasn’t that a cinch? You’ve just made your very own batch of homemade slime! But wait, there’s more you can do to take your slime to the next level, and I’m excited to share those tips and tricks with you. Keep reading to learn how to jazz up your slime with glitter, scents, and even glow-in-the-dark powers!
Remember, making slime isn’t just about following a recipe; it’s about experimenting and discovering new textures and colors. Encourage your kids to try different variations and most importantly, have a fabulous time playing with their creations. After all, that’s what slime is all about – playful, squishy joy!
Now, let’s talk about those exciting additional slime variations and ensure you’re prepared for the ultimate slime experience…

5 Things Parents Should Know Before Making Homemade Slime
1. Safety First: Non-toxic Ingredients and Allergies
When planning your slime-making session, always opt for non-toxic, safe ingredients that are child-friendly. While the basic ingredients like baking soda and PVA glue are generally safe, always check the product labels. Furthermore, be mindful of allergies—some children may be allergic to the ingredients used in slime, like boric acid found in some contact lens solutions. Doing a patch test on your child’s skin before diving into full-on slime play can help prevent allergic reactions.
2. Protecting Surfaces and Clothes
Slime-making is undoubtedly a messy activity, so it’s important to prep your space before getting started. Cover tables with newspaper, oilcloth, or a disposable tablecloth to make cleanup a breeze. Encourage your kiddos to wear old clothes or aprons to protect their outfits. Although our slime recipe is washable, better safe than sorry!
3. Perfecting the Slime Consistency
Achieving the perfect slime texture can sometimes take a little trial and error. If your slime is too sticky, adding a bit more contact lens solution can help, but go slowly; too much, and your slime can turn rubbery. If it’s too runny, a little extra glue might do the trick. Remember, the key to perfect slime is all in the kneading—so flex those muscles and have fun squishing!
4. Adding Wow Factors: Creative Add-ins
There’s so much room for creativity with slime! Encourage your children to think outside the box. Glitter, beads, foam balls, and even small toys can make their slime truly unique. You can also add scents using food-grade extracts or essential oils, but remember to use these sparingly to avoid skin irritation.
5. Storage Solutions: Keeping Slime Fresh
Your homemade slime can last quite a while if stored properly. Once playtime is over, store the slime in an airtight container or a ziplock bag to keep it from drying out. This also makes it easy to take your slime on the go, whether it’s to a friend’s house or just out to the backyard for some sunny day fun!
Enhancing Your Slime: Variations and Ideas
As promised, let’s explore some awesome variations to make your slime even cooler!
Glitter and Glow
Add sparkle to your slime with glitter—a little or a lot, the sky’s the limit! For nighttime fun, consider using glow-in-the-dark paint to give your slime an eerie glow that will surely delight.
Scent-sational Slime
Make your slime smell as good as it looks by adding a few drops of child-friendly fragrance or essential oils. From fresh citrus to sweet vanilla, choose scents that your little one loves.
Themed Slime
Dive into themes based on your child’s interests. Whether it’s mermaid slime with shimmering blue and green hues or dinosaur slime with tiny plastic dinosaurs inside, themed slime is an excellent way to fuel your child’s imagination.
As you embark on your slime-making adventures, remember the importance of supervision, especially with young children. This hands-on activity is not only a chance for endless fun but also a learning opportunity—measurements, chemical reactions, and sensory play all come into the mix.
With these tips and tricks in mind, you’re well on your way to becoming the coolest slime artisans in the neighborhood. So, don your aprons, roll up your sleeves, and get ready for a squishy, squashy good time!
See more great Things to Do with Kids in New Zealand here. For more information see here
Disclaimer
The articles available via our website provide general information only and we strongly urge readers to exercise caution and conduct their own thorough research and fact-checking. The information presented should not be taken as absolute truth, and, to the maximum extent permitted by law, we will not be held liable for any inaccuracies or errors in the content. It is essential for individuals to independently verify and validate the information before making any decisions or taking any actions based on the articles.


