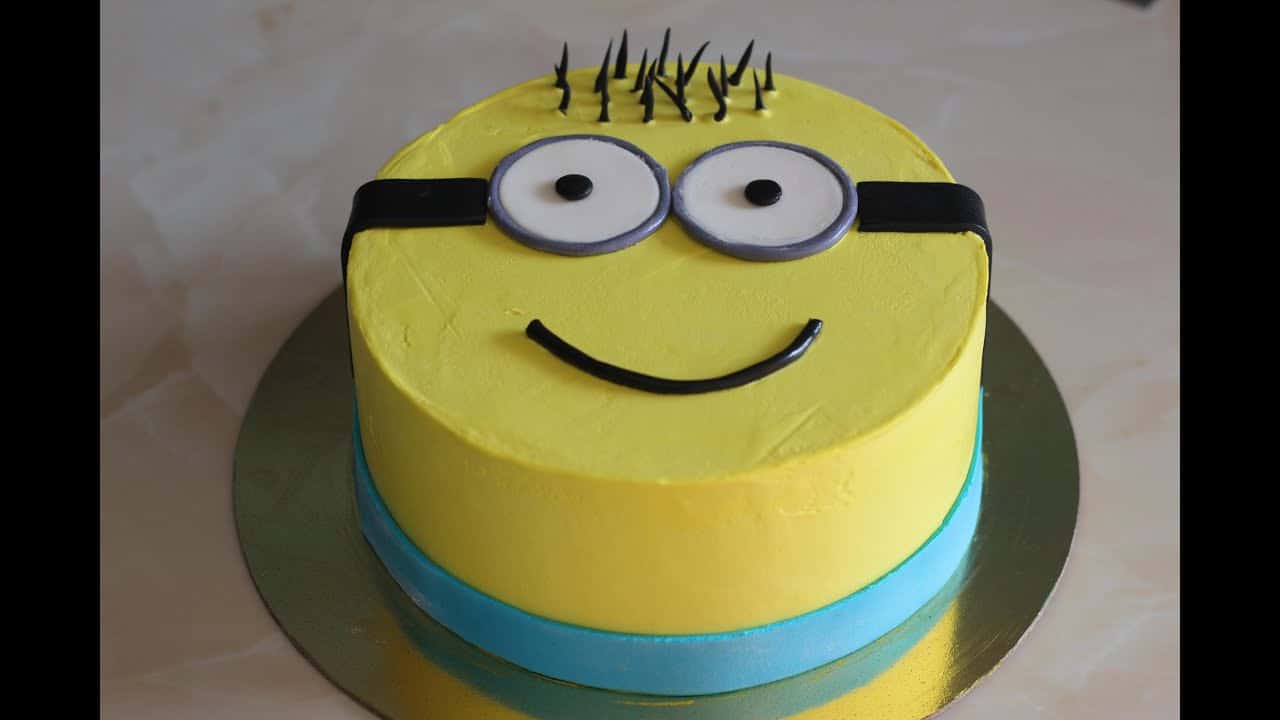
Despicably Delightful Minions Cake: Your Ultimate Guide
Hey there, awesome parents and cake enthusiasts! Are you ready to whip up some despicable fun? That’s right; we’re talking about a Minions cake that will bring gleaming smiles to your little one’s face! Whether it’s for a birthday bash, movie night, or just because Minions make everything better, this cake is a showstopper. So, grab your aprons, because we’re about to dive into the world of Minion-mania, one icing swirl at a time!
Why You’ll Love This Minions Cake
- It’s Fun: Crafting a Minions-themed cake is not just about baking; it’s an expressive journey that lets you tap into your creative side.
- It’s Flexible: You can customize your cake in endless ways, making each Minion character as unique as your kiddo!
- It’s Memorable: Creating this cake will forge fun, flour-filled memories with your family that’ll last longer than the time it takes to devour the cake itself!
Gearing Up: What You Need
Before we kick off our baking escapade, let’s talk about the tools and ingredients you need to make your Minions cake masterpiece come to life.
Tools
- Round cake pans
- Cake leveler or serrated knife
- Electric mixer
- Rolling pin
- Fondant smoother
- Food coloring (yellow, blue, black and white)
- Piping bags and tips
- Fondant cutters (or a sharp knife can do the trick)
- Small paintbrush (for food-use only)
Ingredients
- Your favorite cake recipe (or a box mix if you’re short on time)
- Buttercream frosting
- Vanilla fondant
- Chocolate (for melting, to stick pieces together)
- Edible silver spray or paint (for the goggles)
Step-by-Step Minions Cake Assembly
Now here’s where the magic really happens! Follow these steps to create your edible Minion masterpiece.
Crafting the Cake Base
- Prepare the batter: Whether you’re following a recipe from scratch or embracing the convenience of a box mix, prepare your cake batter as directed.
- Bake the layers: Divide the mixture evenly between round cake pans and bake according to instructions. Remember to let them completely cool before the next step – a warm cake can lead to melty decorating disasters!
- Level the tops: Using a cake leveler or a serrated knife, gently even out the tops of your cakes for a flat surface that’s perfect for stacking.
It’s All About the Buttercream
- Create your crumb coat: With a generous swoosh of buttercream frosting, crumb coat your cake. This initial layer doesn’t have to be neat – it’s meant to keep those crumbs at bay! Chill the cake in the fridge for about 30 minutes to set the frosting.
- Add another layer: Apply a second, thicker layer of buttercream for a smooth finish. This will be the canvas for your fondant to adhere to, so take your time to make it as smooth as possible.
That’s just the beginning, dear baking buddies! I can sense your Minions cake is going to be absolutely fabulous. Stay tuned for more detailed decoration tips, how to shape and apply fondant, and secret tricks to bring your Minions cake character to life with personality and charm that even Gru would be proud of. Get ready for icing, laughing, and possibly a little bit of yellow and blue everywhere, but that’s half the fun!
Next up, we’re rolling, coloring, and creating the cutest Minion faces, so don’t go anywhere – you’ll want to see how these little guys take shape!

5 Essential Tips for Parents Preparing a Minions Cake
Embarking on the cake creation journey can be as adventurous as a Minions mission—so here are five golden nuggets of wisdom to keep in mind:
Tip 1: Plan Ahead
Time is your secret ingredient! Start by sketching your design a few days in advance. Decide which Minion (or Minions!) you’d like to replicate. Kevin, Stuart, or Bob? Or perhaps a whole Minion crew? Gather all the tools and ingredients early so you won’t have to rush on the big day.
Tip 2: Keep It Simple
If you’re new to the cake decorating world, don’t fret about making it complicated. Focus on capturing the essence of a Minion—bright yellow skin, blue overalls, and those unmistakable goggles. As long as your cake has these key elements, it will be unmistakably Minion!
Tip 3: Fondant vs. Buttercream
Decide whether you want to cover your cake in fondant or buttercream. Fondant gives a smooth, professional finish but can be trickier to work with. Buttercream is more forgiving and can be just as impressive with the right techniques! Whichever you choose, practice makes perfect.
Tip 4: Get the Kids Involved
Why not make it a family affair? Including your little helpers can add to the fun. Let them assist with simple tasks like mixing colors or rolling out fondant. It’s a great way to inspire creativity and make them feel involved in the process!
Tip 5: Embrace Imperfections
Your Minions cake doesn’t have to be perfect. In fact, Minions themselves are known for their playful and mischievous behavior. Any little imperfections will only add character to your creation. Remember, it’s all about the joy it brings!
Creating Your Minions
With your cake base and smooth buttercream all set, it’s time to delve into the fun part—bringing your Minions to life!
Shaping the Fondant
- Color the fondant: Tint your vanilla fondant with yellow food coloring for the skin and blue for the overalls. Keep some fondant white for the eyes, and mix black for details. Wearing gloves can help avoid stained hands!
- Roll out the fondant: On a clean, flat surface dusted with powdered sugar, roll out the fondant to about 1/4 inch thick.
- Cut the shapes: Use your fondant cutters or a sharp knife to cut out the iconic round eyes, goggles, overalls, and mouth shapes. Don’t forget the hair!
- Assemble the face: Stick the fondant pieces onto the buttercream with a touch of water or melted chocolate. Gently smooth them out to ensure they adhere well.
Adding Finishing Touches
- Paint the details: Using the small paintbrush and a little food coloring, add details to your Minion’s face, like the straps of the goggles and the pupils of the eyes. The edible silver spray will give the goggles an authentic metallic sheen.
- Piping for hair and outfits: Employ your piping bag and tips to create the Minion’s spiky hair or to add texture to the overalls.
Your Minions cake is almost ready to steal the spotlight! These guidelines will help you transform a simple cake into the ultimate Minion masterpiece. With a dash of creativity, a sprinkle of patience, and an avalanche of love, you’ll conjure up a confectionery sensation that’s as joyous as the Minions themselves!
As you move towards the final touches of your Minions cake, remember that this isn’t just about baking—it’s about the experiences and stories that you will create and share. Every giggle, every smear of icing, and every moment of anticipation brings its own sweetness, surpassing even that of the cake. So, brave bakers, it’s time to don your yellow hats (or aprons) and create something that’s one in a Minion!
See more great Things to Do with Kids in New Zealand here. For more information see here
Disclaimer
The articles available via our website provide general information only and we strongly urge readers to exercise caution and conduct their own thorough research and fact-checking. The information presented should not be taken as absolute truth, and, to the maximum extent permitted by law, we will not be held liable for any inaccuracies or errors in the content. It is essential for individuals to independently verify and validate the information before making any decisions or taking any actions based on the articles.


