
A Step-by-Step Guide to Making Pompoms with Your Kids
Hey there, craft-loving parents and guardians! Are you looking for a delightful activity to share with your little ones? Search no more, because you’re about to dive into the whimsical world of pompom making! These fluffy bundles of joy are not only fun to create but can adorn just about anything – from cozy winter hats to chic room decor. Let’s get those creative juices flowing and make some pompom magic together!
What You’ll Need
Before we start, let’s make sure you have all the necessary materials at the ready. Thankfully, you don’t need much, and most of these items can be found around the house or at a local craft store.
- Yarn: You can choose any color or texture that tickles your fancy. The more colorful, the merrier!
- Pompom Makers: These handy tools come in various sizes and are super easy to work with. If you don’t have any, no worries! A piece of cardboard or a fork can do the trick too.
- Scissors: A sharp pair will make cutting the yarn a piece of cake.
Choosing the Right Yarn
Let’s talk yarn! The type of yarn you choose will determine the look and feel of your pompom. Worsted weight yarn is a great all-rounder, but don’t be afraid to experiment with chunky yarn, variegated skeins, or even some sparkle for a touch of dazzle (just be sure the yarn is not too thick or too thin for the pompom maker you’re using). The beauty of pompom making is in your imaginative possibilities, so encourage your kids to pick their favorite colors and textures for a personalized touch.
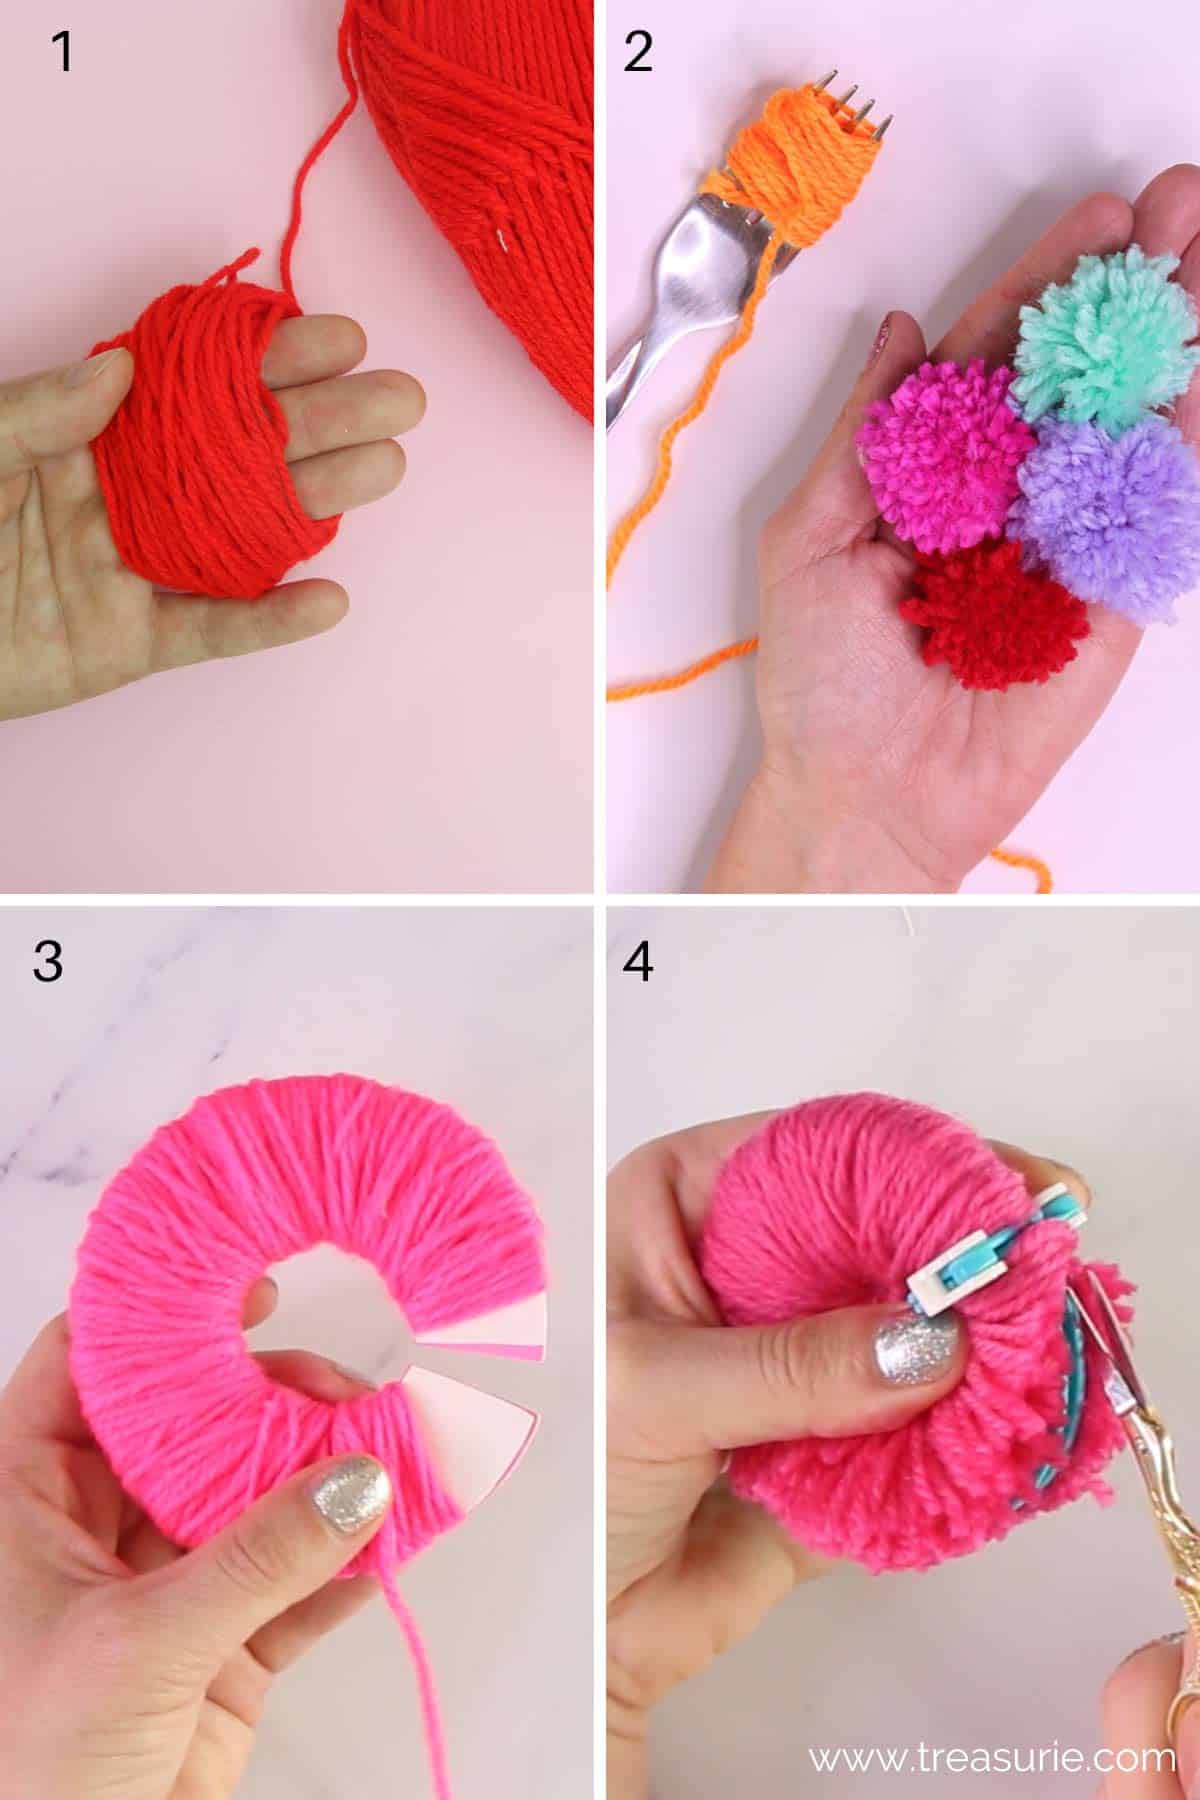
Step-by-Step Pompom Making
Alright, let’s get into the nitty-gritty of creating our pompoms! Follow these steps for a stress-free crafting experience:
- Open Your Pompom Maker: If you’ve got pompom makers, open them up so that the two arms on each side are extended and ready to wrap.
- Start Wrapping: Take your yarn and start wrapping it around one side of the pompom maker. Encourage your kids to wrap evenly! Not too tight and not too loose.
- Fill It Up: Keep wrapping until that half of the pompom maker is full and fluffy. The more you wrap, the denser your pompom will be.
- Repeat: Close the first half and repeat the process on the other side.
- Close and Cut: Once both sides are full, close the pompom maker entirely and start cutting. Slide your scissors into the groove between the pompom maker’s arms and snip all the way around.
- Tie It Together: Before you open your pompom maker, take a piece of yarn and tie it tightly around the middle groove. This yarn will keep all of your wrapped threads together – knot it twice for good measure.
And we’re not done just yet! There’s a little more fluffing and trimming to do before your pompom is ready to make its grand debut. But don’t worry; we’ll guide you through every single step to make sure your pompom is as perfect as can be. Crafting with kids should always be about the fun, not the fuss!
Now that you’ve got the basics down, stay tuned for more tips on how to cut, shape and style your pompoms. Plus, we’re full of ideas on how to use them once you’re done! From garlands to gift toppers, the possibilities with pompoms are simply endless. Keep those scissors handy, and let’s keep crafting a world full of color and creativity!
Remember, the key to a perfect pompom is patience and practice. So, let those little hands work their magic, and watch as they beam with pride at their handmade creations. Pompoms are not just a craft; they’re a cheerful burst of handmade happiness that you and your kids can make together. Stay with us as we continue to unravel the joys of pompom magic. We’re just getting started!
5 Essential Tips for Parents Preparing for Pompom Making
Getting ready for this fluffy craft is just as important as the making itself. Here are five essential tips that will help you prepare for a successful pompom crafting session:
- Workspace Preparation: Choose a clear, flat surface for your pompom crafting. A dining table or a large tray can work wonders. Make sure the area is free of clutter, and perhaps lay down some newspaper or a craft mat to catch any yarn snippets.
- Material Quality: Yarn quality can affect the outcome of your pompoms. Opt for medium-weight, acrylic or wool yarn for the best results. Avoid yarns that are too slippery or too fuzzy, as they can be difficult for little fingers to handle and might not fluff up as nicely.
- Safety First: While pompom making is relatively safe, scissors are involved, so it’s always good to supervise closely, especially if younger children are participating. Pre-cutting yarn strands for smaller kids can speed up the process and keep them focused on the fun part – wrapping and fluffing!
- Patience is Key: Remind your children (and yourself!) that it’s okay if the first few pompoms aren’t perfect. There’s a joy in learning and improving with each new creation. Turn mistakes into learning opportunities and encourage creativity and experimentation.
- Pacing the Project: Depending on the age and attention span of your children, consider breaking the project into manageable chunks. You can wrap the yarn one day, cut and tie the next, then decorate with the pompoms later. This keeps the experience fresh and fun without overwhelming younger crafters.
Cutting and Shaping Your Pompoms
Once you have bound and cut the yarn using the pompom maker, it’s time to give your pompom a haircut! Gently fluff out the strands and give it a good shake. You’ll then want to trim it into a neat sphere. Younger children might need help with this step – it’s a great opportunity for a mini lesson on symmetry and hand-eye coordination.
And don’t fret over stray pieces or uneven areas – every pompom has its own personality, and that’s part of the charm! As you trim, regularly turn the pompom in your hand to check for any long pieces. A good rule of thumb is to trim less initially; you can always cut more if needed.
Styling and Using Your Handmade Pompoms
Now comes the best part – deciding how to show off your fabulous pompoms. The options are limitless! You could attach them to the top of homemade hats, dangle them from backpacks, or string them into a gorgeous garland. Pompoms can also be fabulous additions to wrapped gifts, giving them a personal and playful touch.
Get your kids involved in this process too. Ask them where they would like to see their pompoms or what they want to do with them. Some might come up with ideas you hadn’t even considered, like creating a pompom pet with googly eyes or making a colorful pompom rug!
By making pompoms with your kids, you’re not just creating cute crafts but also making memories and developing skills. Pompom crafting encourages fine motor development, creativity, and patience. Plus, it’s a wonderful way for the whole family to bond over shared accomplishments. So, gather your materials, prep your space, and get ready to fluff your way to fun times and fuzzy creations!
See more great Things to Do with Kids in New Zealand here. For more information see here
Disclaimer
The articles available via our website provide general information only and we strongly urge readers to exercise caution and conduct their own thorough research and fact-checking. The information presented should not be taken as absolute truth, and, to the maximum extent permitted by law, we will not be held liable for any inaccuracies or errors in the content. It is essential for individuals to independently verify and validate the information before making any decisions or taking any actions based on the articles.


