
Get Ready for Slime-Time with This Easy PVA Glue Slime Recipe!
Hey there, awesome parents and fun-loving guardians! Are you ready to add a pinch of creativity to your family time? Making PVA glue slime is not just a fantastic activity that provides endless hours of enjoyment, but it’s also a sneaky little way to teach the kiddos about science! Don’t worry; we’re here to guide you through the magical journey of transforming simple household ingredients into ooey-gooey slime!
Why PVA Glue Slime Is a Great Choice for Family Fun
PVA (Polyvinyl Acetate) glue, widely known as white school glue, is the perfect base for making homemade slime. It’s safe, non-toxic, and easy to find. Plus, when you make slime at home, you have full control over the ingredients, ensuring it’s safe for your little ones’ delicate fingers.
Gather Your Magic Slime Ingredients
Before we dive into the concoction process, let’s make sure you’ve got everything you need. Here’s a simple checklist:
- PVA Glue: The star of our slime! Any brand of white school glue should do the trick.
- Baking Soda: This common kitchen ingredient helps thicken the slime.
- Contact Lens Solution: Make sure it contains boric acid and sodium borate, important for slime activation.
- Food Coloring (Optional): Want to jazz up your slime with some color? Get those food dyes ready!
- Glitter or Confetti (Optional): For an extra sparkly touch, gather some glitter or confetti.
Step-By-Step Guide to Slime-Sational Success
Now that our ingredients are lined up, let the fun begin! Follow these simple steps to slime perfection:
Step 1: The Gluey Beginning
Start with a bowl, ready to catch all your ingredients. Pour in the entire bottle of PVA glue. The amount of glue you use will determine the size of your slime batch, so feel free to adjust according to how much slime you want to make.
Step 2: A Dash of Baking Soda
Add a teaspoon of baking soda to the bowl and mix well. This is going to give your slime the right texture and firmness.
Step 3: Color Me Slimy
If you’re using food coloring or glitter, this is the moment to unleash the artist within. Add your chosen colors and sparkles to the mixture and stir until evenly distributed.
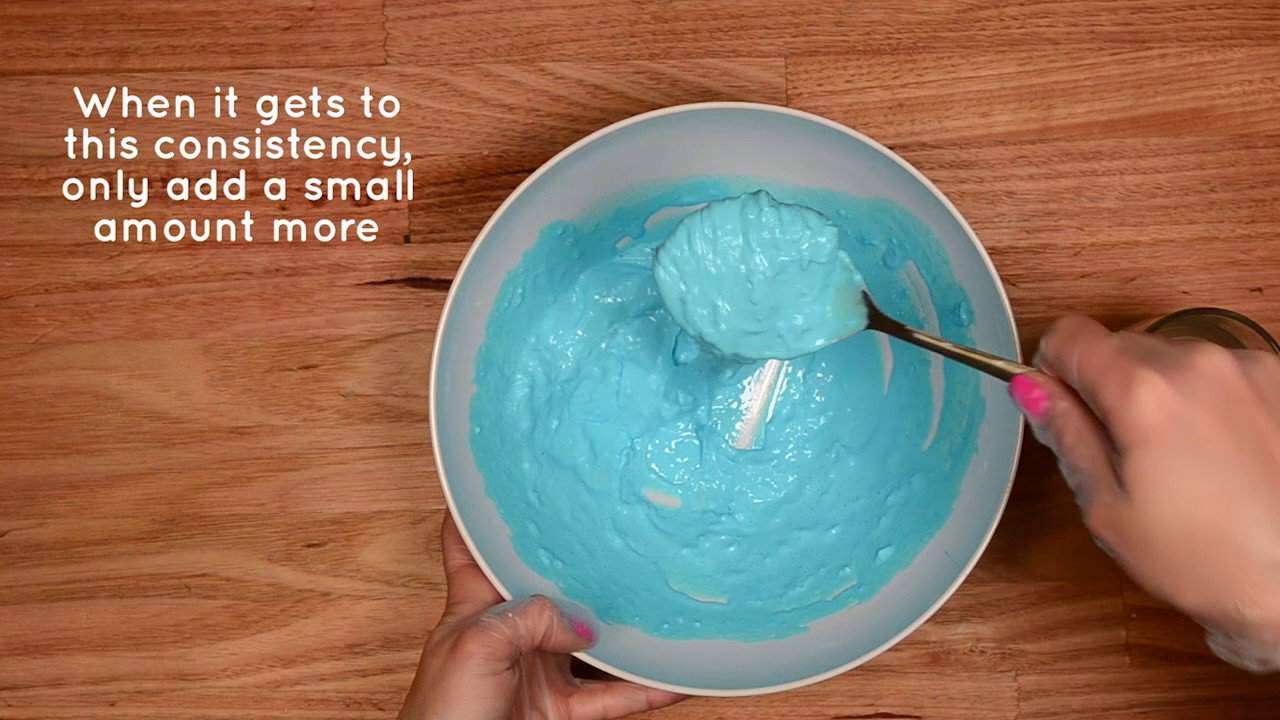
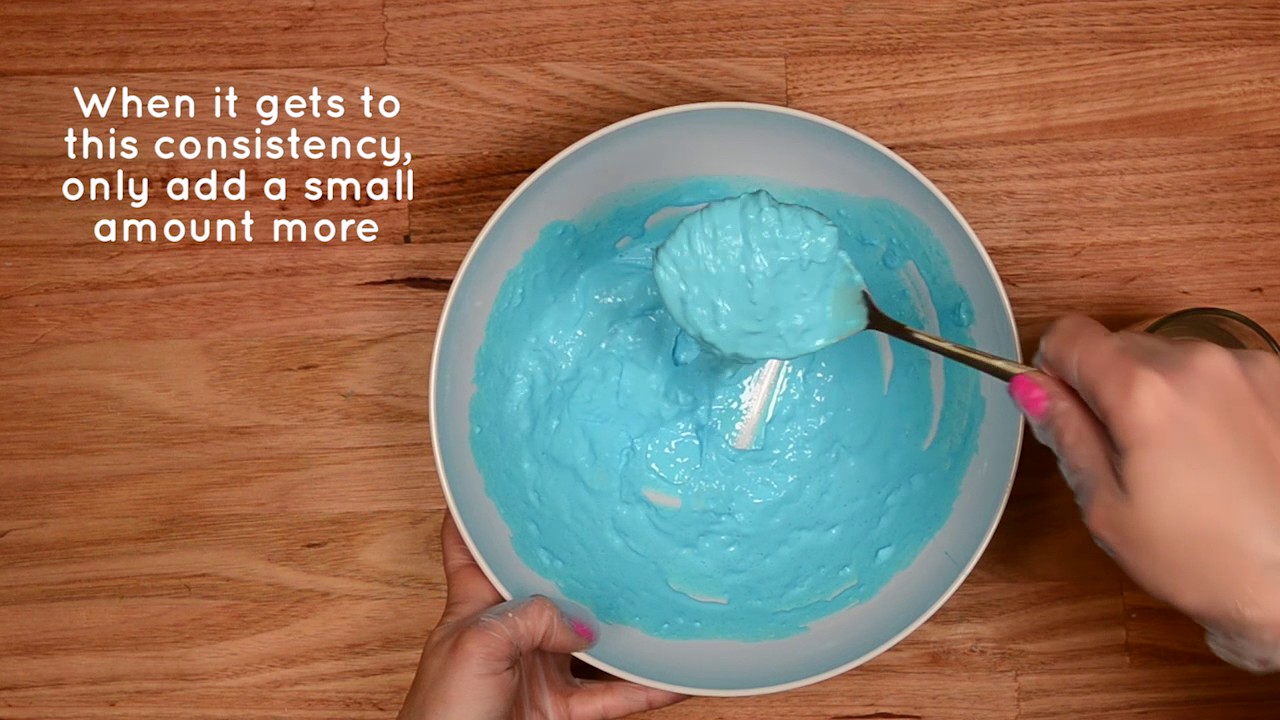
Step 4: The Activating Potion
Add a few drops of the contact lens solution to the bowl. This liquid contains the magical activators that will transform your glue mixture into slime. Stir continuously and watch the slime begin to form. You might need to add the contact lens solution incrementally, so keep it at hand.
If you’re ready to dive even deeper into the world of slime, keep reading for more tips, tricks, and even troubleshooting advice for common slime-making challenges. Together, we’ll make sure that your PVA glue slime adventure is a sticky success!
Remember, making slime is not just about following a recipe; it’s a chance to bond with your children, explore their creativity, and create memories that will stick (just like slime!) for a lifetime. So, roll up those sleeves, let your hair down, and prepare for some hands-on fun!
Stay tuned as we continue this goopy saga with advanced techniques, customization options, and answers to all your slimy queries!
Create Memorable Moments: Crafting PVA Glue Slime with Your Kids
Greetings, crafty parents and guardians! Are you on the lookout for an activity that’s sure to capture your children’s imagination and creativity? Look no further! Creating PVA glue slime is an entertaining, educational pursuit that provides both quality family time and a soft introduction to basic chemistry. So sit back, relax, because this ultimate guide is going to walk you through the ins and outs of making the perfect PVA glue slime!
Slime-making is a sensory treat that helps children develop fine motor skills and learn about science in a practical, hands-on way. And you, dear parent, get the satisfaction of facilitating this inventive play while ensuring a safe environment. Ready to embark on this slippery endeavor? Let’s get started!
Advantages of Homemade PVA Glue Slime
PVA glue is a widely available and safe adhesive, making it ideal for home slime projects. It’s the go-to ingredient for an easy, mess-free, and non-toxic slime experience. Crafting your own slime at home allows you to control the ingredients and avoid any unwanted chemicals, ensuring peace of mind as your kids squish and stretch their homemade goo.
Five Things Parents Should Know Before Making PVA Glue Slime
Before you begin your adventure into the realm of slime, it’s helpful to keep these essential tips in mind:
- Safety First: While PVA glue and the other ingredients used in slime are generally safe, it’s always best to supervise your children during the process to avoid ingestion or messes.
- Prep Your Space: Choose a comfortable area that can get a little messy. Cover your table with a washable cloth or craft mat and have paper towels at the ready for quick clean-ups.
- Ingredients Matter: Use quality PVA glue and ensure your contact lens solution contains both boric acid and sodium borate for a better slime consistency.
- Patience is Key: Slime doesn’t come together instantly. It might take some stirring and a little bit of time for the chemical reaction to run its course. Encourage your children to be patient.
- Storage Solutions: Have an airtight container ready to store your slime once it’s made. Proper storage extends the life of your slime, keeping it fresh for more playtime.
Let’s Start the Slime Party!
If you’ve gathered your squadron of little scientists and your workspace is prepped and ready, here’s how you can create the most wonderful slime together:
Beginning with the Base
Grab a clean bowl and pour in your desired amount of PVA glue. The more you add, the bigger the batch!
Thicken It Up
Sprinkle a teaspoon of baking soda into your glue. Blend it evenly for that perfect snappy texture.
A Splash of Personality
Time for a pop of color or a shimmer of glitter! Let your kids choose their favorite food coloring or glitter and mix thoroughly into the bowl.
The Magical Transformation
Slowly introduce a few drops of the contact lens solution to initiate the slime formation. Mix with dedication until you reach that satisfyingly sticky consistency.
Becoming a professional slime creator means going beyond the basics, adding your unique flair to this stretchy phenomenon. We’re covering all the know-how you need, from texture tweaks to mastering the perfect firmness.
Embarking on this slimy adventure isn’t just about effort and outcome—it’s about sharing laughter, fostering growth, and sculpting young minds. It’s about the moments where you’re all kneading together, engrossed in creativity, breaking the routine by making something extraordinary out of the ordinary.
Ready to push your slime skills to the next level? Stick with us, and we’ll explore the exciting universe of slime customization and playful experimentation. It’s slime to shine!
See more great Things to Do with Kids in New Zealand here. For more information see here
Disclaimer
The articles available via our website provide general information only and we strongly urge readers to exercise caution and conduct their own thorough research and fact-checking. The information presented should not be taken as absolute truth, and, to the maximum extent permitted by law, we will not be held liable for any inaccuracies or errors in the content. It is essential for individuals to independently verify and validate the information before making any decisions or taking any actions based on the articles.

