
#
A Fun Guide for Parents: How to Make Redskins Vodka at Home!
Hello fellow parents! We all know how important it is to have a little “me-time” now and again, don’t we? Well, today’s post is geared toward just that! We’re exploring how you can create your very own redskin vodka, right in the comfort of your home. Kiss goodbye to store-bought versions! And don’t worry – it’s a simple quick fix, whether you’re a cocktail guru or you’re mixing it for the first time. Let’s dive in!
##
Understanding the Redskins Vodka Charm
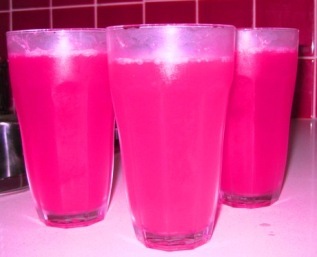
Are you wondering what the buzz around redskin vodka is? Well, people love this fist-punching flavor for its unique taste, adorable pink hue, and the rush of nostalgia it brings. The name comes from the “Redskin” lollies (or candy) used in its making, giving the vodka a sweet and delicious twist.
###
Why Make It At Home?
You might be thinking, “Sure, it sounds tasty, but why should I make it at home?” Well, the answer is simple. Homemade redskin vodka:
1. Gives you control over the sweetness level.
2. Is often more flavorful than store-bought variants.
3. Does not contain added preservatives or colors.
4. Helps you show off your creative cocktail skills!
##
Let’s Get Mixing: Redskins Vodka Recipe
Right then, it’s time to roll up our sleeves and get down to the business of making this enticingly pink concoction. Here’s a step-by-step guide that will help you through the process.
###
What You’ll Need:
Before we start, collect all the necessary items. You will need:
– A bottle of your favorite vodka
– A packet of Redskins lollies
– A large, sealable glass jar
– A funnel
– A fine mesh strainer
– Bottles for storing the finished product
###
Step-by-Step Guide:
1. Begin by unwrapping each of the Redskins lollies.
2. Place your unwrapped lollies in the sealable glass jar.
3. Using the funnel, pour vodka into the jar until the lollies are fully submerged.
4. Once you’ve added the vodka, seal the jar tightly.
The making process is that simple! Now get ready to wait as the lollies dissolve (this could take up to a week, so patience is key). After it’s all dissolved, strain through a fine mesh strainer, and your homemade redskin vodka is ready.
So there you have it, parents – the perfect guide to creating a fabulous redskin vodka right in your kitchen. With this terrific recipe, your next weekend relaxation or get-together with friends is undoubtedly going to be a hit! Enjoy!
Stay tuned for more fun and simple recipes to amp up your parents-only time. Cheers!
#
A Fun Guide for Parents: How to Make Redskins Vodka at Home!
Hello fellow parents! We all know how important it is to have a little “me-time” now and again, don’t we? Well, today’s post is geared toward just that! We’re exploring how you can create your very own redskin vodka, right in the comfort of your home. Kiss goodbye to store-bought versions! And don’t worry – it’s a simple quick fix, whether you’re a cocktail guru or you’re mixing it for the first time. Let’s dive in!
##
Understanding the Redskins Vodka Charm
Are you wondering what the buzz around redskin vodka is? Well, people love this fist-punching flavor for its unique taste, adorable pink hue, and the rush of nostalgia it brings. The name comes from the “Redskin” lollies (or candy) used in its making, giving the vodka a sweet and delicious twist.
###
Why Make It At Home?
You might be thinking, “Sure, it sounds tasty, but why should I make it at home?” Well, the answer is simple. Homemade redskin vodka:
1. Gives you control over the sweetness level.
2. Is often more flavorful than store-bought variants.
3. Does not contain added preservatives or colors.
4. Helps you show off your creative cocktail skills!
##
Let’s Get Mixing: Redskins Vodka Recipe
Right then, it’s time to roll up our sleeves and get down to the business of making this enticingly pink concoction. Here’s a step-by-step guide that will help you through the process.
###
What You’ll Need:
Before we start, collect all the necessary items. You will need:
– A bottle of your favorite vodka
– A packet of Redskins lollies
– A large, sealable glass jar
– A funnel
– A fine mesh strainer
– Bottles for storing the finished product
###
Step-by-Step Guide:
1. Begin by unwrapping each of the Redskins lollies.
2. Place your unwrapped lollies in the sealable glass jar.
3. Using the funnel, pour vodka into the jar until the lollies are fully submerged.
4. Once you’ve added the vodka, seal the jar tightly.
The making process is that simple! Now get ready to wait as the lollies dissolve (this could take up to a week, so patience is key). After it’s all dissolved, strain through a fine mesh strainer, and your homemade redskin vodka is ready.
So there you have it, parents – the perfect guide to creating a fabulous redskin vodka right in your kitchen. With this terrific recipe, your next weekend relaxation or get-together with friends is undoubtedly going to be a hit! Enjoy!
Stay tuned for more fun and simple recipes to amp up your parents-only time. Cheers!
Preparing to Make Redskin Vodka: A Guide for Parents
Creating delectable homemade spirits like redskin vodka can be an exciting project, especially when done carefully and safely. Here are five crucial things parents should be aware of and prepared for when deciding to venture into this DIY project:
1. Supervision is Key
Ensure that making redskin vodka is a strictly adult activity. Keep these efforts confined to a time when children are asleep or not within house to avert any accidents. You are dealing with alcohol, which should always be kept out from the reach of children.
2. Proper Tool Use and Safety
Familiarize yourselves with the tools you’ll need and how to use them properly. Typical requirements include a large glass jar, measuring cups, a sieve and most importantly, a bottle to store your homemade redskin vodka. Ensure these tools are clean and safe to use.
3. Select Quality Ingredients
Invest in quality ingredients. This means buying a good, pure vodka and real redskins. The pure vodka will serve as your base while the redskins will give your mixture a distinct, sweet flavor.
4. Time is a Major Ingredient
Remember that making redskin vodka is not an instantaneous process. After adding your redskins to the vodka, grant it ample time to infuse. This might take a few days, or even a week, depending on the strength of flavor you wish to attain.
5. Consider Health Factors
While fun to make and delightful to taste, always bear in mind the health implications. Vodka, including redskin vodka, should be consumed moderately. Also, consider allergies: make sure you’re aware of any potential allergic reactions to the redskins or any other ingredients you’re using.
By keeping these five preparation tips in mind, parents can ensure a safe and successful experience making their own delicious redskin vodka. Happy infusing!
For more great articles please see here. For more information see here
Disclaimer
The articles available via our website provide general information only and we strongly urge readers to exercise caution and conduct their own thorough research and fact-checking. The information presented should not be taken as absolute truth, and, to the maximum extent permitted by law, we will not be held liable for any inaccuracies or errors in the content. It is essential for individuals to independently verify and validate the information before making any decisions or taking any actions based on the articles.


