
Ultimate Slime Recipe Guide for Parents: Easy and Fun DIY Slime
Hello there, awesome parents! Are you ready to dive into the gooey, squishy, and utterly fascinating world of slime? It’s not just a glob of sticky joy for the kiddos; it’s a fantastic way to bond and create lasting memories. Plus, the sensory play is phenomenal for their development. So, let’s roll up those sleeves and get ready for some slimy fun!
Why Slime?
Slime isn’t just a toy, it’s an experience. It stretches, it oozes, it bounces, and it can even make funny noises. By joining your kids in this creative adventure, you’re not only giving them a plaything but also stimulating their imagination and sense of wonder. Plus, making slime is a sneaky way to teach science concepts like non-Newtonian fluids (but shhhh, we don’t need to tell the kids that!).
Getting Started: Slime-Making Essentials
Before we jump into the actual recipes, it’s important to gather all the necessary ingredients. Here’s a quick checklist to ensure you have everything you need:
- Glue (white or clear PVA works best)
- Baking soda
- Contact lens solution (containing boric acid and sodium borate)
- Food coloring (for that pop of color)
- Glitter or confetti (optional, for that glam slime)
- Bowls and mixing utensils
- Measuring spoons
Now that we’ve got our slime lab ready let’s dive into the recipes.
The Classic Fun: Simple Slime Recipe
Our first recipe is the classic slime that’s perfect for beginners. Here’s how to whip it up:
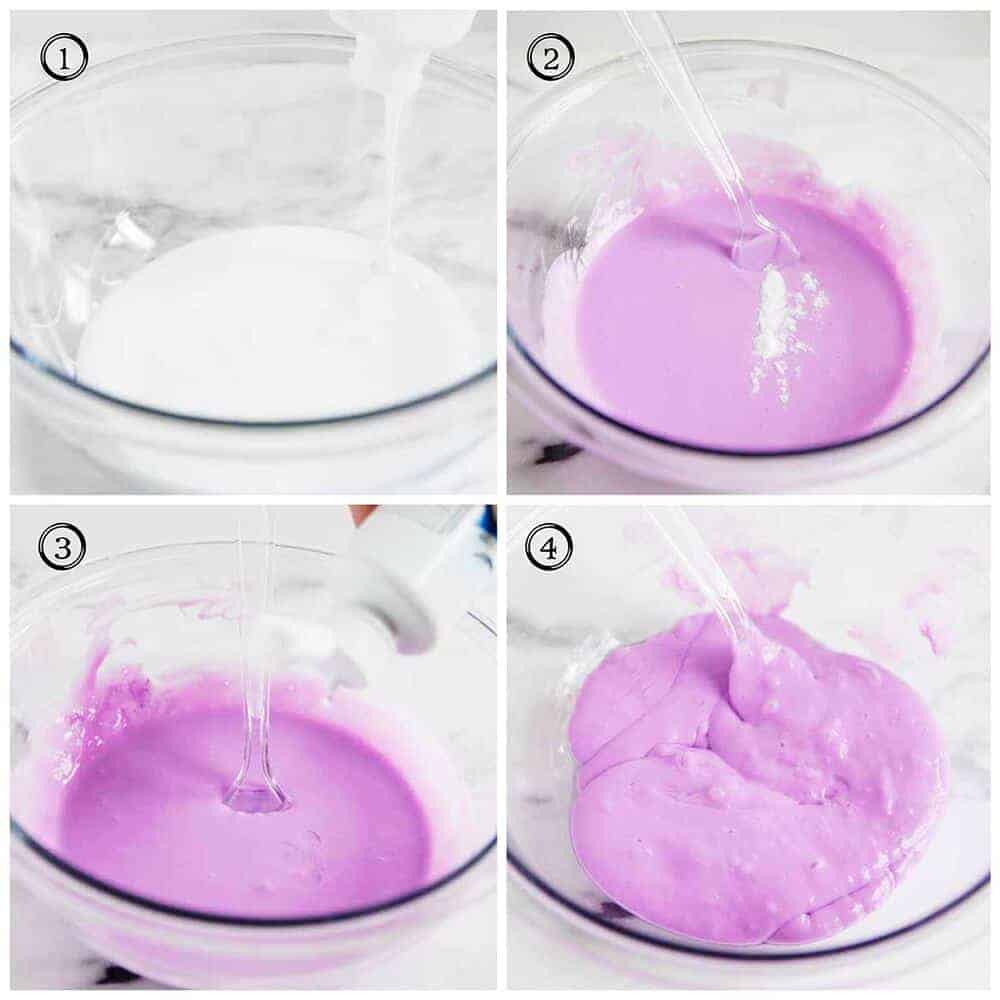
- Start with 1/2 cup of PVA glue in a bowl.
- Add a few drops of your favorite food coloring and mix.
- Sprinkle 1/2 teaspoon of baking soda into the mix and stir.
- Slowly add in 1 tablespoon of contact lens solution. Stir continuously until the slime begins to form.
- Once it starts pulling away from the edges of the bowl, it’s time to knead! Take it out and use your hands to work it into that iconic slimy texture.
Voilà, you’ve just made your very own classic slime!
The Sparkly Twist: Glitter Slime Recipe
Want to add some sparkle to your slime? Here’s how:
- Begin with 1/2 cup of clear PVA glue for that transparent look.
- Add your choice of glitter or confetti into the glue and mix well.
- Mix in 1/2 teaspoon of baking soda.
- Gradually mix in 1 tablespoon of contact lens solution. Keep stirring until it starts to form.
- Knead the sticky mixture until it becomes less sticky and more like slime.
This glittery concoction is not just fun to play with but absolutely gorgeous to look at!
Safety First
Before we continue with more recipes, let’s talk safety. Making slime is generally safe, but there are a few precautions you should take:
- Always supervise your kids during slime-making. It’s not edible and should not be put in the mouth.
- If your child has sensitive skin, consider wearing gloves as some kids might react to the contact lens solution used in the recipes.
- Be mindful of the ingredients you’re using and ensure they’re non-toxic and safe for your child’s use.
- Keep slime away from fabrics and hairy pets — it’s a nightmare to get out!
Now, with the safety box ticked, let’s get back to more slime magic!
We’re just getting started, and there are more exciting recipes on the way – from fluffy slime that feels like a cloud in your hands to edible slime that is as fun to make as it is to eat (for real, you can actually eat it!). So, stick around, and let’s turn your home into the best slime factory ever!
Five Things Parents Should Know Before Making Slime
Parents, before you embark on this squishy journey, here are five golden nuggets of wisdom to make your slime-making adventure a success:
1. Choose the Right Environment
Find a space that’s easy to clean. A kitchen countertop, a plastic tablecloth-covered dining table, or outdoor areas work great. You’ll thank yourself later when cleanup time rolls around. Slime has a knack for getting everywhere, and being prepared will save you from a sticky situation.
2. Prep Your Ingredients in Advance
Having all your slime ingredients measured and ready to go can make the process smoother and more enjoyable for everyone involved. It’s like having your own cooking show setup, but for slime! It also helps minimize the mess and prevents any last-minute scrambles for missing ingredients.
3. Allergies and Sensitivities Matter
Check the ingredients list for any potential allergens. If your child has sensitive skin, the contact lens solution (which contains boric acid) may cause irritation, so wearing gloves might be a good precaution. Alternatively, you can look for gentler slime recipes that do not require boric acid.
4. Creativity Is Key, But So Is Consistency
Slime-making is not just science; it’s an art. Encourage your kids to experiment with colors, add-ins like beads or foam balls, and different textures. However, sticking to the recipe’s ratios is crucial for achieving the right slime consistency. Too much of any ingredient can turn your perfect slime into a gloppy mess or a rubbery ball.
5. Storage Solutions
After creating your slime masterpieces, you’ll want to store them properly. Airtight containers or zip-lock bags work wonders for keeping slime fresh and ready for the next play session. Oxygen is the arch-nemesis of slime, drying it out and turning it into a sad, crumbly shadow of its former glory.
Keep the Fun Going: More Slime Variations
If your slime enthusiasts are craving variety, fear not. The world of slime offers endless possibilities. For instance, add shaving cream to your basic slime recipe for a fluffy, mousse-like version or mix in a bit of cornstarch for a more moldable, putty-like texture. Want your slime to smell divine? A few drops of essential oils can do the trick (just make sure they’re safe for your child).
Remember, partaking in this gooey pastime isn’t just about the end product; it’s the laughter, the silly mistakes, and the joint discovery that counts. Each batch of slime holds a special memory, a shared giggle, or a triumphant high-five. It’s these moments that will stick (pun intended!) much longer than any slime could ever adhere to your furniture.
So go ahead, mix that concoction and marvel at the magic that unfolds in your very hands. Delight in the squeals of excitement as the first slime bubble pops. But most importantly, revel in the knowledge that today, in the grand adventure that is parenthood, you’re nailing it!
Happy slime-making!
. For more information see here
Disclaimer
The articles available via our website provide general information only and we strongly urge readers to exercise caution and conduct their own thorough research and fact-checking. The information presented should not be taken as absolute truth, and, to the maximum extent permitted by law, we will not be held liable for any inaccuracies or errors in the content. It is essential for individuals to independently verify and validate the information before making any decisions or taking any actions based on the articles.


