
Let’s Get Slimy: Your Easy-Peasy Guide to Homemade Slime!
Hey there, Awesome Parents!
If you’re looking to create some ooey-gooey memories with your kiddos, you’ve stumbled upon the perfect read! Welcome to our slime-tastic world, where we promise to keep things simple, mess-minimized, and laughter-maximized. Prepare to be crowned the coolest parent on the block!
Before we dive into the colorful abyss of slime making, let’s go over what you’ll gain from this delightful activity:
- Creativity Boost: Slime offers a world of texture, color, and sparkles that can ignite imaginative play and artistic expression!
- Sensory Play: Kids adore the squish and squash of slime. It’s an excellent way for them to explore their senses and develop fine motor skills.
- Science Fun: Concocting slime is like a mini chemistry lesson! Introduce basic principles of materials and reactions in a hands-on way.
- Quality Time: Making slime together is a bonding experience. Chat, laugh, and create special moments you’ll treasure forever.
Now, without further ado, let’s get to the star of the show—making the slime! Here’s what you’ll need to get started:
Slime Ingredients:
- Glue: Good old PVA white or clear school glue works wonders. It’s the base of our slime creations.
- Activator: This is the magic ingredient that transforms glue into the slime. Common activators are borax solution, liquid starch, or contact lens solution containing boric acid.
- Coloring: Food coloring or paint will bring your slime to life. Go as bold or as pastel as you wish!
- Add-ins: Glitter, beads, foam balls, and scents all add a little extra pizzazz to your slime. They’re totally optional but totally fun!
Safety note: Always supervise your children during slime play, and ensure they wash their hands after handling slime. For children with sensitive skin, non-borax options are advisable.
Simple Slime Recipe:
All right, the sleeves are rolled up, the table’s covered, and the excitement is palpable. Here’s a basic slime recipe to kickstart your slimy adventure:
Classic Borax Slime
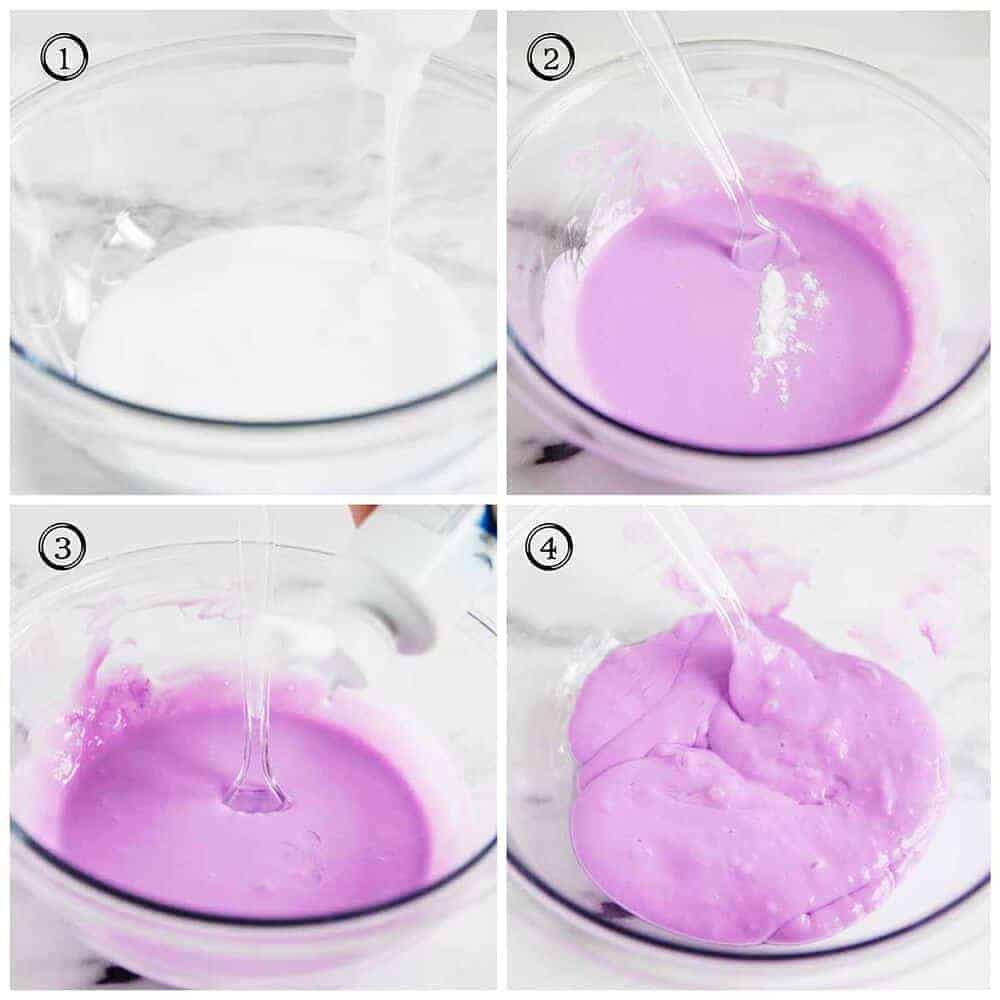
- In a bowl, mix 1/2 cup of white or clear glue with 1/2 cup of water until well combined.
- Stir in your choice of food coloring and glitter, if desired.
- In a separate container, dissolve 1/4 teaspoon of borax powder in 1/2 cup of warm water.
- Slowly add the borax solution to the glue mixture, stirring constantly.
- Watch the mixture clump together as you stir—this is your slime forming! Once it begins to pull away from the sides of the bowl and is hard to stir, take it out of the bowl.
- Now, the hands-on fun begins. Knead the slime until it reaches your desired consistency. If it’s too sticky, add a little more activator sparingly until it’s just right.
Voilà! You’re officially a slime connoisseur! But we’re not stopping there, no siree! In the next part of our guide, we’ll explore variations, troubleshooting tips, and how to store your gooey masterpiece for lasting fun. So, stick around, brave slime-charmers, we’ve just begun to unlock the squishy universe of homemade slime!
And remember, the journey of slime is as important as the slimey destination—have fun and enjoy the giggles!
5 Things Parents Should Know in Preparing for How to Make Slime Simple
-
Set the Scene for Slime Time
Slime making can get a bit messy, but that’s part of the fun! To keep the chaos contained, cover your work area with newspapers, plastic sheets, or a disposable tablecloth. Wear old clothes or aprons to protect your wardrobe, and have paper towels on hand for quick cleanups. Embrace the mess—it’s a perfect chance to teach the little ones that it’s okay to get a bit untidy when being creative.
-
Gather All Materials Beforehand
Have all your slime ingredients and tools ready to go before you start. Scrambling for supplies mid-process can disrupt the slime-making magic. Make sure you have bowls, spoons, measuring cups, and any add-ins your heart desires. Let your kiddos pick their favorite colors and textures—it empowers them in their creative journey.
-
Understand the Science
Knowing a bit about the science behind slime can not only satisfy your own curiosity but also help you answer those inevitable “why” questions from the kids. Slime is a non-Newtonian fluid that acts like both a solid and a liquid. When you add the activator to the glue, it creates polymer chains—long strings of molecules that give slime its stretchy and gooey properties. Science is cool, and now you’re the professor of polymer fun!
-
Keep Safety in Mind
Always use child-safe, non-toxic ingredients when making slime. If using borax, it must be diluted and handled properly. Non-borax recipes might be preferable for younger children or those with sensitive skin. It’s also important to remind the kids not to eat the slime or put it near their mouths. Washing hands after playing with slime is a must. Stay safe, play safe!
-
Be Ready for Trial and Error
Part of the fun in making slime is finding the perfect consistency for you and your kids. Slime can turn out too sticky, too runny, or too tough. Don’t worry! If the slime is too sticky, add more activator little by little. If it’s too runny, add more glue to balance it out. If it’s too tough, a bit of warm water can soften it. Be patient, experiment, and enjoy the process of perfecting your personalized slime.
Slime Variations: Let’s Mix it Up!
Now that you’ve mastered the classic borax slime, let’s delve into the world of creative variations your kids will love:
Fluffy Slime: The Cloud-like Wonder
- Add shaving cream to your glue in a 1:1 ratio for a fluffy, cloud-like texture that’s incredibly satisfying to squish.
- Follow the same steps with the activator as the classic recipe.
- Mix in some food coloring for a dreamy pastel cloud or a vibrant burst of color.
Glitter Galaxy Slime: Sparkle and Shine
- Start with clear glue to let the glitter really show through.
- Go wild with all the glitter—mix in different sizes, shapes, and colors for a truly cosmic effect.
- Follow the basic steps, and watch as your glitter galaxy comes to life.
There are countless ways to customize slime—think glow in the dark, thermochromic (color-changing), magnetic, and so much more. Encourage your kids to come up with their own unique ideas. Who knows? They might just invent the next big slime trend!
Slime Troubleshooting: Sticky Situations Solved
Even slime experts sometimes face goo-related hiccups. If your slime isn’t quite right, here’s how to troubleshoot:
- Too Sticky: Slowly add more activator until the consistency improves. A little goes a long way!
- Too Liquid: Add more glue to the mixture, bit by bit, to thicken it up.
- Too Brittle: Knead in a splash of warm water to make it more pliable.
Remember: Experimentation is key. Each batch of slime can be a little different, and that’s the beauty of it!
Storing Your Slime: Keep the Fun Going
Once your slime-making session is over, storing it properly will ensure it stays fresh for the next playtime. Place your slime in an airtight container or a zip-lock bag, and keep it in a cool, dark place. If your slime starts to dry out, a little bit of water kneaded in can revive it. If it becomes too watery, add a touch of activator or glue.
There you have it, fabulous slime creators! You’re not only equipped to whip up the simplest, most delightful slimes, but you now also have the insider know-how to keep your slime in peak squishy condition for days to come. Get ready to roll up your sleeves, bond with your kids, and add a little slime wonder to your family’s crafty repertoire. The possibilities are endless, and the fun is just beginning!
See more great Things to Do with Kids in New Zealand here. For more information see here
Disclaimer
The articles available via our website provide general information only and we strongly urge readers to exercise caution and conduct their own thorough research and fact-checking. The information presented should not be taken as absolute truth, and, to the maximum extent permitted by law, we will not be held liable for any inaccuracies or errors in the content. It is essential for individuals to independently verify and validate the information before making any decisions or taking any actions based on the articles.


