
Ultimate Guide to Making Slime at Home: Fun and Easy Recipes
Welcome, creative parents and curious kiddos! You’re on the cusp of becoming slime connoisseurs, and we can’t wait to dive into this gooey adventure with you. The joy of making slime at home is unparalleled—whether it’s the squishy feel, the vibrant colors, or the mesmerizing ooze, there’s something about this stretchy substance that captivates children and adults alike.
What You Need to Start Your Slime Journey
No need to fret over lengthy shopping lists or obscure ingredients; we bet you have most of what you need for basic slime right in your own home. Here’s a quick checklist to get you started:
- Basic white or clear school glue
- Baking soda
- Contact lens solution (make sure it contains boric acid)
- Food coloring (for that pop of color!)
- Glitter (if you want some sparkle)
- Measuring spoons and cups
- Mixing bowl and spatula or spoon
These simple ingredients will set the foundation for your basic slime, and later on, you can experiment with various add-ons for different textures and effects!
Basic Slime Recipe: Your First Step to Slime Mastery
Ready to get gooey? This standard recipe is foolproof—ideal for first-time slimers and a great base for more complex creations.
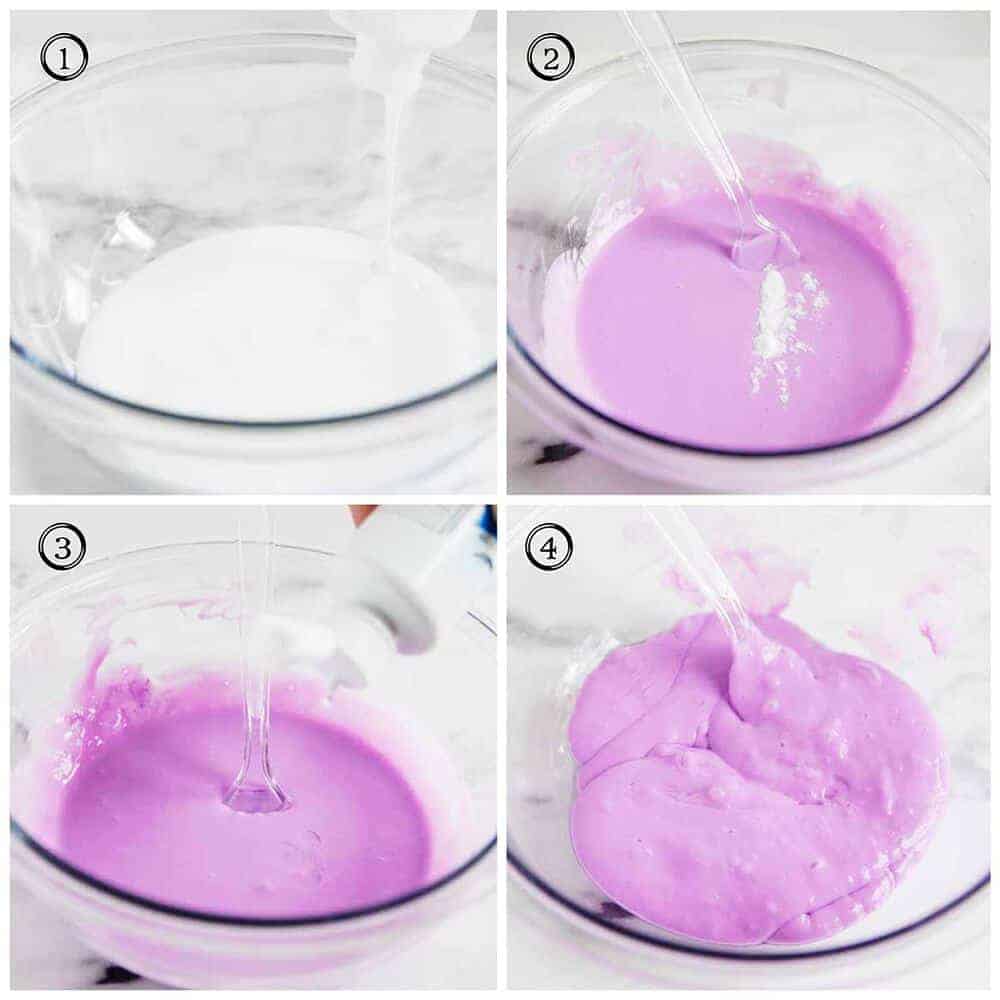
- Pour 1/2 cup of glue into your mixing bowl.
- If you’re using food coloring or glitter, now’s the time to add it. Stir your desired amount into the glue until evenly distributed.
- Add 1/2 teaspoon of baking soda to the glue mixture, stirring until fully mixed.
- Start adding your contact lens solution. Begin with 1 tablespoon, and mix it in until the slime starts to form and pull away from the sides of the bowl. If your slime is still too sticky, add another 1/2 tablespoon and mix thoroughly. Repeat this step as necessary, but be cautious—as adding too much can make the slime stiff and less pliable.
- Once the slime has formed, take it out of the bowl and start kneading it with your hands. If it’s still too sticky, add a drop or two of contact lens solution to your hands.
- Voilà! You’ve just made your first batch of homemade slime! Feel free to squish, stretch, and play with your new creation.
Slime Safety Tips: Fun Without the Fuss
While slime making is generally safe, we like to stick to a few simple rules to ensure everyone has a good time:
- Always supervise young children during the slime-making process.
- Keep raw materials and finished slime away from pets.
- Wash hands thoroughly after playing with slime, especially before eating.
- If using borax powder in any recipes, handle with care, as it can be an irritant. We’ve opted for contact lens solution here, which is a safer alternative when used properly.
- Avoid putting slime on fabrics and surfaces that may stain or be difficult to clean.

Welcome to the Ultimate Guide to Making Slime at Home!
Hey there, wonderful parents and awesome kiddos! Get ready to roll up your sleeves and dive into the whimsical world of slime-making! It’s fun, easy, and a perfect activity for some family bonding time. This guide is here to walk you through the exciting process of concocting your very own slime right at home—let the fun begin!
Five Things Every Parent Should Know Before Making Slime
Before you embark on your homemade slime adventure, here are five essential tips to prepare you for a smooth and enjoyable experience:
- Plan for Mess: Choose a workspace that’s easy to clean, and lay down newspapers or plastic sheets to catch any spills. Remember, making slime can be a messy affair, but that’s part of the fun!
- Ingredient Quality: Make sure your ingredients are fresh, especially the glue and contact lens solution, as they are the key for perfect slime consistency.
- Batch Size: Start with smaller batches to perfect your recipe before making larger quantities. This will help you conserve ingredients and make adjustments more easily.
- Customization Options: Have extra mix-ins like food coloring, glitter, and beads on hand. Slime is not just about the texture—it’s about unleashing creativity!
- Storage Solutions: Store your slime in airtight containers to keep it fresh and to prevent it from drying out. Labeling containers with creation dates helps manage your slime inventory.
By keeping these tips in mind, you’re all set to make the slime-making process as seamless as possible.
DIY Basic Slime Recipe – A First-Time Slimers’ Delight
Eager to make your very first batch of slime? Here’s the ultimate beginner-friendly recipe to kick off your slimy creations:
- Begin with 1/2 cup of your chosen glue in a mixing bowl.
- Add in your favorite colors or glitter to the glue, mixing thoroughly for an even hue and sparkle.
- Gently stir in 1/2 teaspoon of baking soda to the mix for better consistency.
- Time for some magic—gradually mix in 1 tablespoon of contact lens solution. If your slime feels sticky, add a smidgen more until it’s just right.
- Pull the slime out and knead it with clean hands. Add a tad more contact lens solution if needed.
- Celebrate! Your homemade slime is ready for playtime. Stretch it, roll it, or make art—the sky’s the limit!
Exciting Slime Variations to Try at Home
Once you’ve mastered the basic recipe, why not dive into some thrilling variations? Here are a few ideas to get your creative juices flowing:
- Fluffy Slime: Add shaving cream into your basic recipe for a fluffier, softer texture that’s simply delightful.
- Magnetic Slime: Mix in some iron filings and watch your slime dance with a magnet—science has never been so entertaining!
- Glow-in-the-Dark Slime: Use glow-in-the-dark paint or pigment to create slime that lights up the night.
- Textured Slime: Throw in foam beads or rice grains for a sensory twist that’s perfect for tactile exploration.
- Edible Slime: Choose edible ingredients like marshmallows or gummy bears for slime that’s safe-TASTIC to eat (with adult supervision)!
These are just a sprinkle of what you can do. With a dash of imagination, you can whip up a slime that’s uniquely yours!
Slime Safety Tips: Ensuring a Worry-Free Experience
Your child’s safety is paramount during the slime-making process, so here are some key points to keep in mind:
- Adult supervision is vital at all times, especially for the little ones.
- Use child-friendly and non-toxic ingredients to avoid any potential mishaps.
- After the slime playtime is over, ensure everyone washes their hands properly.
- Store slime out of reach of pets and small children when not in use.
- Designate a specific play area to prevent slime from getting on household surfaces that could be difficult to clean.
Cleanup and Storage: Keeping Your Slime Fresh and Home Clean
After enjoying countless hours of slimy fun, it’s essential to tidy up and store your creations properly. Here are some practical tips:
- Clean as You Go: Mix your slime on a washable surface and keep wipes or damp cloths handy for quick cleanups.
- Proper Storage: Containers with tight seals are perfect for keeping your slime in tip-top shape for the next play session.
- Stain Prevention: Be cautious of using slime on certain fabrics or areas of the house—it can be tricky to remove once set!
- Slime Care: If your slime starts to dry out, a little bit of water or contact lens solution can bring it back to life.
- When in Doubt, Toss it Out: Slime does not last forever. When it’s time to say goodbye, dispose of it responsibly to avoid plumbing issues.
See more great Things to Do with Kids in New Zealand here. For more information see here
Disclaimer
The articles available via our website provide general information only and we strongly urge readers to exercise caution and conduct their own thorough research and fact-checking. The information presented should not be taken as absolute truth, and, to the maximum extent permitted by law, we will not be held liable for any inaccuracies or errors in the content. It is essential for individuals to independently verify and validate the information before making any decisions or taking any actions based on the articles.


