
Fun-Filled Adventure into Homemade Slime Making for Kids and Parents Alike!
Hey there, super parents! Are you ready to dive into the gooey world of homemade slime? It’s the perfect mix of science and fun, and it’s guaranteed to bring on heaps of giggles and maybe a gasp or two. Not only is making slime an incredibly fun past-time, but it’s also a stellar way to introduce your kids to basic chemistry concepts – talk about a win-win!
Stick with us, and you’ll be the coolest, slime-savvy parent on the block. We’ll guide you through the simple steps to create the ooziest, gooiest, most Instagram-able slime ever. Grab your spatulas, roll up your sleeves, and let the slime extravaganza begin!
What You’ll Need to Get Started
- Glue – The backbone of any slime recipe, white school glue works wonders.
- Baking soda – This household staple is your ticket to slime perfection.
- Contact lens solution – Make sure it contains boric acid, as it’s the secret activator!
- Food coloring (optional) – To add that pizzazz to your slime, let your imagination run wild with colors!
- Glitter (optional) – Because who doesn’t love a little sparkle in their slime?
- A mixing bowl and spatula – Your magic wands to mix up the potion!
Basic Safety Tips Before You Begin
Even though slime-making is a hoot, we need to keep safety at the forefront, especially with our curious little ones. Here are some quick tips to ensure your slime adventure is as safe as it is fun:
- Always supervise your children during the slime-making process.
- Be mindful of any allergies and avoid ingredients that may cause reactions.
- Wash your hands before and after making slime.
- Do not allow children to eat any of the slime ingredients or the slime itself.
- Always make slime in a well-ventilated area.
Let’s Make Some Basic Slime!
To kick things off, we’ve got a basic slime recipe that’s simple enough for even the littlest hands to help out with. Follow these steps and you’ll be on your way to slime glory:
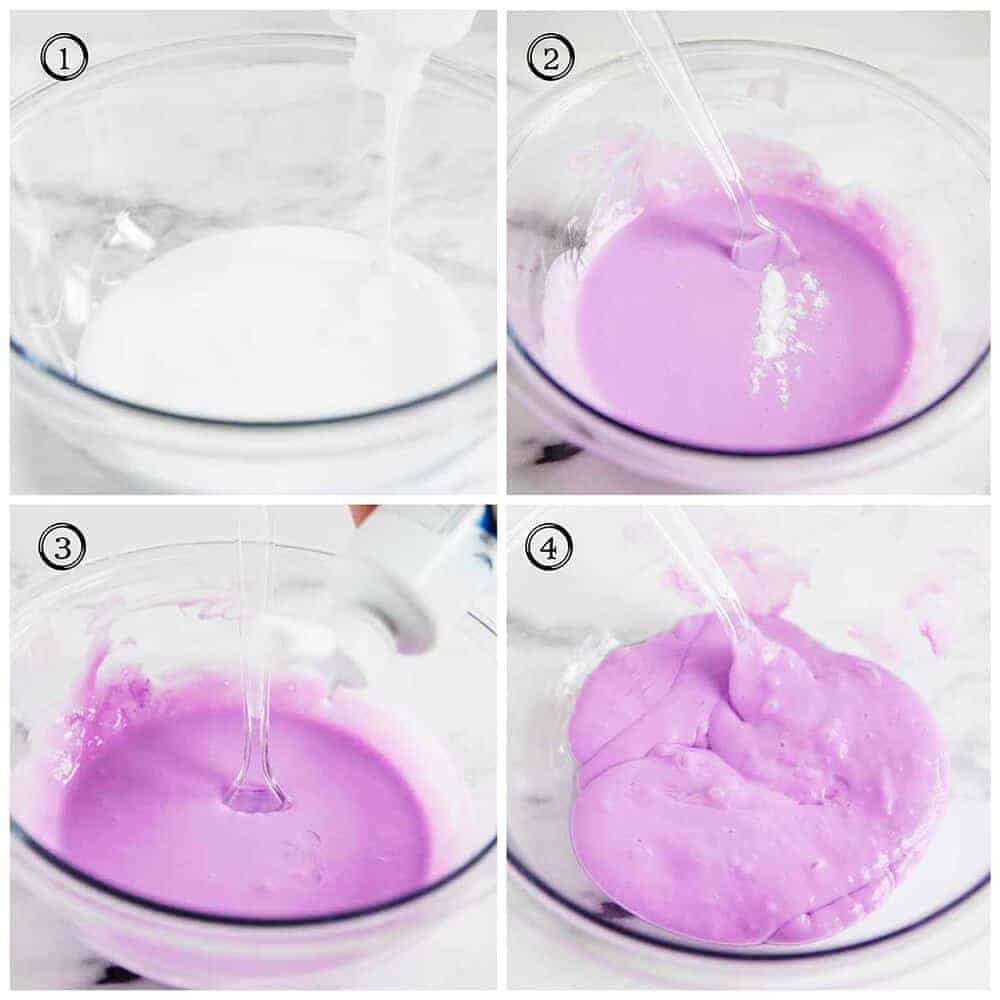
- In a large mixing bowl, pour one cup of white school glue.
- Add a drop or two of your choice of food coloring – this is where the magic starts to happen!
- Stir in half a teaspoon of baking soda, and mix it all up until well combined.
- Now, it’s time for the activator. Add in one tablespoon of contact lens solution to the mixture. You’ll begin to see the slime forming right before your eyes!
- Keep mixing until the slime begins to pull away from the sides of the bowl. When it starts to clump together, you’ll know you’re on the right track.
- Get hands-on! Knead the slime with your fingers until it reaches the desired consistency. If it’s too sticky, you can add a little more contact lens solution, but be careful – a little goes a long way!
- If you’re feeling extra, sprinkle in some glitter for that mesmerizing, sparkly effect.
Voila! You’ve now got yourself a batch of fresh, squishy homemade slime. But wait, there’s more! Slime comes in all sorts of varieties, and we’re here to walk you through every single one.
Ready to explore more exciting recipes? Stay tuned as we unveil some super cool slime variations, including fluffy slime, butter slime, and even edible slime (because we know someone is going to try a taste-test, no matter how much we say not to!). The adventure continues with more gooey-goodness just around the corner.
Have you caught the slime fever yet? Well, there will be no turning back after you see what else you can create with just a few household ingredients. Let’s keep the fun rolling as we delve into more extraordinary slime-making tips and tricks!
5 Things Parents Should Know When Preparing to Make Slime at Home
Before you embark on this slime-making journey, here are five essential pointers to keep in mind:
- Understanding the Ingredients: It’s crucial to get to know the ingredients you’re working with. Some slime recipes call for borax, which can be a skin irritant. The basic recipe we provided uses contact lens solution instead, which contains a much lower concentration of boric acid and is considered safer for kids. Reading labels and knowing the purpose of each component can help you make informed choices for your family’s safety.
- The Importance of Measurements: Slime making is a bit like baking – proportions matter! Encourage your kids to measure the ingredients accurately, as this can affect the final product’s quality. Too much of an activator like contact lens solution, and your slime could turn rock solid.
- Customization and Creativity: Slime offers endless possibilities for customization. Whether you’re adding food coloring, glow-in-the-dark paint, beads, or foam balls, the sky’s the limit. Use this opportunity to let your child’s creativity shine, encouraging them to experiment with colors, textures, and additions to personalize their slime.
- Preparation and Clean-Up: Have a dedicated space for making slime, preferably a surface that’s easy to wipe down. Non-porous countertops, silicone mats, or even a covered table can make clean-up a breeze. Keep a roll of paper towels or cleaning wipes handy for any surprise spills.
- Storage Solutions: Once your slime is made, it’s important to store it properly to keep it fresh. Airtight containers or zip-lock bags are perfect for keeping your slime from drying out. Also, this step ensures that your creations are ready for play at any time without any fuss!
Advanced Slime Recipes for the Brave and Bold
When you and your kids have mastered the basic slime recipe, it’s time to graduate to the next level of slime-making mastery. Here are some fantastic adventures awaiting in the world of advanced slime:
- Fluffy Slime: For a delightful texture, fluffy slime is the way to go. All you need to add to your basic recipe is shaving cream! This gives the slime a fluffy, cloud-like feel that is sure to bring joy to little ones.
- Butter Slime: If you want a spreadable, smooth texture, butter slime is your friend. You’ll add a touch of soft clay to your basic slime recipe to achieve a buttery consistency that is oddly satisfying to squish and spread.
- Magnetic Slime: Incorporate iron oxide powder into your slime, and watch as it reacts to magnets! This type of slime is not only fun but introduces children to the wonders of magnetism.
- Glow-in-the-Dark Slime: Add a splash of glow-in-the-dark paint to your slime mix, and shut off the lights for a mesmerizing experience. It’s great for sleepovers and nighttime play!
- Edible Slime: If you’ve got younger kids who are tempted to taste, then edible slime is a safe alternative. Made with gummy candy, cornstarch, and powdered sugar, this slime is safe to eat—but you’ll still want to moderate the sugar intake!
Remember, each new type of slime comes with its own set of instructions and ingredient tweaks, so follow those recipes closely for the best results. As you adventure through these various concoctions, you’ll find that each batch of slime is a unique and exciting creation that you’ve developed together with your kids.
Slime-making is more than just a plaything. It’s a hands-on activity that sparks creativity, teaches the basics of chemistry, and results in hours of fun. So what are you waiting for? Let’s get slimy!
See more great Things to Do with Kids in New Zealand here. For more information see here
Disclaimer
The articles available via our website provide general information only and we strongly urge readers to exercise caution and conduct their own thorough research and fact-checking. The information presented should not be taken as absolute truth, and, to the maximum extent permitted by law, we will not be held liable for any inaccuracies or errors in the content. It is essential for individuals to independently verify and validate the information before making any decisions or taking any actions based on the articles.


