
How to Make Slime Easy: A Fun and Simple Guide for Parents
Hey there, amazing parents and crafty kiddos! Are you ready to dive into the squishy, stretchy, and sensational world of slime? Making slime at home is not only an incredibly fun activity that can spark creativity and imagination in your little ones, but it’s also a fabulous way to learn a little bit about science in the process. Don’t worry, you don’t need to be a wizard in the kitchen or a scientist in the lab to make some awesome slime. I’m here to guide you through the easy peasy process, step-by-step!
The Ultimate Slime Recipe for Beginners
Before we get our hands gooey, let’s ensure we have all the ingredients and tools needed for our super simple slime recipe. Don’t fret; you probably have most of these items lying around your house already!
Ingredients and Tools:
- 1/2 cup of non-toxic PVA glue (That’s your standard school glue, folks!)
- 1/2 cup of water (Just turn on that tap and you’re golden.)
- 1/4 cup of liquid starch (This magic potion is the key to slime success.)
- Food coloring (Any color your heart or, more importantly, your kiddo’s heart desires.)
- Glitter or small beads for some extra pizazz (Totally optional but super fun!)
- A mixing bowl (For concocting your slimy masterpiece.)
- A mixing spoon or spatula (Unless you want to get your hands messy right from the start.)
- Measuring cups (Accuracy is kinda important here.)
- Airtight containers for storage (Because you’ll want to play with your slime again and again.)
Step-by-Step Slime Making Fun
Alright, all-star, it’s time to create some slime! Here’s a simple guide that will have you and the kiddos doing the happy dance in no time.
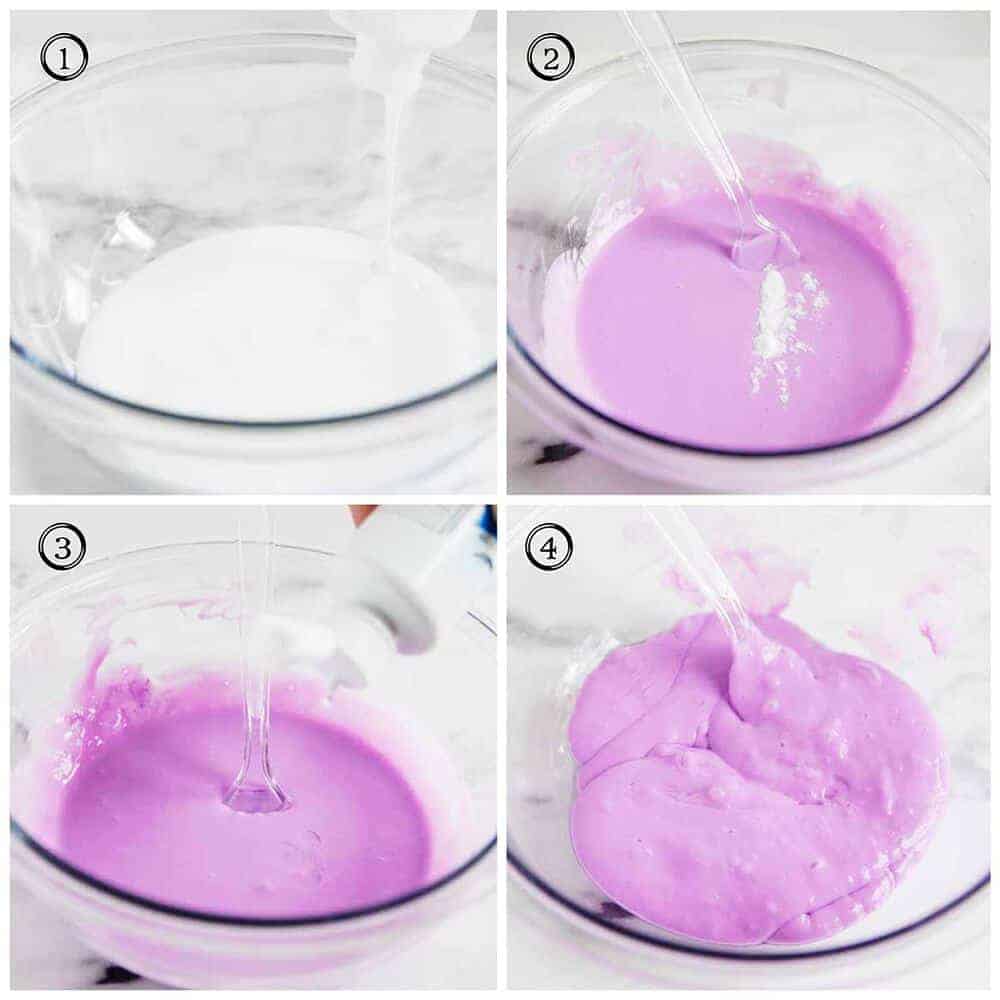
- Mixing the Base: In your mixing bowl, blend together 1/2 cup of glue with 1/2 cup of water until it’s nice and uniform. This is a great time to chat about mixtures and solutions if you’re looking to sneak in a mini science lesson!
- Color Me Bubbly: Drop in a few splashes of your chosen food coloring into the glue solution and stir it in. If you’re feeling adventurous, mix colors to create your very own hue. A little color mixing lesson, perhaps?
- Sparkle and Shine: If glitter or beads are on your rad slime agenda, now’s the time to add these into the bowl and mix them well with your base.
- Starch Time: Slowly pour in 1/4 cup of liquid starch into the mixture while stirring. You’ll notice the mixture will start to thicken and pull away from the sides of the bowl – that’s slime magic happening!
- Work It: Once the slime has formed, it’s time to knead it with your hands. This helps improve the texture and ensures the slime is nice and stretchy. It’ll be sticky at first, but the more you work with it, the less sticky it becomes. It’s a good workout for the hands too!
- Ready, Set, Play: Voila! Your slime is ready for action. Stretch it, squish it, roll it, twist it. The sky’s the limit with what you can do. Remember, always supervise your kiddos during slime play to ensure they don’t try to taste it or put it in their mouths.
And there you have it – making slime is as easy as 1-2-3 (and 4-5-6)! Not only do you have a stretchy, gooey, and colorful creation to play with, but you also made some precious memories with your youngsters. Remember to safely store your slime in an airtight container to keep it fresh for as long as possible.
But wait, there’s more! Don’t you want to know how to jazz up your slime game even further? How about some fluffy slime, or even glow-in-the-dark slime? Stay tuned, because I’ve got a whole lot of cool tricks up my sleeve to make your slime experience even more exhilarating! Let’s get ready to take our slime to the next level and become certified slime maestros!
Stay crafty, be imaginative, and remember, when it comes to making slime easy, it’s all about enjoying the process and embracing the inevitable mess. So, let’s roll up those sleeves and get ready for some gooey greatness!

5 Things Parents Should Know in Preparing to Make Slime Easy
1. Setting Up Your Slime-Making Workspace
Before the slime-making begins, it’s essential to prepare a space that’s ready for the gooey fun. Find a surface that’s easy to clean, such as a kitchen counter or a covered table. It’s also a smart idea to have paper towels or cleaning cloths handy for any spills. Encourage your children to wear old clothes or aprons to safeguard their outfits from any slime splashes.
2. Understanding the Safety Aspects
While most slime recipes are made from safe, non-toxic ingredients, it’s important to ensure the safety of your children. Always supervise the slime-making and playing process, especially with younger children who might be tempted to taste their creations. Be aware of any allergies and check the ingredients of products like liquid starch for any potential allergens.
3. The Importance of Measuring
Slime recipes aren’t just about combining ingredients; they’re about doing it with the right ratios. Teaching your children to measure the ingredients carefully can be a practical lesson in following directions and understanding proportions. It also ensures that your slime turns out perfect and not too sticky or too brittle.
4. Embracing the Mess and Creativity
Slime making can be messy, but that’s part of the fun! Embrace the mess as an opportunity for your kids to learn and express their creativity. Encourage them to choose colors, add-ins like glitter or beads, and even scents to personalize their slime. Remember, creativity is a messy process, but the results are worth it.
5. Storing Slime for Longevity
After playing with slime, storing it correctly ensures that it remains fresh for the next use. Airtight containers are the best option for keeping out dust and preventing the slime from drying out. Teach your kids to pack away their slime after playtime which helps instill good habits and responsibility.
With these key tips in mind, you’re all set for a successful slime-making adventure. The excitement on your children’s faces when they stretch out that first batch of handmade slime is priceless. Remember, it’s all about the experience, so relax, have fun, and get ready for some squishy, stretchy playtime!
Advanced Slime-Making Tips for Eager Explorers
If you and your kids have gotten the hang of the basic slime recipe and are eager to experiment further, here’s where things get really interesting. Let’s talk about embellishing your basic slime into some truly awe-inspiring creations.
Creating Fluffy Slime
To make slime even more exciting, consider making fluffy slime! This variety uses shaving cream to give the slime an airy texture that feels like a cloud in your hands. Simply add the shaving cream to your glue and water mixture before the starch, and voilà – fluffy slime!
Glow-in-the-Dark Slime
For those night owls or space enthusiasts, glow-in-the-dark slime is a must-try. Swap out your regular food coloring for a glow-in-the-dark paint or purchase a specialized glow-in-the-dark glue. Charge up your slime under a light, and then marvel at its luminescent properties in the dark!
With these expanded options, slime time is never going to be boring. Mixing and matching different ingredients can lead to endless hours of sensory play and discovery. Not to mention, you’ll be the coolest parent on the block with these slime hacks!
So, what are you waiting for? Gather your materials, roll up your sleeves, and get ready to mix up some amazing memories with your children. Happy slime making!
See more great Things to Do with Kids in New Zealand here. For more information see here
Disclaimer
The articles available via our website provide general information only and we strongly urge readers to exercise caution and conduct their own thorough research and fact-checking. The information presented should not be taken as absolute truth, and, to the maximum extent permitted by law, we will not be held liable for any inaccuracies or errors in the content. It is essential for individuals to independently verify and validate the information before making any decisions or taking any actions based on the articles.


