
Discover the Joy of Homemade Slime: A Parent’s Guide to Safe and Easy Slime-making!
Welcome, creative parents and excited kiddos! If you’re looking to delve into the goopy, stretchy, and oddly satisfying world of slime, you’ve reached the perfect place. Slime has taken the world by storm and for good reasons. It’s not only a blast to play with but also an amazing way to engage kids in a fun science experiment right at home. In this ultimate guide, we’ll walk through the simple steps to create your own homemade slime!
Before we start, let’s make sure you’ve got all the ingredients on hand for a typical slime recipe! Remember, making slime is like a little kitchen science project, so measuring the ingredients properly is key to achieving that perfect slime consistency.
What You Need to Create Your Slime Masterpiece
- Basic Slime Ingredients: Most slime recipes will call for glue (white or clear PVA), baking soda, and a slime activator, which is typically a solution of borax or a substitute such as contact lens solution and baking soda.
- Color and Sparkle: To jazz up your slime, have food coloring, glitter, or even glow-in-the-dark paint ready to go!
- Mixing Bowls and Spoons: Have a couple of bowls and spoons for mixing different colors or batches.
- Storage Containers: Once you have made your slime, you’ll need an airtight container to keep it fresh and ready to play with another day.
Step-by-Step Slime Making Magic
The actual process of making slime is super simple. Here’s the most straightforward method to create basic slime:
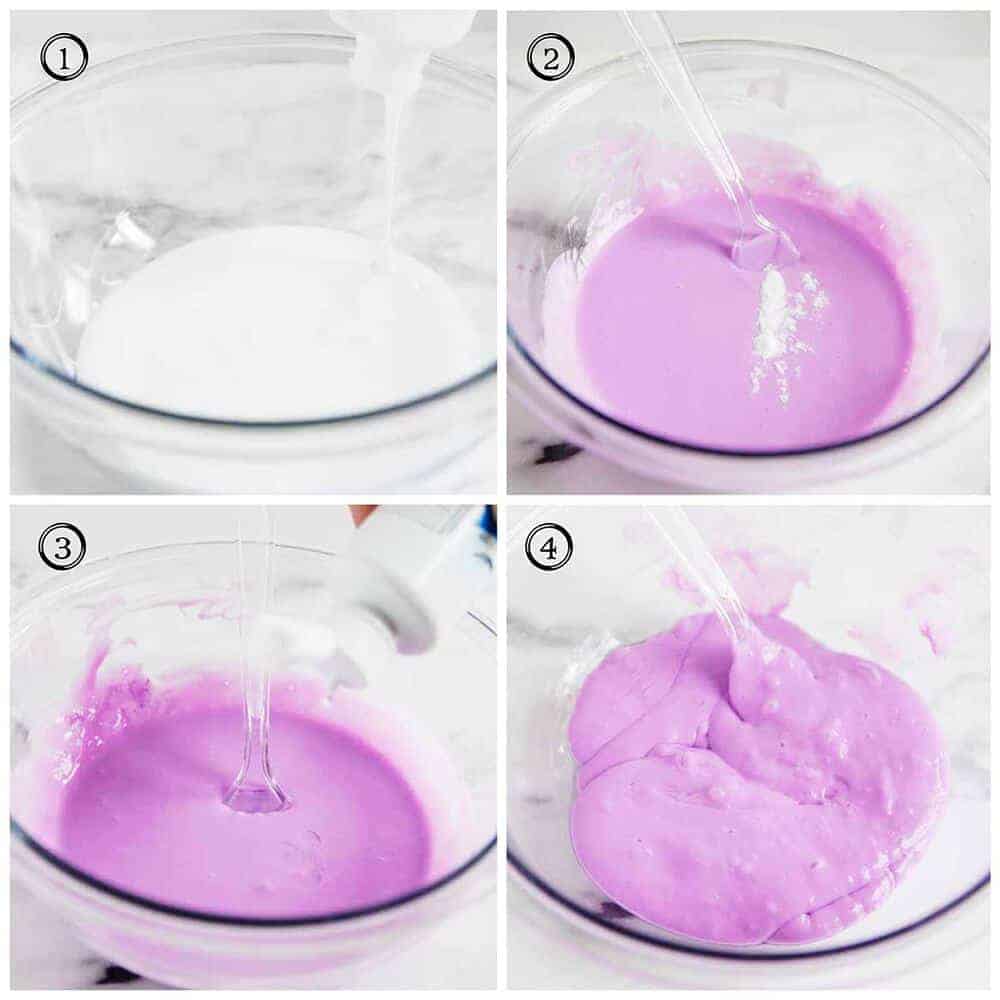
- Pour and Prepare: Start by pouring your glue into a mixing bowl. If you want your slime to be colorful, this is the moment to add a few drops of food coloring. Mix gently until you achieve the hue of your dreams!
- Baking Soda: Sprinkle a bit of baking soda into your glue mixture. Around a teaspoon should do the trick. Stir until it’s completely mixed.
- Add Your Slime Activator: This is the magical part! Slowly add your activator (borax solution or contact lens solution mixed with the additional baking soda) to the bowl. What’s incredible is you’ll start to see the transformation right before your eyes. The mix will begin to come together and firm up into slime!
- Mix, Mix, Mix: Keep mixing and kneading your slime. Eventually, it should start to form a gooey, stretchy consistency. If it’s too sticky, add a little more activator. If it’s too rubbery, you’ve added a bit too much – no worries, just add a bit more glue!
- Customize Your Creation: Now it’s time to make it your own. Fold in some glitter for that starry look or that glow-in-the-dark paint for an eerie nighttime effect!
- Knead by Hand: Take your slime out of the bowl and start to knead it by hand. This part is super fun (and a bit messy), so make sure you have a clean surface or do it over a tray.
If you follow these steps, voila! You should have some homemade slime that provides endless fun and creativity. But why stop there? There are so many variations to try – from fluffy slime made with shaving cream to crunchy slime with beads. The possibilities are endless!
Making slime is not just an activity; it’s an experience. It teaches kids about the wonders of science, allows them to unleash their creativity, and gives them a sensory toy that can help with stress relief. Plus, it’s a fantastic opportunity for family bonding. So, let’s roll up our sleeves and get ready for some slimy fun!
In the next section, we’ll explore different types of slime and troubleshoot any slime-related issues, ensuring your slime-making adventures are always a success!
Stay tuned for extra tips, tricks, and creative ideas to elevate your next slime project!

Five Essential Slime Tips for Parents Preparing for Slime Time
As parents, it’s exciting to do activities with your kids that are not only fun but also sneak in a little learning. Making slime at home does just that, and here are five essential tips to ensure your slime experience is as smooth as the final product!
- Safety First: Always supervise your little ones during the entire slime-making process. Use safe, non-toxic ingredients, and make sure small children do not put slime in their mouths. Wash hands thoroughly after playing with slime, especially before eating!
- Prep Your Space: Slime can get messy, so prepare your workspace with newspapers, plastic tablecloths, or trays. This will make cleanup a breeze and also help protect your surfaces from stains or spills.
- Quality Ingredients: The quality of the glue and the activator can significantly affect your slime’s texture. Opt for reliable brands of PVA glue and follow the instructions for your chosen activator precisely for the best results.
- Allergy Awareness: Be vigilant about allergies, especially if you’re using products like borax. Some people may have skin sensitivities, so consider alternative slime recipes that use ingredients like cornstarch or psyllium husk if needed.
- Persistence Pays Off: If your first batch of slime doesn’t turn out perfect, don’t worry! Slime-making is a bit of trial and error. It’s a great lesson for kids to learn that sometimes you need to try a few times to achieve success. Adjust the ingredients as needed, and you’ll soon find the perfect slime recipe for your family.
Different Slime, Same Excitement: Varieties to Explore
If you’re looking to spice up your slime routine, there are numerous variations you can try. Here are a few ideas:
- Fluffy Slime: For an ultra-light and airy texture, add shaving foam into your basic slime recipe. This creates a delightful, fluffy mass that is super satisfying to squish!
- Butter Slime: Mix in some soft clay to your basic slime until you achieve a spreadable and smooth texture that holds its shape better, hence the name ‘butter’ slime.
- Crunchy Slime: Add in beads, foam balls, or crushed plastic Easter eggs to create a satisfyingly crunchy texture that adds an auditory element to the slime experience.
By varying ingredients and textures, your children can discover new aspects of slime-making and keep their engagement levels high. Encourage them to experiment and maybe even come up with their own signature slime recipe!
Troubleshooting Common Slime Issues
Even with care, you might run into some issues when making slime. Here are a few common problems and their solutions:
- Slime Too Sticky: If the slime sticks to everything and won’t form, try adding a bit more activator, but do so sparingly to avoid making the slime too stiff.
- Slime Too Brittle: A slime that snaps instead of stretches likely has too much activator. Knead in more glue until you reach a stretchier consistency.
- Slime Not Forming: Check the expiration date on your glue, as old glue may not work effectively. Also, be sure you’re using the correct glue type (PVA) as not all glues are created equal when it comes to slime.
Remember, patience and a willingness to fine-tune your recipe are key. With these tips and some practice, you’re well on your way to becoming a slime-making master!
As you can see, there’s a whole world of slime possibilities out there waiting to be discovered. With these guidelines, some creativity, and a bit of science, you and your kids can enjoy hours of slimy fun. So gather your ingredients, prepare your workspace, and start the magical process of transforming simple household items into stretchy, squishy, sensational slime!
For more great articles please see here. For more information see here
Disclaimer
The articles available via our website provide general information only and we strongly urge readers to exercise caution and conduct their own thorough research and fact-checking. The information presented should not be taken as absolute truth, and, to the maximum extent permitted by law, we will not be held liable for any inaccuracies or errors in the content. It is essential for individuals to independently verify and validate the information before making any decisions or taking any actions based on the articles.


