
“`html
DIY Magic: How to Make Hand Spinners for Endless Fun!
Hello there, crafty parents and fun-loving families! Are you searching for a thrilling project to delight your little ones? Well, grab your creative hats and gear up because today we’re diving into the whimsical world of homemade hand spinners! Not only are they super cool to play with, but they’re also a blast to make.
Spinning toys have been captivating children and adults alike for ages, and it’s no secret why – the mesmerizing spinning action is absolutely fascinating. But, did you know that making one from scratch can be equally enchanting? It’s true! So, let’s get started and spin our way to an afternoon filled with giggles and spins!
What You’ll Need to Create Your Hand Spinner
Before we twirl into the crafting process, let’s gather our materials. Making a spinner is super simple, and you might already have most of these items at home:
- Cardboard or thick paper stock
- A toothpick or a paperclip
- A small piece of old CD or sturdy plastic
- Glue (preferably quick-drying or super glue)
- Scissors
- Decorative materials (colorful markers, stickers, glitter – get creative!)
- A small bead or a button (this will serve as the center balance point)
Step-by-Step Guide to Crafting Your Spinner
Lovely, now that we have our materials handy, we can jump right into the fun part. Follow these easy steps to create a hand spinner that’ll be the envy of the playground!
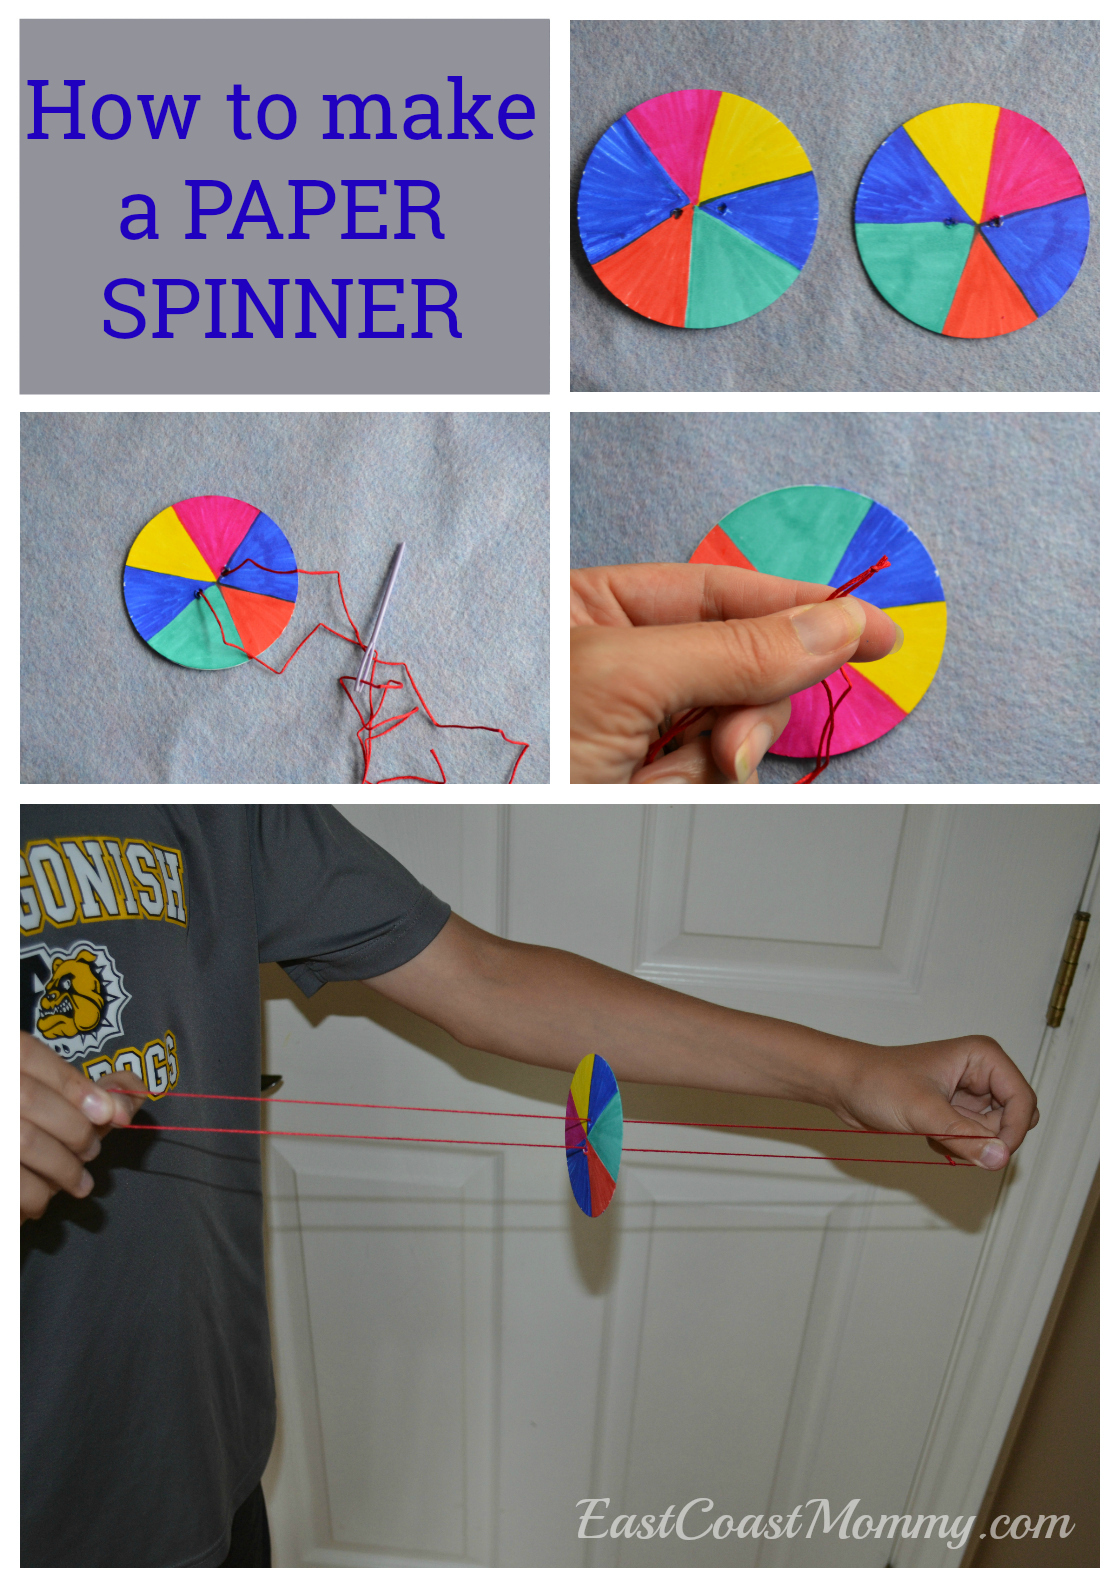
- Begin with the base of the spinner. Trace out a circle (around 2-3 inches in diameter) on your cardboard or paper stock. This will be the main spinning part.
- Cut out the circle precisely. Even edges help your spinner…well, spin better!
- Time to decorate! Unleash your inner artist and decorate one side of the circle with markers, stickers, or glitter. Let your imagination go wild!
- While your masterpiece dries, cut a small circle from the old CD or plastic. This will reinforce the spinner and make it more durable.
- Next, glue the small plastic circle to the undecorated side of your cardboard circle. This step is crucial for a balanced spin.
- Now, take your bead or button and glue it right in the center of the decorated side of the cardboard circle. Make sure it’s firmly in place.
- Once everything is dry, carefully pierce the toothpick or straightened paperclip through the center of the spinner. The bead or button should act as a barrier so the toothpick doesn’t pop out the other side.
- Test your spinner by holding the ends of the toothpick and giving it a gentle twist. Voilà! You’ve got yourself a homemade spinner!
Making spinners at home is not just about crafting a toy; it’s about spending quality time with your family, enhancing your children’s motor skills, and sparking their creativity. As you work together to create these simple yet fascinating toys, you’ll create memories that are just as precious as the spinners themselves.
But wait, there’s more! In the next section, we’ll dive into some advanced techniques and design tips to make your spinners even cooler. Get ready to upgrade your spinner game to the next level!
Enjoying this fun-filled guide? Share it with your friends and let the spinning sensation spread! And don’t forget to sign up for our newsletter to never miss out on awesome DIY projects like this one.
“`

“`html
Ultimate Guide to Homemade Hand Spinners for Kids
Welcome, wonderful parents! Today, we embark on an exciting journey to the land of DIY hand spinners, where joy spins around every corner! Let us prepare to create something extraordinary with our kids that will keep them entertained for hours on end.
These hand spinners are not just toys, they’re tools that stimulate imagination and improve fine motor skills, making this project a win-win for fun and development. So, cheer up and let’s start spinning into action!
Five Handy Tips Before You Start
Before we delve into making our funky spinners, here are five key points you should consider to ensure a delightful and hassle-free experience:
- Safety First: Always supervise your kids when using scissors or other sharp tools. Pre-cut materials can be prepared beforehand to keep everything child-friendly.
- Workspace Setup: Choose a clean, flat surface and cover it with newspaper or a craft mat to protect against glue or marker stains.
- Gather Materials: Keep all your crafting items within reach, but ensure that glue or other adhesives are handled by adults or older children only.
- Time Management: Allocate enough time for this activity. Rushing might spoil the fun and the final result. A relaxed pace enhances creativity!
- Personalization: Encourage kids to come up with their own designs for the spinners. This personal touch not only fosters creativity but also makes the spinners extra special to them.
DIY Spinner Creation: Easy Steps for Parents and Kids
With those tips in mind, let’s take a look at the simple steps to craft your very own hand spinner:
After completing these steps, you get to watch your kids’ eyes light up with the thrill of playing with their personally crafted spinners!
The crafting doesn’t have to stop here. Very much like art, the possibilities of spinner creation are endless. Experiment with different shapes, sizes, and materials. Try adding multiple beads for varied spinning dynamics or painting both sides for a surprise when spinning at high speeds.
Found this guide useful? Share your experiences and the wonderful spinners you’ve created together with your family and friends. Encourage others to join the DIY spinner craze and let the joy spin far and wide!
“`
See more great Things to Do with Kids in New Zealand here. For more information see here
Disclaimer
The articles available via our website provide general information only and we strongly urge readers to exercise caution and conduct their own thorough research and fact-checking. The information presented should not be taken as absolute truth, and, to the maximum extent permitted by law, we will not be held liable for any inaccuracies or errors in the content. It is essential for individuals to independently verify and validate the information before making any decisions or taking any actions based on the articles.


