
Step-by-Step Guide to an Adorable Easter Bunny Drawing for Kids
Hello there, amazing parents! Easter is hopping around the corner, and what better way to hop into the spirit than with a fun, easy drawing activity that’ll have your kids grinning ear-to-ear. Drawing an Easter Bunny can be a delightful adventure for little artists of all skill levels. In this guide, we’ll take you through simple steps to create a whimsical Easter bunny that your kids will be proud to display on the fridge!
Why Drawing is Great for Kids
Before we start sketching our bunny friend, let’s quickly talk about the benefits of drawing. Not only does it boost your child’s motor skills and creativity, but it also provides a wonderful opportunity for family bonding. So, grab those crayons, and let’s make some magical memories!
Gather Your Supplies
- Paper: Any type of paper will do, but a thicker sheet can handle markers and paints if your little ones want to add a pop of color later.
- Pencils: A regular pencil for sketching, and an eraser for those little oopsies.
- Coloring Supplies: Crayons, markers, colored pencils, or even paint — let your child pick their favorites.
With all your supplies in hand, let’s hop right into the creative process!
Step 1: Draw the Head
Start by drawing an oval shape near the top of your paper. This will be the head of your Easter Bunny. Encourage your kids to make it as big or as small as they want – this is their bunny masterpiece, after all!
Step 2: Add the Ears
Above the oval, draw two long and slightly curved lines for the ears. They can be tall and pointy or short and floppy depending on your bunny’s personality. Connect the lines at the top for the ear’s tips, and then add another line inside each ear to give them depth.
Step 3: Crafting the Bunny’s Face
Now for the face! In the middle of the oval, draw two small circles for the eyes. Add a tiny shine to the eyes with a small white circle or by leaving a small area uncolored. Right below the eyes, draw a small triangle nose and extend a curved line down for the mouth. Don’t forget to add those whiskers — just a few light strokes on each side of the nose.
Step 4: Bunny Body Basics
Directly under the head, draw a larger oval for the body. This doesn’t need to be perfect – bunnies come in all shapes and sizes! Then, add two little ovals at the bottom for the cute bunny paws.
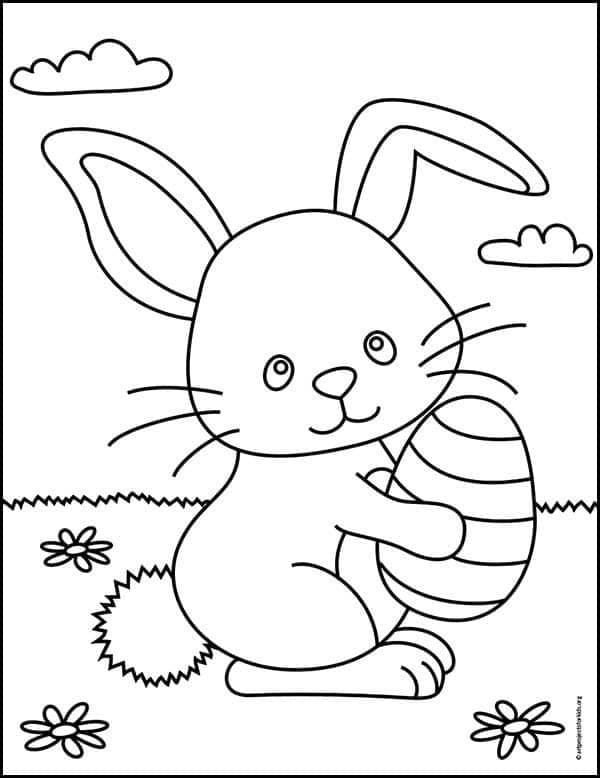
Step 5: Fluffy Tail and Final Touches
No bunny is complete without a fluffy tail! On one side of the body, draw a small circle and fill it with short strokes for a furry effect. Now is the time to add any accessories you like. Perhaps a bow tie, a vest, or even a little Easter egg resting in its paws.
Encourage your kiddos to let their imagination run wild – after all, the Easter Bunny is as unique as they are! The sky’s the limit when it comes to dressing up your bunny drawing.
Ready to Add Color?
Once the drawing looks “egg-cellent,” it’s time to bring it to life with some color! Pastel hues work wonderfully for Easter, but any palette your child loves will make their bunny special. While they color, ask them about their bunny’s story. Is it a superhero bunny? Or perhaps the fastest Easter egg deliverer? Engaging their creative storytelling is just another layer of fun!
All right, superstar parents, that’s all for the beginning of our hoppy drawing adventure! Keep encouraging your little ones as they embark on this artistic journey. Stay tuned for the next steps, where we’ll dive into some fun variations of our Easter Bunny drawing and explore how to create a full Easter scene with your child’s newfound drawing skills. Until then, keep those creative juices flowing, and enjoy the precious moments of crafting and joy with your family this Easter season!
5 Things Parents Should Know in Preparing for Easter Bunny Easy Drawing
1. Embrace the Process
Creating art is not just about the final product; it’s about the experience. Reinforce with your child that it’s okay if the drawing doesn’t come out perfect. The joyful moments spent together are the true masterpiece. Celebrate each stroke, and remind them that every artist has a unique style.
2. Create a Positive Environment
Set up a drawing space where your child feels relaxed and excited to draw. Ensure the area is well-lit and clutter-free. Playing some soft music or having a comfortable seat can also help in making the drawing experience more enjoyable and festive!
3. Simplify Instructions
Break down each step into simple, manageable parts, especially for younger children. Keep your instructions clear and easy to follow to avoid any frustration. Use language that children understand and be patient as they follow along with their own pace.
4. Encourage Creativity and Personalization
The Easter Bunny can wear glasses, fly a plane, or even play the guitar in your child’s imagination. Encourage them to add personal touches to their drawing. Maybe it’s a pattern on the Easter egg or a design on the bunny’s bow tie. These unique flourishes will make their drawing even more special to them.
5. Prepare for a Mess
Get ready for a bit of a mess, especially when paints or markers are involved. Keep wipes or a damp cloth nearby for quick cleanups. You can also cover the workspace with old newspapers or a tablecloth to protect surfaces. Remember, a little mess is part of the fun and creative process!
Parent pro tip: Take pictures during different stages of the drawing to create a beautiful memory timeline of your child’s artistic development. It will be wonderful to look back on and see how much their skills have grown! Plus, it’s a great way to share the moment with family and friends on social media.
Now armed with these tips, you’re all set to have a fantastic time drawing with your kids. Dive into the fun of creating and make the most of this Easter by fostering a creative atmosphere where everyone can enjoy and participate in the joy of drawing. Let those bunnies hop from your minds onto the paper and fill your home with laughter and creativity this Easter season!
See more great Things to Do with Kids in New Zealand here. For more information see here
Disclaimer
The articles available via our website provide general information only and we strongly urge readers to exercise caution and conduct their own thorough research and fact-checking. The information presented should not be taken as absolute truth, and, to the maximum extent permitted by law, we will not be held liable for any inaccuracies or errors in the content. It is essential for individuals to independently verify and validate the information before making any decisions or taking any actions based on the articles.


