
How to Make a Paper Mache Volcano for a Fun Science Project!
Welcome, dear parents and crafty adventurers! Are you ready to dive into an exciting project that combines creativity, learning, and a bit of geological magic? Making a paper mache volcano is an awesome activity for children of all ages. Whether for a cool science project, a rainy day, or a family bonding session, this craft is bursting with opportunities for fun and education!
Gather Your Materials
Before we begin, let’s make sure we have all the materials needed. Here’s a checklist to help you prepare:
- Old newspaper
- Balloons or a small plastic bottle
- Flour and water (for the paper mache paste)
- A large bowl for mixing
- Paints and brushes
- Vinegar
- Baking soda
- Food coloring (red and orange for lava)
- Dish soap (optional, for frothy lava)
Once you’ve got everything, spread out your newspapers, and let’s get our hands a little messy!
Creating the Base Structure
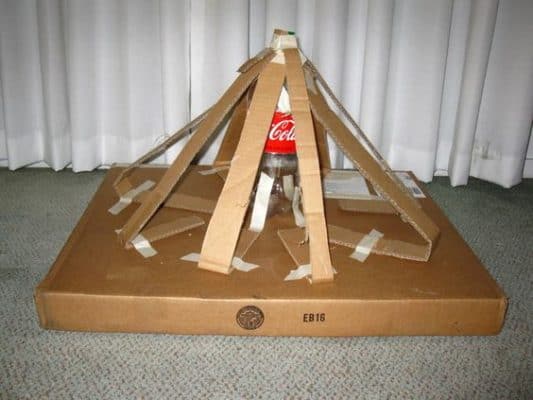
The first step in crafting your volcano is to create the base structure. You can do this using a balloon or by repurposing an empty plastic bottle. The choice is yours, and each provides a slightly different shape and size for your volcanic creation.
If you’re using a balloon, inflate it to the desired size of your volcano, and set it on top of a sturdy base, like a cardboard box or a wide bowl. If you’re opting for a bottle, fill it halfway with water to give it some stability and set it on your base.
Mixing the Paper Mache Paste
Now it’s time to make your paper mache paste! Follow these simple steps to create a mixture that will mold the landscape of your tiny Earth-shaker:
- In your large bowl, mix one part flour with two parts water. Adjust the quantities depending on the size of your volcano, but make sure the paste is smooth and has the consistency of pancake batter.
- Tear the old newspaper into strips about 1 inch wide and long enough to cover your balloon or bottle with some overlap.
- Dip the newspaper strips into the paste, thoroughly coating them, and then run them through your fingers to remove excess paste.
Excitement’s bubbling up, isn’t it? Just like the lava that will soon be flowing down the sides of your child’s handmade volcano!
Applying the Paper Mache
Now, let’s apply the paste-covered strips to our volcano’s form. Whether using a balloon or bottle, start at the bottom and work your way up, overlaying the strips in a crisscross pattern for added strength. Remember to leave the top open if using a bottle, as we’ll need this for our explosive finale!
Once your volcano shape is covered in two to three layers of paper mache, let it dry completely. This can take several hours or overnight, depending on the thickness of your layers and the humidity in the air.
While waiting for your volcano to dry, maybe discuss with your kids how real volcanoes are formed and why they erupt. It’s a wonderful opportunity to infuse some educational facts into this fun activity!
Stay tuned for the next exciting steps where we will paint, decorate, and finally, make our paper mache volcano erupt with a simple, yet spectacular chemical reaction! And remember, the key ingredients for a successful craft are a splash of imagination, a pinch of patience, and heaps of smiles. So, let’s spread out those newspapers and start shaping our very own miniature mountain!
Five Things Parents Should Know When Preparing to Make a Paper Mache Volcano
1. Safety First!
Even though crafting a paper mache volcano is fun, it’s important to consider safety measures. Use non-toxic paints, and ensure that the baking soda and vinegar reaction is performed in a well-ventilated area. Also, supervise younger children to prevent accidental ingestion of materials or choking hazards.
2. Preparing Your Space
Paper mache can get quite messy, so choose an area that’s easy to clean, like a kitchen table or tiled floor. Lay down plenty of newspapers or a disposable tablecloth to catch drips and spills, and keep a wet cloth nearby for quick cleanups.
3. Managing Drying Time
Paper mache takes time to dry fully, which can test little ones’ patience. Plan the drying times accordingly; perhaps breaking up the activity over a weekend or painting and erupting the volcano on different days can help manage the wait.
4. Embracing the Mess and Creativity
Embrace the creative and messy nature of this project. Let your kids express themselves through painting and decorating their volcanoes. Don’t worry about perfection; it’s the experience and memories you’re creating that are priceless.
5. Incorporating Learning
Treat the volcano-making process as a teaching moment. Explain the basic concepts of volcanic activity, introduce new vocabulary, and, most importantly, encourage questions. Tailor the educational content to your child’s age and curiosity level.
Decorating Your Volcano
Once the volcano is rock-solid dry, it’s time to let creativity erupt! Grab those paints and brushes, and decorate your volcano in earthy tones like brown, green, and gray. Vegetation around the base adds a realistic touch, while red and orange can simulate the flowing lava. Don’t forget to paint the inside of the crater (the bottle opening or balloon knot area) in fiery colors to prepare for the eruption!
The Erupting Finale
The moment we’ve all been waiting for – making our volcano erupt! Follow these steps to create the explosion:
- Place the volcano on a surface that can get messy, like a tray or sink.
- Fill the volcano’s crater with a couple of tablespoons of baking soda.
- Optionally, add a squirt of dish soap for an extra frothy effect.
- Mix red and orange food coloring in a little vinegar to create your “lava.”
- Pour the colored vinegar into the crater and watch the chemical reaction take place!
Children will be amazed as the fizzy, colorful “lava” oozes out. This is also a prime chance to talk about the chemical reaction and compare it to a real volcanic eruption.
And there you have it – an explosive finale to a project bursting with creativity, learning, and fun! Remember, mistakes and messes are just part of the adventure. Enjoy this explosive journey with your little ones, and who knows, you might just ignite a passion for science and crafting that lasts a lifetime!
See more great Things to Do with Kids in New Zealand here. For more information see here
Disclaimer
The articles available via our website provide general information only and we strongly urge readers to exercise caution and conduct their own thorough research and fact-checking. The information presented should not be taken as absolute truth, and, to the maximum extent permitted by law, we will not be held liable for any inaccuracies or errors in the content. It is essential for individuals to independently verify and validate the information before making any decisions or taking any actions based on the articles.


