
Unleash Your Inner Craft Wizard: Making PVA Glue at Home
Welcome to our magical guide, where we’ll elevate your craft game by teaching you and your little apprentices how to concoct your very own PVA glue! In a world where convenience often leads us to store-bought solutions, taking the time to create something with your own hands can be both rewarding and fun. Plus, involving your kids in this alchemy can kindle their love for science and crafting. So, without further ado, let’s delve into the enchanting realm of homemade adhesives!
Why Make Your Own PVA Glue?
Making PVA glue at home has a cauldron full of benefits. It’s not only cost-effective but also ensures you know exactly what’s inside your potion, making it a safer option for your young sorcerers. On top of that, it can be a fantastic educational experience that blends science and art, perfect for a rainy day activity or a school project.
The Ingredients You’ll Need
Before we start, make sure you have your wizard’s hat on and your ingredients ready. You’ll need:
- 1 cup of Flour
- 1/3 cup of Sugar
- 1 1/2 cups of Water
- 1 teaspoon of Vinegar
- A pinch of Salt
These commonplace ingredients are likely already available in your kitchen, making your quest as convenient as it is thrilling!
Equipment Needed
Every good spell requires the right tools. For this glue-making adventure, you’ll need:
- A medium-sized cooking pot
- A stirring spoon or spatula
- A mixing bowl
- A measuring cup and spoons
- An airtight container for storing your glue
With the equipment assembled, you’re nearly ready to begin!
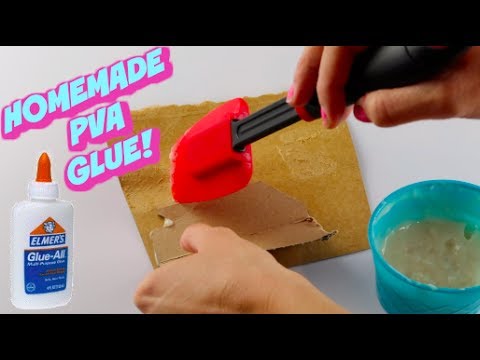
Step-by-Step Guide to Making PVA Glue
Now, let’s get to the exciting part – brewing your glue! Follow these steps closely, and you’ll have a fabulous homemade glue ready in no time.
- Combine Dry Ingredients: In your mixing bowl, whisk together the flour and sugar. The ratio of sugar to flour is crucial for achieving the perfect stickiness.
- Mix with Water: Gradually add cold water to your dry mixture while stirring continuously. Ensure that there are no lumps in the mixture and it’s smooth like a potion should be.
- Cook the Mixture: Pour the mixture into the cooking pot and heat it over medium flame. Keep stirring to avoid any lumps from forming.
- Add Vinegar and Salt: As the mixture warms up, it’s time to add some magic—stir in the vinegar and a pinch of salt. The vinegar acts as a natural preservative, and the salt will help to prevent mold.
- Stirring Spell: Keep stirring! As the mixture heats up, it will start thickening. Cast your patient stirring spell for around 10 minutes or until the glue reaches the consistency of store-bought glue.
- Cooling Phase: Once your glue reaches the desired consistency, take the pot off the heat and allow it to cool before transferring it.
- Spell Completion: When the mixture is cool enough, pour it into the airtight container. Your homemade PVA glue is ready for action!
Congratulations, you’ve just created your own batch of PVA glue! Not only is it effective, but you can also rest easy knowing it’s non-toxic and perfect for all sorts of paper crafts and projects.
Now that you’ve unlocked this crafting skill, there are countless magical projects that await you and your children. From scrapbooking to collages, and even homemade slime, your DIY PVA glue will surely be a hit.
Remember, when you involve your children in such experiments, you’re not just creating glue; you’re building memories and nurturing a sense of wonder and accomplishment. So, grab your stirring stick, gather your ingredients, and prepare to have a fantastical crafting adventure with homemade PVA glue!
Stay tuned for more tips on how to use your homemade PVA glue and creative project ideas to bond with your kids and foster their creativity!

5 Things Parents Should Know Before Making PVA Glue
As we delve into the mystical world of PVA glue preparation, there are a handful of pearls of wisdom every parent should know to ensure their magical concoction is a success:
- Safety First: Always remember that safety comes first, especially when little wizards are involved. Although the ingredients are non-toxic, the cooking process requires adult supervision. Make sure youngsters are away from the heat source and handle all hot equipment yourself.
- Patience is Key: This craft isn’t a race; it’s about enjoying the time spent with your children and learning together. Expect lots of stirring and waiting for the perfect consistency. Assure your kids that great things come to those who wait!
- Mess is Part of the Process: Embrace the mess! Crafting with kids is bound to get a bit wild, but it’s all part of the fun. Lay down newspapers or plastic sheets to guard your surfaces and get stuck into the gluey glory without worry.
- Customization: Once you’re comfortable with the basic recipe, feel free to experiment. Add food coloring for vibrant glue or glitter for a sparkly effect. It’s a great way to spark creativity and make unique creations with your children. Just remember that any additions should be non-toxic and safe for kids.
- Storage Smarts: Your PVA glue can last a long time if stored properly. Keep it in an airtight container and in a cool, dry place. If you notice any odd smells or signs of spoilage, it’s best to err on the side of caution and whip up a fresh batch.
With these key insights in mind, you and your children are all set for a successful, enjoyable crafting session. Now, let’s get to the sticky and delightful business of making PVA glue at home!
SEO-Optimized HTML Content for WordPress
<article>
   <header>
      <h1>Unleash Your Inner Craft Wizard: Making PVA Glue at Home</h1>
   </header>
   <p>Welcome to our magical guide, where we'll elevate your craft game by teaching you and your little apprentices how to concoct your very own PVA glue! ... </p>
   <section>
      <h2>Why Make Your Own PVA Glue?</h2>
      <p>Making PVA glue at home has a cauldron full of benefits. ... </p>
      <!-- Add rest of the content here -->
   </section>
   <section>
      <h2>5 Things Parents Should Know Before Making PVA Glue</h2>
      <p>...</p>
      <ol>
         <li><strong>Safety First:</strong> Always remember ...</li>
         <li><strong>Patience is Key:</strong> This craft ...</li>
         <!-- Add remaining list items here -->
      </ol>
      <p>With these key insights in mind, ...</p>
   </section>
   <section>
      <h2>Your New Go-To Recipe for Homemade Fun: PVA Glue!</h2>
      <!-- Include additional tips, tricks, and craft ideas -->
   </section>
   <footer>
      <p>Stay tuned for more tips on how to use your homemade PVA glue ...</p>
   </footer>
</article>
Using this structured HTML format will help to ensure your content is easy to follow, engaging, and SEO-friendly. Now, go ahead and add some more magic to your crafts with the incredible power of DIY PVA glue!
See more great Things to Do with Kids in New Zealand here. For more information see here
Disclaimer
The articles available via our website provide general information only and we strongly urge readers to exercise caution and conduct their own thorough research and fact-checking. The information presented should not be taken as absolute truth, and, to the maximum extent permitted by law, we will not be held liable for any inaccuracies or errors in the content. It is essential for individuals to independently verify and validate the information before making any decisions or taking any actions based on the articles.

