
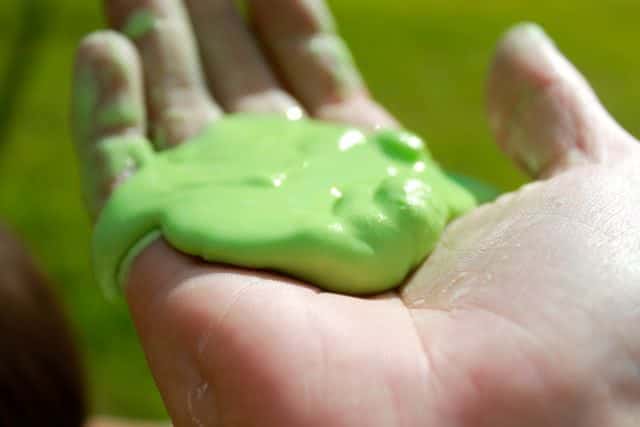
Discover the Joy of Homemade Cornflour Slime
Welcome to the delightful world of DIY crafts! If you’re a parent looking for a fun, educational, and sensory-rich activity for your kids, you’ve stumbled upon the perfect project! We’re talking about cornflour slime, a gooey, stretchy, and incredibly satisfying craft that’s not only enjoyable for children but is also easy to make and clean up. So put on your crafting hats, and let’s dive into the squishy universe of cornflour slime together!
Why Cornflour Slime is a Hit with Kids
Before we get our hands sticky, let’s explore why cornflour slime should be your next go-to craft activity:
- Sensory Experience: Slime provides a wonderful sensory play experience. It’s perfect for kids to explore textures and practice their fine motor skills.
- Encourages Creativity: With limitless color and add-in possibilities, cornflour slime can spark imagination and allow your little ones to express their creativity.
- Educational Value: Slime-making involves science! It’s a practical way to teach children about basic chemistry principles, such as mixtures and non-Newtonian fluids.
- Safe & Non-toxic: Made with kitchen staples, cornflour slime is safe for kids, giving you peace of mind while they play.
- Stress Reliever: Kneading slime can be a calming activity, helping children to relieve stress and regulate their emotions.
The Basics: What You Need to Make Cornflour Slime
Gearing up to make some fabulous cornflour slime is easy because it requires just a few simple ingredients that you probably already have in your pantry. Here’s what you’ll need:
- Cornflour – The star of the show, providing the slime with its unique non-Newtonian properties.
- Water – The wonder liquid that transforms the cornflour into a magical, malleable substance.
- Food Coloring (Optional) – For that splash of color that makes slime so appealing to kids.
- Measuring Cups and Spoons – Precision is helpful, especially when you’re experimenting with consistency.
- Mixing Bowl – A place where all the ingredients can come together and mingle.
- Spatula or Spoon – To mix it all up without getting too messy (to start with).
Now that you have your materials ready, let’s jump right into the process of creating cornflour slime!
Step-by-Step Guide to Making Cornflour Slime
The process is straightforward, but the fun is endless! Here’s how to make your own cornflour slime:
- Grab Your Bowl: Take your mixing bowl and ensure it’s dry and clean.
- Measure the Cornflour: Using your measuring cups, scoop out the desired amount of cornflour. Start with a manageable quantity—about 1 cup is a great starting point.
- Add Water Slowly: Begin by adding a small amount of water to the cornflour. Go slow! You want to start with about a quarter cup of water and increase as needed.
- Color it Up: This is the perfect moment to add a few drops of food coloring, making the slime bright and personal!
Remember, the key to perfect cornflour slime is in the mixing—so don’t be afraid to get a little messy! Encourage your kids to use their hands to feel the texture and adjust the consistency. If it’s too runny, add more cornflour; if it’s too thick, a bit more water will do the trick.
Now that we’ve covered the basics, it’s time to explore some pro tips and fun variations to take your cornflour slime to the next level. Let’s keep the fun going! Dive in, have a blast, and watch as your mini scientists marvel at the wonders of cornflour slime. It’s an activity they’ll want to repeat time and again, and you’ll love seeing their joy and curiosity in action.
Stay tuned for more insights, as we’ll dive deeper into the science behind the slime, creative additions to personalize your concoction, and even how to store your slime creations for lasting fun. Get ready for endless hours of hands-on fun with this squishy, stretchy, and sensational craft!
5 Things Parents Should Know When Preparing Cornflour Slime
Alright, loving parents and guardians! While cornflour slime is indeed simple and delightful, there are a few nuggets of wisdom to keep in mind to ensure the process is as smooth as the slime itself. Here are five essential tips:
- Mess-Free Zones: Choose an area that’s easy to clean, or lay down newspapers or a plastic tablecloth to catch any spills. Slime making is potentially messy, but with a little preparation, you won’t need to worry about your surfaces.
- Allergy Check: Although cornflour is generally safe, always ensure that your child isn’t allergic to any of the ingredients used in making slime. A quick patch test can go a long way in preventing any unwanted reactions.
- Supervision is Key: This activity requires adult supervision. Not only is it safer, but it also offers a lovely bonding opportunity. Plus, you’ll be there to guide the scientific exploration that ensues!
- Variety is the Spice of Slime: Be open to trying different recipes and consistencies. Some kids love thick and dough-like slime, while others prefer it runny and oozy. Experiment and have fun with it to find your child’s preferred slimey style!
- Prep for Storage: Before you even start, have an airtight container ready. Cornflour slime can dry out quickly, and having proper storage means your kids can enjoy their slime over and over again.
With these tips in mind, you can confidently embark on the slime-making adventure, knowing that you’re all set for a safe, clean, and wholly enjoyable experience!
Getting Creative: Personalizing Your Cornflour Slime
Now that you’ve got the basics down, why not jazz things up a bit? Here are some ideas to personalize your cornflour slime and make it even more special:
- Add Some Glitz: A sprinkle of glitter never fails to sparkle up some joy. However, remember that glitter isn’t eco-friendly, so consider using biodegradable glitter or skip it altogether to keep things green!
- Scent it Up: A drop of child-safe essential oil can add a sensory boost to your slime. Lavender for calm, citrus for a zesty punch—the possibilities are aromatic!
- Texture Talk: Beads, foam balls, or even tiny sequins can add a fun new dimension to your child’s slime. Just make sure that whatever you add is large enough not to be a choking hazard.
- Theme It: Tie the slime-making to a theme, like holidays or seasons. Make pumpkin-colored slime for Halloween, or icy blue with silver glitter for winter wonderland vibes!
- Educational Twists: Use slime making to discuss science concepts, or even form letters and numbers for playful learning.
Maintaining the Fun: Storing Your Slime
Let’s talk about storage. After all, you don’t want that perfect pile of slime to go to waste! Storing your cornflour slime is easy:
- Keep it Airtight: An airtight container is your best friend when preserving that slime goodness.
- Refrigerate if Necessary: If your home is warm, popping the slime in the fridge can help it last even longer.
- Revive That Slime: If the slime dries out a bit, knead it with a touch of water to bring it back to life.
With these handy tips on storage, your little one can enjoy their custom cornflour slime creation again and again!
There you have it, folks – a comprehensive guide to creating your very own cornflour slime! Engaging, educational, and exciting, this DIY craft promises heaps of fun for everyone involved. So, why not start today and make some gooey memories with your kids?
See more great Things to Do with Kids in New Zealand here. For more information see here
Disclaimer
The articles available via our website provide general information only and we strongly urge readers to exercise caution and conduct their own thorough research and fact-checking. The information presented should not be taken as absolute truth, and, to the maximum extent permitted by law, we will not be held liable for any inaccuracies or errors in the content. It is essential for individuals to independently verify and validate the information before making any decisions or taking any actions based on the articles.


