
? Create Colorful Memories: Your Ultimate Guide to Making Pom-Poms with Kids! ?

Hello creative parents and fun-loving families! ? Are you ready to dive into a fluffy world of crafts and laughter?
Today, I’m super excited to share with you an amazing activity that will not only brighten up your home but also create heartwarming memories with your little ones—making pom-poms! It’s a perfect way to spend quality time together and develop your kids’ fine motor skills, all while creating adorable fluffs of joy. ?
Why Pom-Poms, You Ask?
Well, not only are pom-poms a blast to make, but they are also incredibly versatile in the crafty universe! You can use them to embellish hats, scarves, home decor, and so much more. Plus, the process is simple, which makes it an excellent project for crafters of all ages.
So, grab your yarn and let’s get our pom-pom party started! ?
? Gathering Your Pom-Pom Party Supplies
First things first—let’s talk about what you’ll need. The best part? These supplies are easily accessible and you might already have them lying around the house.
- Yarn: Any color or texture will do, so feel free to mix and match to create funky combinations.
- Cardboard: This will be used to make your pom-pom template. Upcycle cereal boxes or shipping packages for an eco-friendly twist!
- Scissors: Make sure they’re sharp enough to cut through layers of yarn.
- A Ruler: Precision is key to perfect pom-poms, so keep that ruler handy!
- Pencil: For tracing your template.
TIP: If you have pom-pom makers at home, they can speed up the process—but don’t worry, we’ll guide you through a foolproof DIY method just in case!
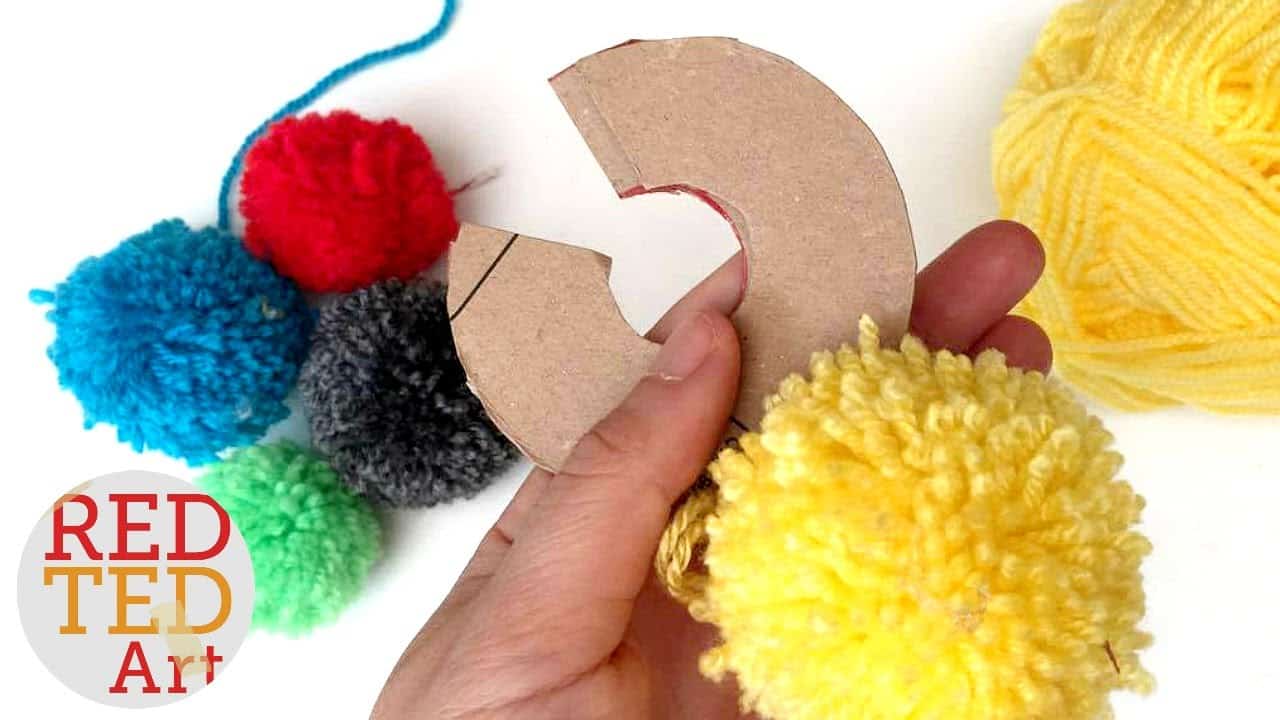
? Crafting Your DIY Pom-Pom Template
Creating a template for your pom-poms is easy as pie! ? You can choose the size of your pom-pom based on how big you want it. A good standard size is around 2-3 inches in diameter, which is perfect for most projects. Ready to get started?
- Find a piece of cardboard and using your ruler, draw two circles with your desired diameter.
- In the center of those circles, draw a smaller circle—about half an inch for the hole where you’ll thread your yarn.
- Cut out the circles, making sure to also cut out the smaller inner circle—voilà, you have your cardboard doughnuts!
Keep in mind, consistency is crucial for a balanced, fluffy pom-pom, so make sure both cardboard circles are as identical as possible.
?? The Pom-Pom Making Process – Let’s Begin!
With your template at the ready, it’s time for the fun part—making the pom-poms! If you’ve made a cup of tea or hot chocolate, take a sip now because we’re about to get into the cozy, crafty zone. ???
- Start by placing your two cardboard circles together.
- Cut a long piece of yarn and start wrapping it around the cardboard circles.
- Continue wrapping, building up the layers of yarn until the central hole is nearly full, creating a thick bundle.
Remember, the more yarn you wrap, the fluffier your pom-pom will be. Encourage your kids to take turns and choose different yarn colors to make the experience more fun and engaging!
Now, I bet you’re excited to see your pom-pom take shape, right? But hold onto your craft scissors, because this is just the beginning. Stay tuned to learn how to tie it all together and fluff up your masterpiece into the most adorable pom-pom ever! How thrilling! ?
? Five Things Parents Should Know When Preparing for Pom-Pom Making ?
Okay, fabulous pom-pom planners, before we roll up our sleeves and jump into the yarn pile, let’s go over five key tips to help ensure your crafting adventure is as smooth as a skein of silk yarn:
- 1. Choosing the Right Yarn is Key
- Select a yarn that’s not too slippery (silk or fine synthetics can be tricky for little hands) and not too rough (it can be difficult to work with and less pleasant to the touch). Acrylic, wool, or cotton blends are typically your best bet. Also, make sure the yarn isn’t too thin, as this will require a lot more wrapping and can test young crafters’ patience!
- 2. Safety Scissors for the Kids
- While we mentioned using sharp scissors, remember that safety comes first! Provide the younger kids with child-friendly safety scissors. They might not cut as quickly, but they’re optimally safe for little fingers.
- 3. Prep Your Space
- Yarn crafting can get a little messy, especially with enthusiastic children. Lay down some craft paper or an old tablecloth to make cleanup a breeze. Plus, having everything in one designated spot helps contain the ‘creative chaos.’
- 4. Patience and Guidance
- Let’s be honest, making a perfect pom-pom may take a couple of tries, and that’s absolutely fine. Children learn through repetition and mistakes. Offer them guidance and encouragement, and make sure to celebrate every step of the process—not just the final product.
- 5. Keep a Pom-Pom First-Aid Kit Handy
- Occasionally, a pom-pom might fall apart during the making process. No worries! Keep extra yarn and scissors at the ready for quick fixes. Sometimes, all a pom-pom needs is a little more yarn or an extra trim to go from floppy to fabulous!
Armed with these handy tips, you’re already halfway to the pom-pom hall of fame! ?
So, what’s next? You’ve wrapped your yarn snugly around the cardboard; it’s time to bring your creation to life! Cut another length of yarn—about 12 inches long. Carefully slide it between the two cardboard circles and wrap it around the center of your wrapped yarn. Now, this is the crucial part—tie a tight knot to secure your pom-pom’s center. Feel free to double-knot it for extra security, especially if your pom-pom is densely packed!
- Cut around the edges of the wrapped yarn, between the two cardboard circles, until you’ve snipped all the way around.
- Gently remove the cardboard, and you’ll have a shaggy sphere of yarn!
- Now, give your pom-pom a haircut! Trim the yarn evenly around until you achieve a beautifully round shape.
Remember, the trimming part is both an art and a science. Keep turning the pom-pom in your hand to make sure you’re cutting evenly from all sides. Here’s where your kids can really get creative, perhaps shaping their pom-poms into hearts, stars, or even crafting multi-colored pom-pom characters.
And there you have it! A delightful collection of handmade pom-poms, bouncing with color and imagination. Stitch them onto beanies, dangle them from a mobile, or even string them together for a whimsical garland—the creative possibilities are as endless as your imagination! As each pom-pom fluffs out into its full glory, you’ll not only have a charming craft but also a house full of proud smiles and high-fives all around. Crafting, learning, and laughing together—what could be better?
Now, your home is sprinkled with a little extra love and cheer, and you’ve got the perfect activity for rainy days, birthdays, or any day that needs a pom-pom pick-me-up. Let the pom-pom parade begin!
See more great Things to Do with Kids in New Zealand here. For more information see here
Disclaimer
The articles available via our website provide general information only and we strongly urge readers to exercise caution and conduct their own thorough research and fact-checking. The information presented should not be taken as absolute truth, and, to the maximum extent permitted by law, we will not be held liable for any inaccuracies or errors in the content. It is essential for individuals to independently verify and validate the information before making any decisions or taking any actions based on the articles.


