
Embark on a Fun DIY Adventure: Crafting Stress Balls with Balloons and Flour
Hello, fabulous parents out there! Are you searching for a delightful and easy DIY project to share with your kids? Look no further because today, we’re diving into the world of homemade stress balls! Not only are these squishy little treasures a blast to make, but they also offer a pinch of stress relief for both you and your little ones. Ready to get your hands (slightly) messy and have a ton of fun? Let’s roll up our sleeves and get into how to make stress balls using just a balloon and some flour!
Why Stress Balls are the Perfect DIY Project for You and Your Kids
Before we leap into the nitty-gritty, let’s take a quick peek at why making a stress ball with balloon and flour is such an excellent activity:
- Motor Skill Development: Squeezing and shaping flour-filled balloons can help your kids develop their fine motor skills in a playful way.
- Creative Expression: Let your child’s imagination run wild by decorating their stress balls with colorful markers, stickers, or yarn.
- Stress Relief: As the name suggests, stress balls can be a soothing way for both kids and parents to manage their daily stress.
- Eco-Friendly Fun: This DIY project is a great opportunity to discuss recycling and reusing materials, as you can use old balloons and materials from around the house.
What You’ll Need: Your Stress Ball Craft Kit
As promised, creating your very own stress ball is as simple as pie—with the added bonus of being mess free if done carefully! Here’s a quick list of the supplies you’ll need to gather:
- Round latex balloons (standard size)
- All-purpose flour
- A funnel or a DIY paper funnel
- A spoon or a similar utensil to pack the flour
- Scissors
- Optional: Permanent markers, stickers, yarn, or fabric for decoration
Step-by-Step: Creating Your Stress Ball Masterpieces
Once you have all your materials at the ready, it’s time to start crafting! Follow these simple steps, and you’ll have a wonderful stress ball in no time:
Step 1: Prep Your Balloon
Firstly, ensure your balloons have no holes or defects. Remember, the quality of your balloon will affect the longevity of your stress ball.
Step 2: Fill It Up
Place the funnel into the opening of the balloon. You might need to stretch the balloon a bit—but that’s part of the fun! Carefully pour the flour into the funnel, using a spoon to push it through if needed. Fill the balloon to your desired size, but make sure not to overfill.
Step 3: Tie It Off
Once your balloon is filled with flour, carefully remove the funnel and let out a little air. This step is crucial; you want your stress ball to be malleable, not rigid. Gently but firmly tie off the end of the balloon.
Step 4: Snip and Wrap
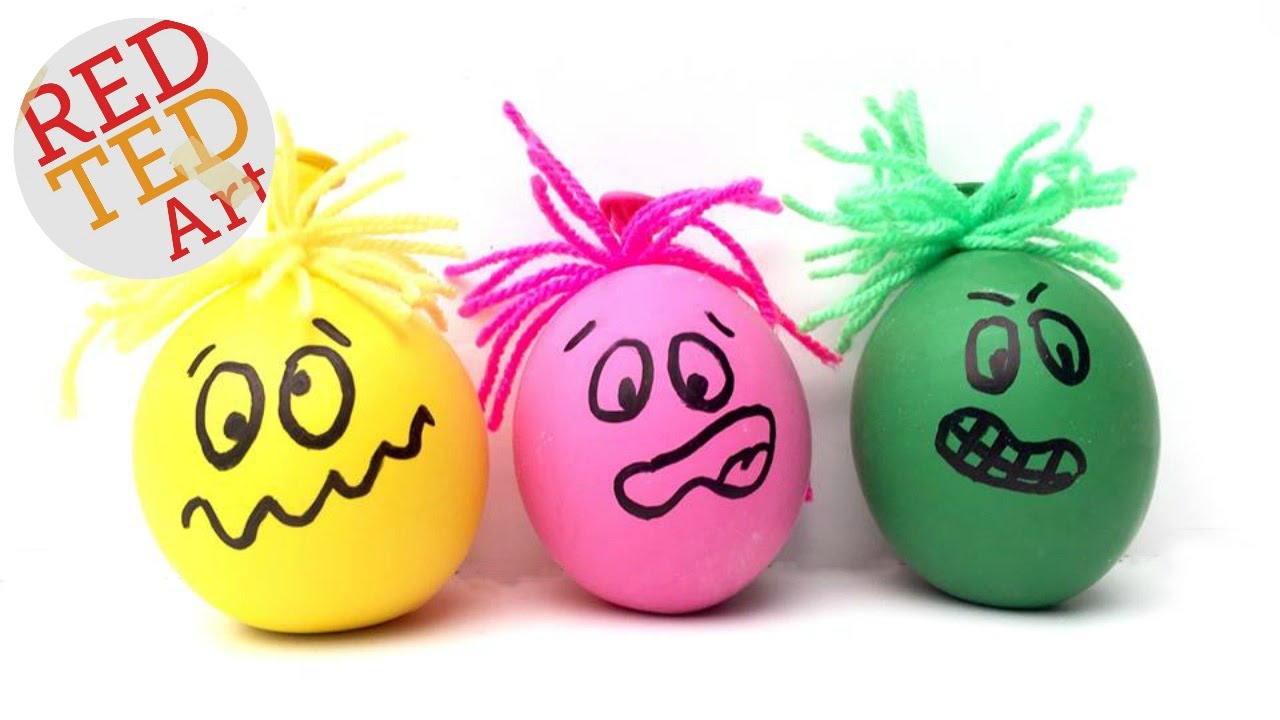
For added security (and to minimize the mess if the balloon ever breaks), snip off the excess part of the balloon above the knot. You can then take another balloon, cut off its neck, and wrap it over the first to create a double-layered stress ball that’s even more durable.
Step 5: Unleash Your Creativity
Now, for the fun part—decoration! Use your markers, stickers, and other materials to give your stress ball a touch of personality. This step is a fantastic way for you and your child to bond over crafts and allows them to showcase their creativity.
By now, you should have a delightful stress ball ready to be squeezed to your heart’s content! But remember, this is just the beginning of our exciting journey into DIY stress ball creation. Stay tuned for more tips on how to make this experience even more amazing and tailoring the activity to the seasons, special occasions, or as part of your home stress-relief toolkit. Until then, enjoy your crafting, and embrace the stress-free moments you’ve created!

5 Things Parents Should Know Before Crafting Stress Ball Balloons with Flour
- Quality Materials Matter: When selecting balloons for this craft, you’ll want to ensure they are of good quality. Opt for thicker balloons if available, as they are less likely to break and can handle more squeezing pressure. Avoid dollar-store balloons that may be thin and prone to popping.
- Handling the Flour: Flour has a tendency to poof and create a mess. To minimize this, prepare your workspace by laying down newspaper or a cloth. Also, consider using a container to catch any spillover when filling the balloon. Always have a vacuum or a dustpan at hand for quick cleanup.
- Supervision is Key: Little ones can get overzealous with the squeezing, potentially causing the balloons to burst. Always supervise children during both the making and playing process to ensure safety and to prevent a flour explosion.
- Allergies and Sensitivities: Be mindful of any flour allergies your child may have, as well as its potential as a respiratory irritant if a balloon does pop. Always have an alternative on hand, such as cornstarch or rice, for filling the stress ball.
- Creative Customization: Stress balls don’t have to be a one-time craft. They can evolve into a continuous creative project. For example, you can change the stress ball’s outer balloon to match holiday themes or allow the kids to redecorate them, constantly refreshing the fun and engagement with their handcrafted toy.
Conclusion
This complete guide to creating your very own stress balls using just balloons and flour is sure to provide hours of entertainment and stress relief. Engage your kids in a fun-filled activity that yields a useful product they can be proud of, and remember, the journey doesn’t end once the last balloon is filled. There’s a whole world of customization, play, and bonding waiting for you just around the corner. Happy crafting!
See more great Things to Do with Kids in New Zealand here. For more information see here
Disclaimer
The articles available via our website provide general information only and we strongly urge readers to exercise caution and conduct their own thorough research and fact-checking. The information presented should not be taken as absolute truth, and, to the maximum extent permitted by law, we will not be held liable for any inaccuracies or errors in the content. It is essential for individuals to independently verify and validate the information before making any decisions or taking any actions based on the articles.


