Shaving Cream Painting: A Whimsical World of Color for Your Little Artists
Hello there, fun-loving parents and crafty kiddos! Are you ready to dive into the vibrant and fluffy world of shave cream painting? Get set for giggles and creativity as we explore one of the most exciting sensory art activities that’s perfect for tiny hands and big imaginations! Not only will you come away with some fantastic masterpieces, but you’ll also share the joy of creating timeless memories together. Let’s get those creative cogs turning and prepare for a color explosion with shaving cream painting!
The Magic of Shave Cream Painting for Kids
Shave cream painting isn’t just a fun way to spend the afternoon; it’s a sensory experience that helps children develop their motor skills, learn about colors, and even sneak in a bit of science as they watch colors blend and swirl. The best part? It’s super easy and mess-friendly (yes, you heard that right)!
Materials You’ll Need for a Shaving Cream Art Adventure
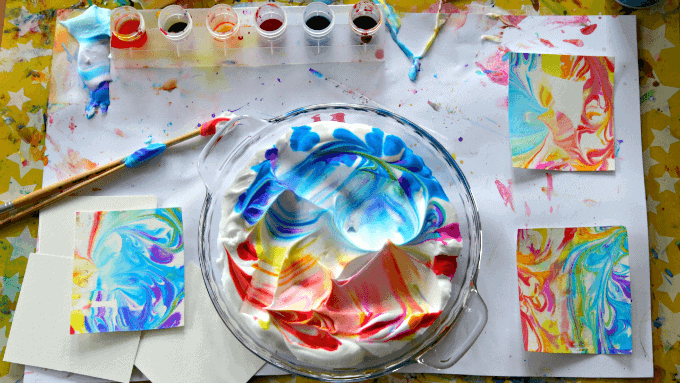
- Shaving cream: Look for foam shaving cream that’s labeled as “Sensitive” or “Fragrance-Free” to keep those little skin types safe and happy!
- Food coloring or washable paint: A rainbow of possibilities awaits! Food coloring or non-toxic liquid watercolors work wonders for this project.
- A tray or shallow pan: This will be the canvas where your little Monet will work their magic.
- A squeegee or plastic ruler: This tool comes in handy when you’re ready to create a clean slate for the next genius work of art.
- Thick paper or cardstock: This is the paper that will capture the glorious patterns your kids create.
- Wearable art smocks or old t-shirts: Keep those adorable outfits paint-free as the fun unfolds.
- Toothpicks, skewers, or combs: These tools allow your little artists to swirl, twirl, and make wondrous patterns.
Setting the Stage for Your Shaving Cream Art Project
As every great artist knows, the preparation is half the fun! So let’s get prepped with these super simple steps:
- Lay the Groundwork: Find a comfortable spot where you can lay out all your materials. An outdoor area or a room with an easy-to-clean floor is perfect!
- Protect the Masterpieces: Place newspapers or a drop cloth under your tray or shallow pan to catch any stray splashes of color. Better safe than sorry!
- Dress for Success: Pop on those smocks or old t-shirts to protect the kiddos’ clothes from any artistic “accidents”.
- Let the Canvas Speak: Fill the bottom of your tray or pan with a layer of shaving cream, smoothing it out slightly so that the entire surface is covered.
- Add a Splash of Color: This is where the magic happens! Let your kids drop in the colors — dots, lines, whirls, let their imagination dictate!
- Create with Freedom: Give your children the tools (toothpicks, skewers, or combs) and let them drag, swirl, and play with the colors to make their own unique patterns.
There you have it, lovely parents and curious kiddos – you’re all set to embark on this artistic adventure! Shaving cream painting is more than just a playful activity. It’s an opportunity to experiment, express, and expand the imagination. Plus, when you’re finished, you’ll have some truly original works of art to display or give away as gifts. So, let those colors fly, make those giggles echo, and, above all, treasure the moments of joy and creativity shared with your little ones!
Stay tuned for the next installment, where we’ll walk through the step-by-step process of creating your child’s first shaving cream painting, as well as tips for preserving these precious artworks. Keep your eyes peeled and your smiles ready; the adventure is just beginning!
5 Essential Tips for Parents Preparing for Shaving Cream Painting Fun
Before the color fiesta begins, here’s what you need to know to make shave cream painting a delightful and hassle-free experience for you and your little ones:
1. Choosing the Right Shaving Cream
Picking the right shaving cream is pivotal. Go for the standard foam shaving cream rather than gel varieties, as the foam is easier for children to manipulate and mix with colors. Tip: A hypoallergenic or sensitive skin formula can minimize the risk of any skin irritation for those lovely little hands.
2. Color Without Concerns
When selecting colors, ensure you’re using child-friendly options like food coloring or non-toxic watercolors. These are much easier to wash off skin and surfaces. Tip: Start with primary colors (red, blue, and yellow) and delight in teaching your kiddos how to mix them and discover new shades!
3. Establish an Artist’s Nook
Set up your shaving cream painting station in an area that’s easy to clean and free from distractions. An outdoor patio, kitchen, or even a bathtub can work wonders. Tip: If you’re indoors, lay down some old sheets or a vinyl tablecloth to catch any mess.
4. Dress the Part
It might get messy, so dress your children in clothes you don’t mind staining. Better yet, have them wear art smocks or oversized shirts. Tip: Keep a clean set of clothes nearby for a quick change once they’re done channeling their inner Picasso.
5. Embrace the Process, Not Just the Product
The goal of shave cream painting is to enjoy the sensory process and the joy it brings rather than focusing only on the end result. Tip: Encourage your children to describe how the shaving cream feels, how the colors mix, and the patterns they create. It’s all about the experience!
Armed with these tips, you’re now ready to set the stage for an unforgettable artistic endeavor. Get ready to fill your home with laughter and creativity as you embark on the shave cream painting journey with your kiddos. Remember, it’s all about having fun and learning through play, so let’s make some colorful memories!
And don’t forget! In our next passage we’ll guide you through the teeny steps of creating an actual shaving cream painting and share some top-notch advice on preserving these vibrant pieces of childhood. The artistic voyage continues, and you are the captains of this color-filled ship. Anchors away to the land of imagination and bright hues!
See more great Things to Do with Kids in New Zealand here. For more information see here
Disclaimer
The articles available via our website provide general information only and we strongly urge readers to exercise caution and conduct their own thorough research and fact-checking. The information presented should not be taken as absolute truth, and, to the maximum extent permitted by law, we will not be held liable for any inaccuracies or errors in the content. It is essential for individuals to independently verify and validate the information before making any decisions or taking any actions based on the articles.