How to Make a Chatterbox: A Step-by-Step Guide for Parents
Hello there, crafty parents and fun-seekers! Are you looking for an engaging and creative activity to share with your kiddos? Look no further because today, we’re diving into the whimsical world of chatterboxes – those delightful paper folding creations that have been a staple of childhood for generations. Not only are chatterboxes super entertaining, but they also help with motor skills, following instructions, and playful learning. So, grab some colorful paper, gather the kids, and let’s get started on this nostalgic journey!
What You’ll Need
- A square piece of paper (any size works, but we recommend starting with a 20cm x 20cm piece)
- Colorful markers, pens, or pencils
- Optional: Stickers or glitter for extra sparkle
Step 1: Crafting Your Chatterbox Base
Before we begin, make sure your paper is a perfect square. If it’s not, trim it down so that all sides are equal.
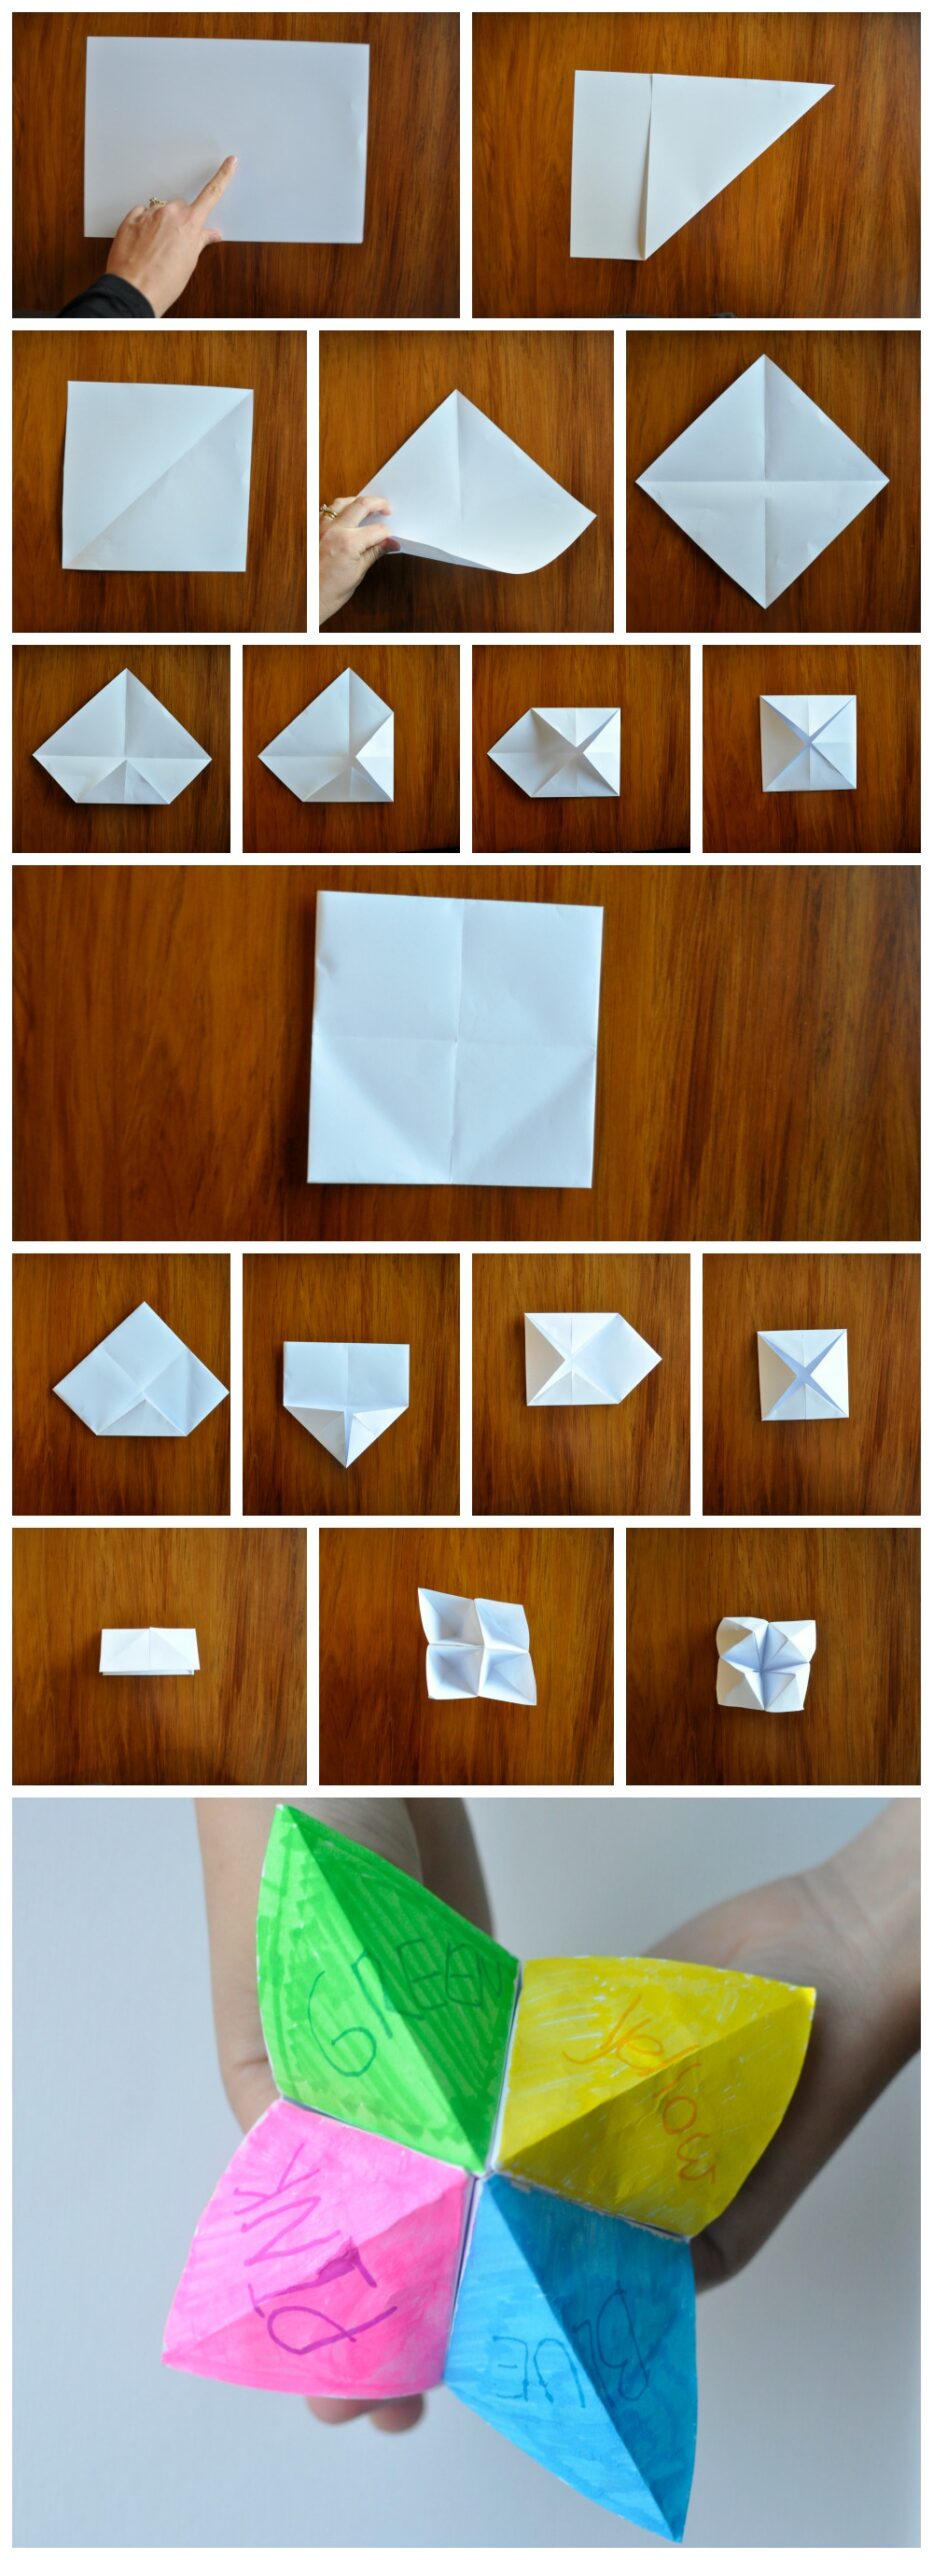
- Place your square paper on a flat surface, colored side down if you have one.
- Fold the paper in half diagonally to form a triangle. Crease well and unfold.
- Repeat the fold with the opposite corners and unfold again, leaving cross-crease lines on the paper.
Step 2: Creating the Inner Squares
- With your paper flat, bring each corner to the center point where your creases intersect. You should now see a smaller square shape.
- Flip the paper over carefully, maintaining the fold lines.
- Once again, fold each corner towards the center, making sure the edges align neatly for a crisp finish.
Step 3: Adding Personality to Your Chatterbox
Now that you have your basic chatterbox shape, it’s time to add some fun details!
- Turn over your chatterbox so the flaps open like a book. Write a color on each of the outer flaps with your markers.
- Open up the flaps, one at a time, and write numbers on the inner segments (traditionally 1-8).
- Lift the number flaps and write secret messages, funny tasks, or questions underneath. These surprises will be revealed during the game!
Ready to Play!
Your chatterbox is now complete and it’s time to discover the magic! Show your kids how to operate the chatterbox: slip thumbs and forefingers under the colored flaps and pinch together to create movement. Your child can ask a friend to pick a color, spell it out while manipulating the chatterbox for each letter, and continue through choices of numbers and secret messages. The possibilities for fun are endless!
Engaging in this craft not only sparks joy but creates a wonderful bonding experience. The nostalgia factor for adults is a sweet bonus, and for modern kids, it’s a fascinating exercise to see a humble piece of paper transform into an interactive toy. Plus, this simple project sneaks in a bit of learning as well – think colors, numbers, spelling, and even a pinch of dexterity. What’s not to adore about chatterboxes?
Don’t forget to encourage your little ones to customize their chatterboxes with their unique personal touch. They can doodle, add glitter, or paste stickers on it. This way, their chatterbox becomes a wonderful outlet for self-expression and creativity!
Making a chatterbox is one of the easiest, yet most thrilling paper crafts out there. With just a piece of paper and a dash of imagination, you’ve got a portable plaything that promises hours of interactive fun. So, cherish these moments of simple pleasures and watch as your kids marvel at the wonder of creating something from nothing – well, except a square piece of paper. And who knows, perhaps the messages inside those colorful flaps will be funny enough to make your whole family giggle!
Are you ready for more creative crafting and play? Of course, you are! Stay tuned for even more delightful activities and remember, when it comes to family time, the simplest ideas often lead to the biggest smiles.

5 Things Parents Should Know in Preparing for How to Make a Chatterbox
As a parent, preparing for a crafting session can be as much fun as the activity itself! To ensure your chatterbox creation experience is smooth sailing, here are five handy tips to keep in mind:
1. Choose the Right Paper
Not all paper is created equal when it comes to making a chatterbox. Go for lightweight, yet sturdy paper that is easy to fold but holds creases well. Construction paper, origami paper, or even regular printer paper can work wonders. If the paper is too thick, it can be difficult for little fingers to manipulate, so consider the age and dexterity of your child when selecting your material.
2. Set Up a Comfortable Crafting Area
Create a crafting space that’s comfortable and well-lit for you and your little one. Make sure the surface is flat for easy folding and consider covering it with a disposable tablecloth for those who get a bit enthusiastic with the markers or glitter!
3. Keep It Simple
If this is your child’s first time making a chatterbox, try not to overwhelm them with too many customization options. Start with simple designs and colors, and as they get the hang of it, you can introduce more elaborate decorations and writing. It’s all about building their confidence and letting them enjoy the process!
4. Encourage Creativity
While the chatterbox itself is a classic design, there’s no limit to how your kids can personalize it. Encourage them to unleash their creativity — everything from the colors they choose, to the messages they write inside, can be a reflection of their personality. Remember, each chatterbox created is a piece of art!
5. Be Patient and Help as Needed
Crafting is a learning process, especially for younger kids. Be patient and offer help only when needed. The goal is to teach your child how to follow steps and solve problems, not just to finish the craft. They might not get it right the first time, and that’s okay! The point is to have fun and enjoy some quality time together.
By keeping these tips in mind, you’re all set for a fun and successful chatterbox-making endeavor. Eager fingers and lively imaginations are about to turn simple squares of paper into cherished childhood memories. Ready, set, fold!
For more great articles please see here. For more information see here
Disclaimer
The articles available via our website provide general information only and we strongly urge readers to exercise caution and conduct their own thorough research and fact-checking. The information presented should not be taken as absolute truth, and, to the maximum extent permitted by law, we will not be held liable for any inaccuracies or errors in the content. It is essential for individuals to independently verify and validate the information before making any decisions or taking any actions based on the articles.


