
Creative Fun with Shaving Cream Marbling: A Parent’s Guide to Crafty Afternoons
Hey there, awesome parents! Are you ready to dive into a world of color, creativity, and giggles? If you’re looking for an activity that will have your kids wowing at their own masterpieces, then you’ve struck gold with shaving cream marbling! This simple, yet stunning craft is not only a blast for kids, but it’s sure to bring out your inner artist too. Let’s get ready to swirl, swoop and create with this easy-to-follow guide to shaving cream marbling.
What Is Shaving Cream Marbling?
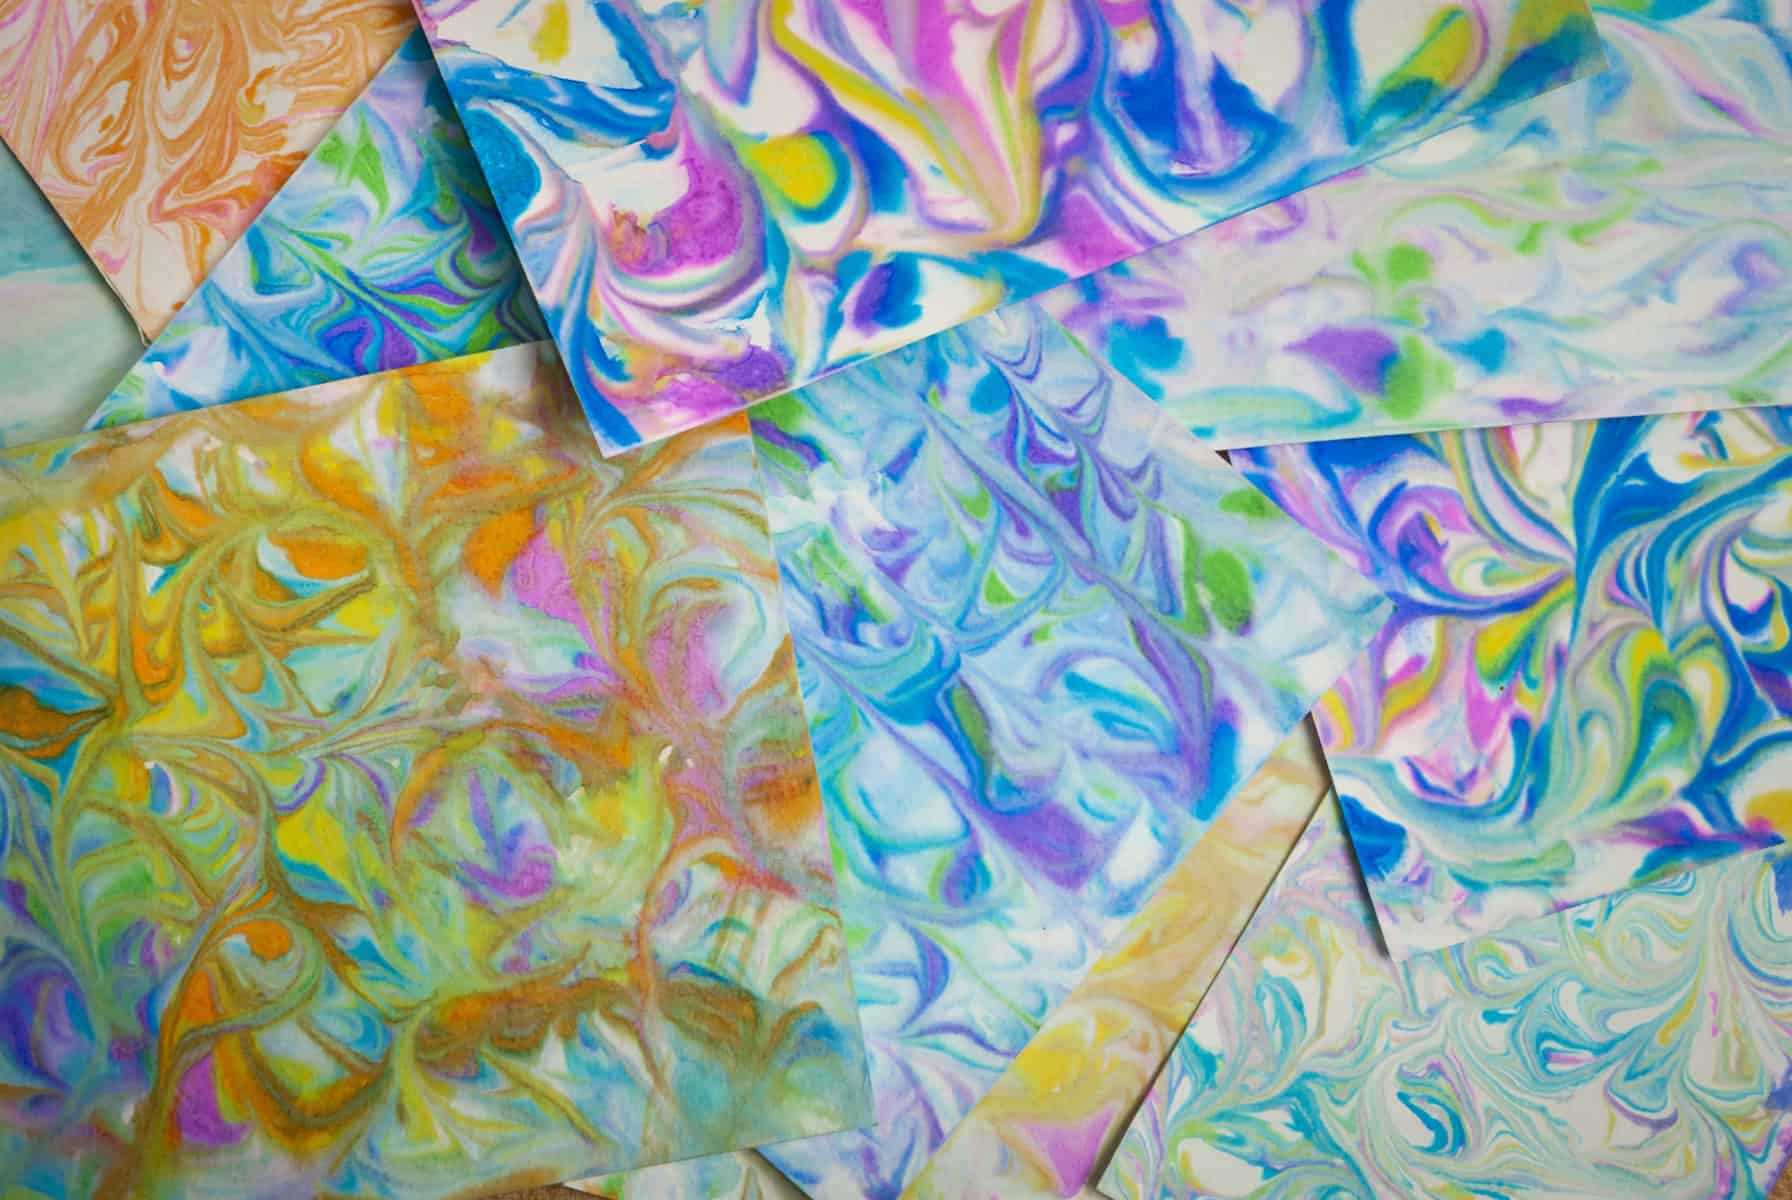
Shaving cream marbling is a hands-on art technique that combines the fluffy texture of shaving cream with the vibrant hues of food coloring or acrylic paints. It’s a fantastic sensory experience that helps kids develop fine motor skills and color recognition, all while having a whole lot of messy fun. The best part? You end up with unique, swirly patterns on paper that can be used for cards, bookmarks, framed art, and so much more!
Materials You’ll Need
- Standard shaving cream (not gel)
- Food coloring or non-toxic acrylic paint
- Thick paper or cardstock
- A ruler or a flat-edged tool
- Wooden skewers, toothpicks, or a comb
- Baking tray or a disposable foil pan
- Paper towels or wipes for easy clean-ups
Step-by-Step Process for Shaving Cream Marbling
Prep Your Space
First things first, let’s make sure mess is kept to a minimum. Find a spot that’s easy to wipe down or cover it with newspapers or a plastic tablecloth. Marbling is fun but can get a little messy, so also make sure your little artists wear aprons or old clothes they won’t mind getting stained.
Let’s Get Foamy!
Take your baking tray or foil pan and fill it with a layer of shaving cream. Smooth it out a bit, but don’t worry about perfection—those little peaks and troughs will add character to your art!
Adding a Splash of Color
Now for the fun part! Let your kids drop food coloring or dollops of paint randomly over the shaving cream. Encourage them to pick colors they love, creating a wild array of beauty. Remember, less can be more; you don’t want the colors to blend into a murky brown.
Make Some Waves
Using a skewer or the back of a comb, gently swirl the colors around in the shaving cream. This is where those mesmerizing patterns will start to take shape. Be careful not to over-mix, or the colors will combine and lose their vibrancy.
Press and Peel
Place a sheet of paper gently on top of the marbled shaving cream. Give it a gentle but firm pat to ensure the paper touches all the colorful areas. Count to ten, then lift the paper off and lay it on a clean surface.
Reveal the Magic
Using a ruler or a straight edge, scrape off the excess shaving cream from the paper to reveal your beautiful marbled design underneath. It’s like a magic reveal every time!
And there you have it, a gorgeous piece of marbled art that your kids created with their own two hands! Let the paper dry, and then it’s all set for displaying or crafting. Shaving cream marbling isn’t just an afternoon of entertainment; it’s an exploration of color, texture, and creativity that will leave everyone beaming with pride.
Stay tuned, as we’ll be diving deeper into tips for success, cleanup strategies, and ideas for using your marbled creations in our next sections. Keep those sleeves rolled up—we’re just getting started on this artistic adventure!
5 Things Parents Should Know When Preparing for Shaving Cream Marbling
1. Choose the Right Shaving Cream:
One of the crucial ingredients for shaving cream marbling is, of course, shaving cream. Make sure to choose a standard, foam-based shaving cream rather than a gel type. The foam consistency is key to creating the marbling effect. It’s also helpful to select a brand that doesn’t have a very strong scent, as some children might be sensitive to it.
2. Protecting Your Surfaces and Clothing:
While shaving cream marbling is undoubtedly fun, it can get messy. Prior to starting, cover your work surface with a plastic tablecloth or old newspapers to catch any stray paint or shaving cream. Ensure that children are either in clothes you don’t mind getting stained or are wearing aprons or smocks to protect their outfits.
3. Paper Quality Matters:
The type of paper you use will affect the outcome of your marbled prints. Thick paper or cardstock is the best choice as it absorbs the paint well and holds up against the moisture from the shaving cream. Thin paper may become too soggy and tear easily when scraping off the excess cream.
4. Color Choice and Balance:
Encourage your kids to select a few favorite colors for their marbling project but remind them to balance their choices. Too many colors can blend into a less attractive brown or gray. Aim for a mix of contrasting and complementary colors to create vibrant results. Also, sparingly use dark colors as they can overpower lighter shades.
5. Drying Time is Essential:
After scraping off the shaving cream, you’ll need to let the marbled paper dry completely before using it. This may take a few hours. Plan for a safe spot to lay out the papers where they won’t be disturbed. You may want to have another activity planned to keep the children occupied while waiting for their creations to dry.
With these tips in mind, shaving cream marbling is set to be a fun, engaging, and colorful activity. It’s an amazing way to nurture your children’s creativity and create beautiful artwork together. Prepare for a little preparation and cleanup, but the results and joy on your kids’ faces will be well worth it!
See more great Things to Do with Kids in New Zealand here. For more information see here
Disclaimer
The articles available via our website provide general information only and we strongly urge readers to exercise caution and conduct their own thorough research and fact-checking. The information presented should not be taken as absolute truth, and, to the maximum extent permitted by law, we will not be held liable for any inaccuracies or errors in the content. It is essential for individuals to independently verify and validate the information before making any decisions or taking any actions based on the articles.

