
Ultimate Guide to Paper Spinners: Fun and Learning Rolled into One!
Hello, super moms and dazzling dads! Are you on the lookout for a simple, yet super-fun activity to keep your little ones engaged? Well, you’ve spun to the right spot! Introducing the classic paper spinner – a whirlwind of colors and joy that not only captivates kids but also stirs up a tornado of developmental benefits. Let’s dive into the wonderful world of paper spinners and discover how you and your kids can create your own spinning masterpieces!
What Exactly is a Paper Spinner?
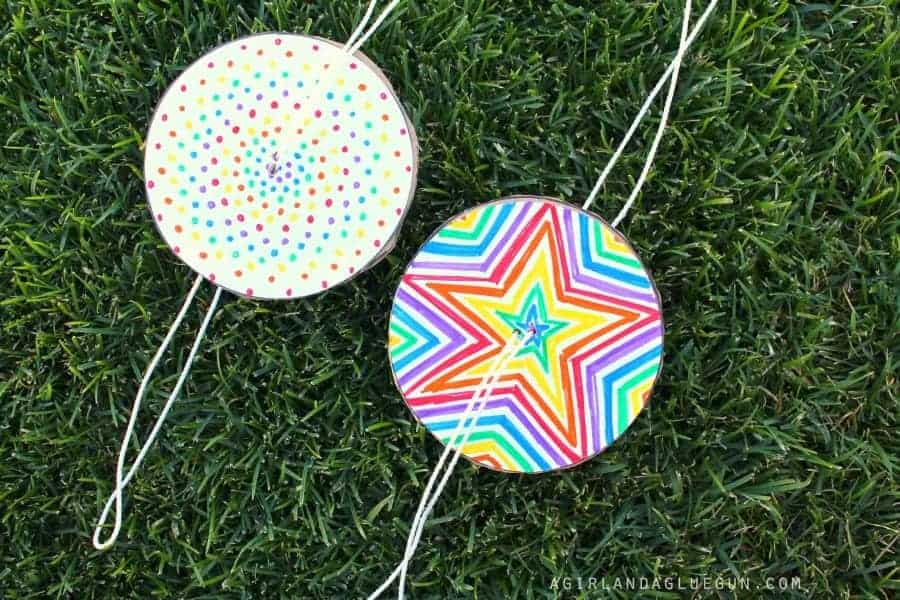
A paper spinner, my dear parents, is a magical little toy made out of paper or cardstock, designed to spin around when you give it a twist. Picture a vibrant whirligig or a merry-go-round for your fingertips! It’s not only a delightful craft to create but also a splendid way to introduce concepts of physics and art, all while refining those oh-so-important fine motor skills.
Materials You’ll Need to Create Your Own Paper Spinner
- Cardstock: This sturdy paper will be the canvas for your kids’ creativity and the main component of the spinner.
- Markers, Crayons, or Paint: To let the colors explode in design and splendor!
- Scissors: To cut out the perfect shape for the spinner.
- String: To give it the twist and twirl.
- A Toothpick or a Small Dowel: For the spine that holds the spinner together.
- Glue: A spot of this to keep everything in place.
And remember, you’re not just crafting a toy; you’re creating a palette of hues that will teach your toddlers about colors and patterns. So, grab your creative hats and let’s get spinning!
Step-by-Step Guide to Making a DIY Paper Spinner
Here we go, step by step, to a whirl of happiness. Follow these simple instructions and watch your kiddo’s eyes light up with glee.
- Choose your cardstock and cut out two identical circles. The size can vary, but a good diameter to start with is about 2 to 3 inches.
- Now, it’s time to let creativity rule! Allow your children to color, paint, or draw patterns on both circles. Encourage them to explore symmetry and color combinations as they decorate.
- While the masterpieces dry, grab the toothpick or dowel and trim it to just a tad longer than the diameter of your circles.
- Once the circles are ready, place them back-to-back, with the decorated sides facing out, and glue them together. Press firmly and let the glue set.
- Take your scissors and make a small slit in the center of the glued circles, just big enough for your toothpick or dowel to fit through snugly.
- Carefully push the toothpick through the center hole. You can add a tiny bit of glue on the toothpick ends to hold the paper in place if needed.
- Cut two pieces of string about 24 inches long. Tie each piece tightly to either end of the toothpick.
And voilà! You have just created a delightful and simple paper spinner. But wait, the fun doesn’t stop here!
We’re just getting started on this whirlwind craft adventure. In the next section, we’ll explore the science behind the spin, marvelous modifications to the basic design, and creative ideas for incorporating learning into the play. Keep your eyes peeled for more fun and learning as you and your little one embark on this creative crafting journey together!
Yes, a paper spinner is more than just a toy; it’s a doorway to understanding simple physics, a chance to practice coordination, and an opportunity to bond ingeniously with your precious ones. So, stay tuned for more tips and tricks on maximizing the joy of paper spinners!
5 Essential Tips for Parents Preparing for Paper Spinner Crafting
Before you and your little artists start spinning away, here are five essential tips to ensure a smooth and joyous crafting experience:
1. Prep Your Space
Choose a crafting area that’s comfortable and easy to clean. Spreading out newspaper or a washable tablecloth can make post-crafting cleanup a breeze. Make sure all the materials are within reach for tiny hands but not so close that they might be accidentally knocked over. Having a dedicated spot for crafting can also help set the tone and get those creative juices flowing!
2. Embrace the Mess
Art and craft projects can get messy, and that’s part of the charm! Set aside perfection and allow your child to revel in the creative process. Whether it’s a bit of glue here or a smudge of paint there, it’s all in the name of fun and learning. Remember, washable materials are your friends.
3. Safety First
When dealing with scissors and other potentially sharp tools, it’s important to supervise your children closely. Depending on their age and skill level, you may need to handle the cutting yourself or guide them through it. Always choose safety scissors for younger children to prevent any crafting boo-boos.
4. Patience is Key
Children may take longer to complete tasks and may want to explore the materials in ways you hadn’t anticipated. Encourage exploration and be patient as they learn through play. It’s not just about the end product but also the experience of crafting together.
5. Experiment and Adapt
There’s no single right way to create a paper spinner. Feel free to adapt the basic design to suit your child’s interests. Use different sizes, shapes, and methods of decoration. Experimentation can lead to unique and personal creations, and it gives children the freedom to think outside the box.
Exploring the Science Behind Paper Spinners
Now that you have your beautiful paper spinner, it’s the perfect time to introduce your little ones to some basic physics. Explain how the force you apply to the strings causes the spinner to rotate – this is a simple demonstration of energy transfer. Discuss concepts like friction, gravity, and air resistance and how they affect how the spinner moves. It’s a whirlwind science lesson in the palm of their hand!
DIY Paper Spinner Variations
Once you’ve mastered the basic paper spinner, why not try some fun variations? Here are a few ideas:
- Two-Toned Spinner: Use contrasting colors on either side for a captivating visual effect when it spins.
- Glitter and Glam: Add glitter, stickers, or other embellishments to make your spinner shine.
- Shape Shifters: Create different shapes like stars, hearts, or even animal faces for an extra dash of whimsy.
- Learning Spinners: Write letters, numbers, or sight words on the spinners to combine play with literacy and numeracy skills.
Remember, each paper spinner is a reflection of your child’s imagination. Encourage them to dream up their own variations – there’s no limit to the creativity!
Ready to watch your child’s eyes sparkle with the joy of creating and learning? Then it’s time to gather your materials, sit down together, and let the good times spin. Happy crafting, everyone!
See more great Things to Do with Kids in New Zealand here. For more information see here
Disclaimer
The articles available via our website provide general information only and we strongly urge readers to exercise caution and conduct their own thorough research and fact-checking. The information presented should not be taken as absolute truth, and, to the maximum extent permitted by law, we will not be held liable for any inaccuracies or errors in the content. It is essential for individuals to independently verify and validate the information before making any decisions or taking any actions based on the articles.

