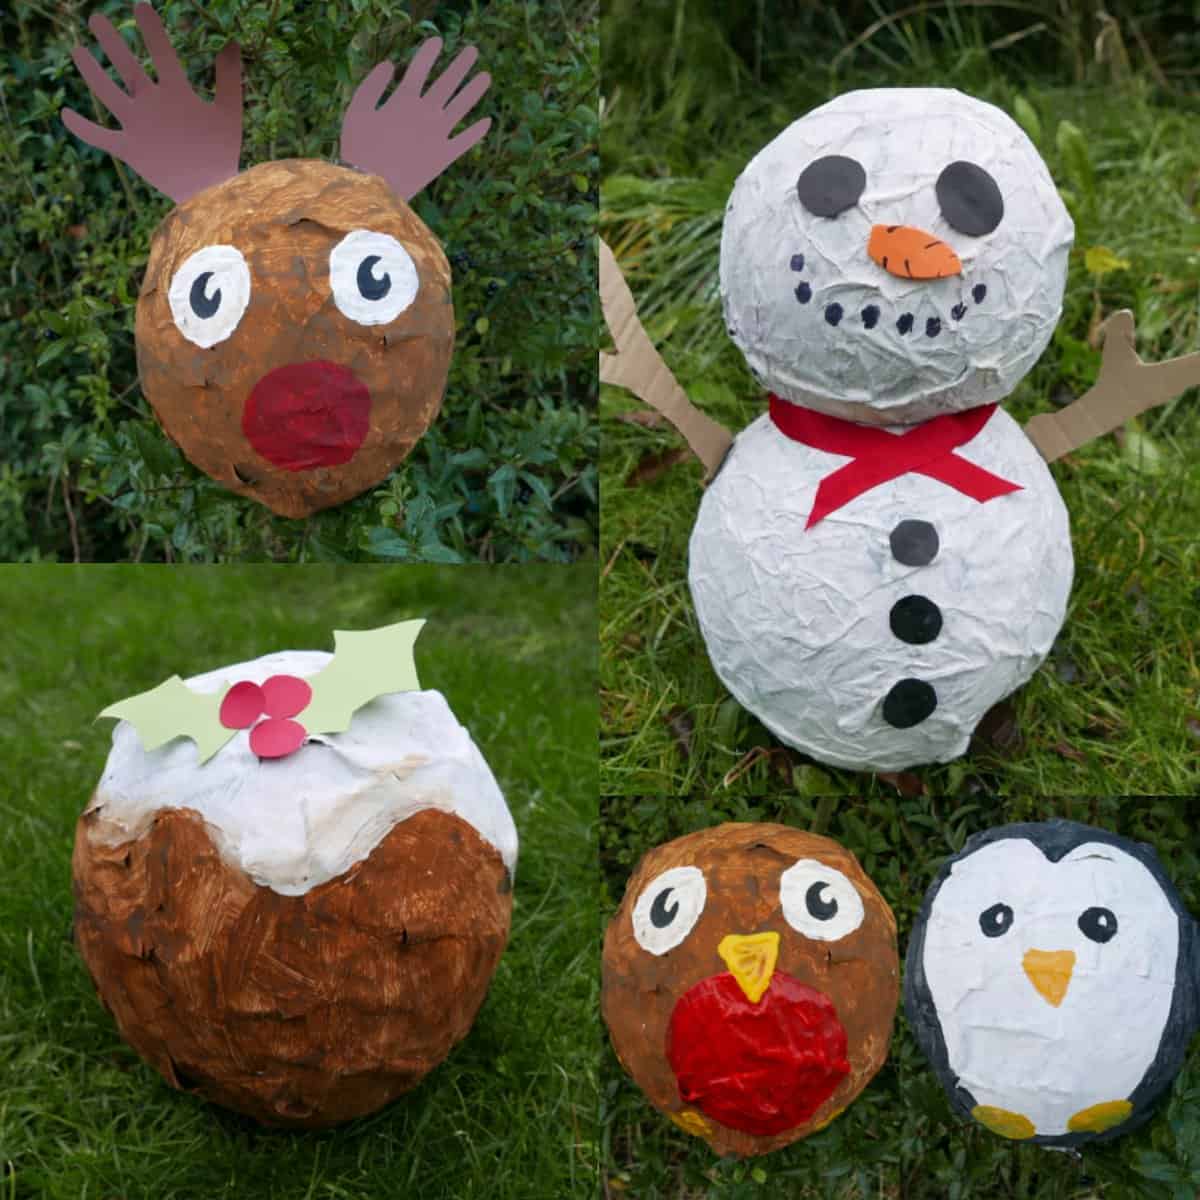
Paper Mache Crafts for Kids: A Parent’s Ultimate Guide
Hey there, creative families! Are you ready to dive into the whimsical world of paper mache crafts? These delightful projects are not just a blast for the kiddos but also a fantastic way to bond as a family while fostering imagination and dexterity. Whether it’s a rainy day, a party, or just an everyday adventure, paper mache crafts are a go-to activity for fun and learning!
What is Paper Mache?
Before we get our hands sticky, let’s talk about what paper mache actually is. Paper mache, also known as papier-mâché, is a versatile crafting material made by combining paper pieces with an adhesive paste. When dry, it creates a firm and lightweight structure that can be painted and decorated. It’s an eco-friendly and cost-effective way to create all sorts of amazing things – from masks to animals, and even big sculptures!
Why Paper Mache is Perfect for Kids
Paper mache is incredible for kids for so many reasons! It encourages creativity and self-expression, helps develop fine motor skills, and teaches the value of recycling and reusing materials. Plus, it’s an easy and low-cost way to create something truly special. The best part? The process is just as fun as the end result!
Materials You’ll Need
- Newspaper: Grab some old newspapers (or any paper you have on hand) and tear them into strips.
- Adhesive: You can use a pre-made paper mache paste, home-made glue with water and flour, or even diluted white glue for your paste.
- Balloons or Molds: Depending on what you’re making, you might need a base to shape your project, like balloons for round objects.
- Paint and Decorations: After your project is dry, you can paint and decorate it with anything you like. Get creative with markers, glitter, fabric, and more!
Simple Paper Mache Recipe for Beginners
Before we jump into crafting, let’s whip up our own paper mache paste. It’s super easy and kid-friendly!
- Mix 1 part flour to 2 parts water until you have a smooth, thin glue-like consistency. Add a bit more water or flour as needed.
- Cook over medium heat for about 3 minutes, stirring constantly until the mixture thickens.
- Let it cool down, and your paste is ready to go. Bonus tip: Add a few pinches of salt to prevent mold!
Getting Started with Your First Paper Mache Project
Now that we have everything ready, let’s begin with a straightforward project: a paper mache bowl!
Step-by-Step Guide to Making a Paper Mache Bowl
- Cover your workspace with a plastic sheet or old newspapers to keep things clean.
- Blow up a balloon to the desired size of your bowl and tie the end.
- Dip your paper strips into the paste, remove excess paste by running the strips through your fingers, and start placing them over the balloon. Overlap the strips for strength.
- Cover half of the balloon to create a bowl shape. Allow the first layer to dry a bit before adding more layers.
- After 3-4 layers, leave your project to dry completely. This might take up to 24 hours, depending on humidity.
- Once dried, pop the balloon and trim the edges of your bowl to make them smooth and even.
- Paint and decorate your bowl to your heart’s content!
Voilà! You and your kids have just made a beautiful paper mache bowl that can be used for storing treasures, as a unique gift, or as a decorative piece in your home. The joy of paper mache is that each piece is as individual as its creator – no two crafts will ever be exactly the same! And remember, the adventure doesn’t stop here. There are endless possibilities to explore with paper mache, and it’s all about letting creativity lead the way.
Stay tuned as we continue our journey through the enchanting realm of paper mache. Next up, we’ll tackle more advanced projects and share expert tips to make your creations stand out. Get ready to be amazed at what you and your little ones can achieve with some paper, paste, and a dash of imagination!

5 Essential Tips for Parents Preparing for Paper Mache Crafts
As you embark on this crafty journey with your kids, here are five must-know tips to ensure a smooth and enjoyable paper mache experience:
1. Prep Your Space and Materials Ahead of Time
Before calling the kiddos to the craft table, make sure you have all your materials gathered and your workspace prepped. Cover your surface with a plastic tablecloth or newspapers to catch spills and drips. Have your paper strips torn and ready to go, and the paste mixed and within reach. This prep work helps keep the focus on fun and creativity rather than scrambling for supplies.
2. Dress for the Occasion
Paper mache can get messy, and that’s part of the charm! However, you’ll want to protect clothing from glue splatters and paint splashes. Encourage kids to wear old clothes or aprons, and have some damp cloths or baby wipes handy for quick clean-ups. This way, no one worries about getting dirty, and you can all enjoy the process.
3. Teach Patience Through Drying Times
One of the most important lessons paper mache can teach is patience. Explain to the little artists that their creations need time to dry between layers and before painting. You can use this waiting time to plan out designs, read a book together, or start another creative activity. Understanding that some things can’t be rushed is a valuable life lesson, delivered through the joy of crafting.
4. Embrace and Encourage Individuality
Your child’s paper mache project doesn’t have to be perfect. Emphasize the importance of self-expression and individual style. If the arm of their paper mache dinosaur is a bit wonky or the colors of their mask are wonderfully wild, that’s fantastic! Celebrate their choices and remind them that art is all about uniqueness and creativity.
5. Keep It Eco-Friendly
Use the paper mache crafting time to teach about recycling and repurposing. Explain how you can make beautiful art from items that would otherwise be thrown away. Involve your kids in choosing materials to recycle for their projects – old newspapers, junk mail, and cardboard all make great choices. This way, paper mache becomes a gateway to discussions about sustainability and caring for our planet.
Now that you’re armed with these helpful tips, you’re all set to guide your children through the fantastic craft of paper mache. As you work on projects together, you’ll create not just fun art pieces, but also precious memories that will last a lifetime. So, roll up your sleeves, take a deep breath, and get ready for some sticky, happy fun!
And hey, don’t forget to snap some photos of your masterpieces and the process! Those smiles covered in a bit of glue and paint are the ones you’ll cherish forever.
Ready? Set? Let’s get crafting!
There’s so much more to explore in the land of paper mache, and I can’t wait to walk you through each step. From quirky creatures to festive decor, the possibilities are endless, and the only limit is your imagination. Keep an eye out for our next chapter, where we’ll delve into more intricate designs and techniques to elevate your paper mache prowess to new heights!
See more great Things to Do with Kids in New Zealand here. For more information see here
Disclaimer
The articles available via our website provide general information only and we strongly urge readers to exercise caution and conduct their own thorough research and fact-checking. The information presented should not be taken as absolute truth, and, to the maximum extent permitted by law, we will not be held liable for any inaccuracies or errors in the content. It is essential for individuals to independently verify and validate the information before making any decisions or taking any actions based on the articles.


