
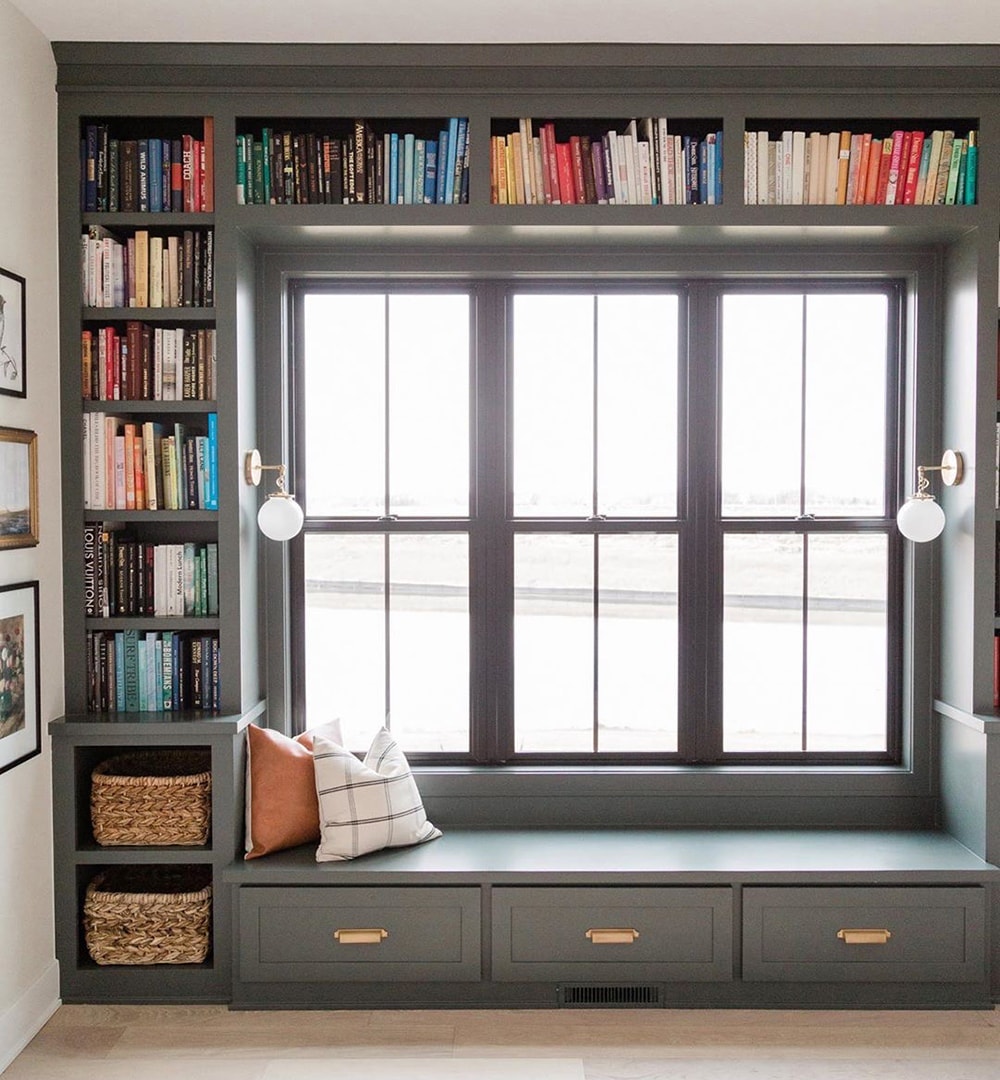
How to Craft a Magical Window Bookshelf Seat Your Kids Will Adore
Hey there, wonderful parents! Are you dreaming of a cozy corner that melds the joy of reading with the tranquility of a window view? Look no further, because I’m here to guide you through crafting a delightful window bookshelf seat that’s sure to become your child’s favorite reading retreat. Not only will this be an enchanting addition to your home, but it’s also a splendid way to nurture your little one’s love of books. Ready? Let’s turn that dream into reality!
Step 1: Measure and Plan Your Space
The foundation of any great project is a solid plan. Start by choosing a window that pours in plenty of natural light – it’s perfect for daytime reading sessions! Measure the width and height of the space to ensure your bookshelf seat will fit like a glove. Don’t forget to account for any radiators or vents nearby; safety first!
Consider how big you want the seat to be, thinking about not only the space available but also the comfort of your kiddos. A depth of 18-24 inches is ideal for snuggly seating, while the height should match that of standard chairs, around 17-19 inches. Now’s also the time to decide on the number of shelves and their height—tailor it to accommodate both Dr. Seuss and J.K. Rowling!
Step 2: Choose Your Materials
When selecting materials, quality and durability matter. You want this cozy nook to withstand the test of time and the energy of excited children. Opt for sturdy wood like plywood or MDF for the frame. For a touch of style, consider adding decorative molding or using hardwood for the seat.
With safety in mind, make sure all materials are child-friendly. Pick paints and varnishes that are non-toxic and lead-free. You’re creating a safe haven, after all, not just a reading spot!
Step 3: Construct the Bookshelf Framework
Building the frame is where you set the stage. If woodworking isn’t your forte, fear not! Many local hardware stores offer cutting services. Have your wood cut to the measurements from step one, ensuring everything is squared up nicely.
Assemble the frame using screws or nails, keeping everything secure and stable. Remember: this frame doesn’t just hold books – it supports your precious little ones, too! Attach the shelving units at equal intervals or vary them to accommodate different book heights, and add a backing for structural integrity.
With the frame assembled, it’s time to attach it to the wall. Locate the studs and use heavy-duty brackets or screws to secure the fixture. This is a critical step since you don’t want the bookshelf to be a tipping hazard.
Before you know it, you’ll have the skeleton of your window bookshelf seat standing tall and proud, ready for the next steps!
Step 4: Craft the Seat and Finish Your Bookshelf
Now, the moment your tools—and your children—have been waiting for: creating the comfy seat! Cut a piece of high-quality plywood or MDF to act as the base of your seat. Add a layer of foam and batting for plush comfort, and choose a durable fabric that can withstand spills and scribbles. Fasten the cushion to the base using a staple gun for an easy yet secure attachment.
With the seat cushion ready, place it atop the frame. It’s thrilling to see the bookshelf seat come to life, isn’t it? To complete the look, paint or stain the wood to match your home’s aesthetic or to offer a pop of color that sparks joy and creativity. Remember to let your paint or stain dry completely—it’s essential for a long-lasting finish.
Accessorize the nook with some cozy pillows, a soft throw blanket, and, of course, an assortment of your child’s favorite books. Not only does this create an inviting atmosphere, but it also invites your little readers to dive into their new special spot for adventures in turning pages.
Congratulations! You’re well on your way to giving your kids the gift of a window bookshelf seat—a nook that’s designed for comfort, imagination, and countless afternoons lost in stories. Stay tuned for more tips on personalizing this space and ensuring it’s a cherished spot for both you and your children!

5 Things Parents Should Know in Preparing for a Window Bookshelf Seat
- Assess the Sturdiness of Your Window Area: Before you begin, examine the wall and window area where you plan to build the bookshelf seat. It’s crucial to ensure that the wall can support the structure and that the window’s frame is not compromised. Safety should always be your top priority.
- Factor in Light and Heat: Windows are sources of both light and heat. Depending on the direction your window faces, sunlight could affect the comfort of your child’s reading nook. You might need to install adjustable window treatments to manage glare and heat during different times of the day.
- Consider the Room’s Design: Think about how the bookshelf seat will blend with the room’s existing design and decor. Your new project should feel like a natural addition to the space. Coordinating the paint color and wood finish with the room’s palette can make the bookshelf seat look built-in and intentional.
- Plan for Growth: Kids grow fast, and so do their book collections. When planning your shelves, consider adjustable shelving or extra space at the top to allow for taller books and additional items as your child’s interests evolve. Make sure the seat itself is a size that will still be comfortable for them as they grow.
- Involve Your Child in the Process: One of the best ways to ensure that your child loves their new bookshelf seat is to include them in the planning and building process. Whether it’s letting them pick out the fabric for the cushion or choose some of the books to be displayed, having a say will give them a personal connection to the space and encourage them to use it more often.
By keeping these tips in mind, you’ll be well-equipped to create a functional, safe, and beloved reading nook for your child. The window bookshelf seat is more than just a piece of furniture—it’s an investment in your child’s love of reading and a cozy corner they can call their own. Happy building, and may this new nook be the site of many happy reading adventures!
See more great Things to Do with Kids in New Zealand here. For more information see here
Disclaimer
The articles available via our website provide general information only and we strongly urge readers to exercise caution and conduct their own thorough research and fact-checking. The information presented should not be taken as absolute truth, and, to the maximum extent permitted by law, we will not be held liable for any inaccuracies or errors in the content. It is essential for individuals to independently verify and validate the information before making any decisions or taking any actions based on the articles.


