
Ultimate Guide to Making Slime: Essential Ingredients and Tips for Parents
Welcome to the wonderfully gooey world of slime-making, where fun and creativity come together to create a sensory wonderland for kids and parents alike! If you’re looking to craft the perfect slime with your little ones, look no further. We’ve got the ultimate list of what you’ll need to get started, plus some handy tips to guarantee slime-making success. So, roll up your sleeves and get ready for some sticky good fun!
What is Slime?
Slime is a non-Newtonian fluid that’s all the rage among kids (and adults too!). It’s a stretchy, squishy, and sometimes even sparkly substance that you can squash, poke, and mold. But before we dive into the how-to’s, let’s make sure you’ve got all your slime essentials ready to go!
Basic Ingredients for Slime
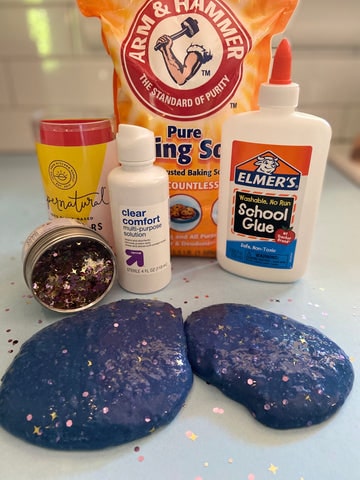
Starting your slime adventure is easy-peasy! The ingredients are simple, and you probably already have most of them lying around your home. Here’s a basic list to get you on the right track:
- Glue: The base of most slime recipes is good old-fashioned white or clear PVA glue. Make sure it’s nontoxic and washable, especially if little hands are involved.
- Borax Solution: Often used as a slime activator, borax solution helps bond the glue molecules together. You’ll need to dissolve a teaspoon of borax powder in one cup of warm water, but remember, this is for adult hands only!
- Contact Lens Solution: If you prefer a borax-free recipe, you can use contact lens solution that contains boric acid and sodium borate instead.
- Baking Soda: This common household item is used to help firm up the slime and provide a better texture.
- Food Coloring: Add some pizzazz to your slime with a few drops of food coloring! Go for classic colors, or mix things up to create your own unique shade.
- Glitter, Beads, or Other Add-ins: Want to make your slime extra special? Throw in some glitter, foam beads, or even scented oils. Unleash your creativity—this is your chance to shine!
Gearing Up: Equipment to Have on Hand
Now that you’ve got your ingredients, let’s quickly talk equipment. You won’t need much, just a few household items:
- A Mixing Bowl: Use a good-sized bowl that can handle all the mixing and mess.
- A Mixing Tool: A sturdy spoon or spatula will do the trick.
- Measuring Cups & Spoons: Accuracy is key when measuring your ingredients.
- Airtight Containers: Once you’ve made your slime, you’ll need somewhere to keep it fresh. Airtight containers or zip bags work great.
Now that you’re fully prepared, the real fun begins! In part two of this guide, we’ll walk you through the step-by-step process of creating your very own batch of homemade slime. Whether you’re looking for a classic gooey formula or something more avant-garde, we’ve got you covered. Stay tuned for more slime-rific tips and tricks that will keep the smiles and the slime stretching!
Remember, making slime is not just about the end product—it’s about the laughter and memories you create along the way. Are you ready to embark on this sticky journey? Let’s make some slime!
Five Things Parents Should Know Before Making Slime
Before diving into your slime-making adventure, there are a few important things every parent should know:
- Supervision is Key: Always supervise your children during slime-making. Some ingredients, if not handled correctly, can be harmful. It’s crucial to ensure that kids aren’t ingesting any ingredients or rubbing them in their eyes.
- Allergies and Sensitivities: Check for any potential allergies to the ingredients being used. For example, some people can have a reaction to borax or certain food colorings. Use alternatives or hypoallergenic options as needed.
- Mess Management: Slime-making can be a messy endeavor. Protect clothing and work surfaces with aprons and wax paper or plastic sheets. Keep wipes or a damp cloth handy for quick clean-ups.
- Slime Consistency: The wonderful thing about slime is that you can tweak its consistency to your liking. If it’s too sticky, add a bit more activator slowly. If it’s too runny, a little extra glue can help solidify it. Patience is key as you find the perfect balance.
- Storage and Lifespan: Slime doesn’t last forever. Keep your slime in an airtight container to prevent it from drying out, but remember that it will eventually need to be discarded. Regularly check the condition of the slime and toss it out once it starts to change in texture or odor.
Keeping these points in mind will help ensure a fun and safe experience for everyone. Now let’s move on to making slime!
Step-by-Step Process: Crafting the Perfect Slime
Ready to become a slime master? Follow these simple steps to create the ultimate slime:
Step 1: Pour the glue into your mixing bowl. Start with about 4 ounces for a standard batch.
Step 2: If you’re using food coloring or add-ins like glitter, now’s the time to mix them in with the glue.
Step 3: Add a pinch of baking soda to help firm up the slime.
Step 4: Begin adding your activator (borax solution or contact lens solution with boric acid) little by little while stirring continuously. You’ll start to see the slime form right before your eyes!
Step 5: Once the slime begins to pull away from the sides of the bowl and starts clumping together, it’s time to get your hands dirty. Knead the slime until it reaches your preferred consistency.
Step 6: Store the slime in an airtight container when not in use to keep it fresh and playable.
Voila! You now have a batch of homemade slime to enjoy with your family. Invite your kids to stretch, squish, and experiment with their new creation. The possibilities are endless, and so are the giggles.
Don’t forget to take pictures and share your family’s slime creations on social media or in the comments below. We’d love to see the fun colors and textures you come up with. If you run into any slime dilemmas, feel free to ask questions or share your experiences. This way, our community of parents can learn from each other and find the best ways to perfect our slime-making techniques.
Happy slime-making, dear parents and little slime scientists! Let the fun begin!
See more great Things to Do with Kids in New Zealand here. For more information see here
Disclaimer
The articles available via our website provide general information only and we strongly urge readers to exercise caution and conduct their own thorough research and fact-checking. The information presented should not be taken as absolute truth, and, to the maximum extent permitted by law, we will not be held liable for any inaccuracies or errors in the content. It is essential for individuals to independently verify and validate the information before making any decisions or taking any actions based on the articles.


