
Step-By-Step Guide to Creating a Volcano Paper Mache
Greetings, lovely parents and craft enthusiasts! Are you ready to dive into an exciting, educational activity that your kids will absolutely erupt with joy over? That’s right—we’re talking about making a volcano paper mache!
Not only is this a brilliant way to spend quality time with your children, but it’s also a splendid chance to incorporate a mini science lesson, and trust me, it’s going to be a blast! Let’s get started on our journey to make a spectacular volcano model that can “erupt” with all the fiery enthusiasm of your little ones’ imaginations.
What You’ll Need
- Old newspaper
- Balloons or a small bottle
- Flour and water (for the paper mache paste)
- Paper mache strips (we’ll show you how to make these)
- Paints and paintbrushes
- Vinegar
- Baking soda
- Food coloring (red or orange for the lava)
- A tray or a large piece of cardboard (to stand your volcano on)
Step 1: Preparing Your Workspace
Before we get our hands messy with paper mache, let’s prepare our workspace. Cover the table or the surface you’ll be working on with old newspapers or a plastic sheet. This activity can get a bit messy, so it’s best to play it safe!
Step 2: Building the Base of Your Volcano
First things first, we need to create the skeleton of our volcano. Inflate a balloon and tie it off, or use a small bottle as the central structure. If you’re using a balloon, place it on your tray or cardboard piece and secure it with tape so it doesn’t roll away.
Step 3: Mixing Your Paper Mache Paste
Mix one part flour to two parts water to create a smooth paste. You want the consistency to be similar to glue – not too thick, but not runny. Remember, a good paste is key to a sturdy volcano!
Step 4: Applying the Paper Mache
Cut or tear the newspaper into strips. Dip a strip into the paste, running it between your fingers to remove excess paste, and then apply it to the balloon or bottle. Overlap the strips and cover the entire surface except for the balloon knot or bottle opening – that’s your “volcano crater”.
For the best results, let your children get involved in this step; there’s nothing more delightful than seeing their little hands craft a mighty volcano. Aim for at least two to three layers of newspaper for a sturdy model. Don’t worry if it looks messy; it’s all part of the fun!
Step 5: Letting the Volcano Dry
After finishing the layers, let your volcano dry completely. It may take a day or two, so patience is a virtue here. You can place it in the sun or a warm room to expedite the drying process, but make sure it’s fully dried before moving on to painting.
Now, wasn’t that just an exhilarating start? You’re on your way to creating a marvelous volcano with your kids – I can already hear the excited giggles and see the wide-eyed wonder as you all craft together. Stay tuned for our next steps, where we’ll delve into painting and, of course, creating the eruption!
Get ready to see your living room transform into Mount Vesuvius, and don’t forget to capture the joyous moments on camera. Learning has never been so explosive! Keep your spirits high, and let’s prepare for a thrilling volcanic adventure!
Note: Keep an eye on your little ones during the activity to ensure they’re safe and not putting any materials in their mouths, especially when working with small objects or edible ingredients. Safety first!
This is just the beginning, dear parents and guardians. By the end of this guide, you’ll have a magnificent paper mache volcano that will awe and inspire everyone involved. Plus, you’ll have crafted treasured memories that, much like a real volcano, will stand the test of time. Stay jovial and excited – adventure awaits!
5 Things Parents Should Know in Preparing for How to Make a Volcano Paper Mache
1. Set Realistic Expectations for Mess and Time
Creating a paper mache volcano can be a wonderfully messy experience. It’s important to set aside enough time for both crafting and cleaning up afterward. Anticipate that the paper mache will need time to dry, often overnight, so this project can span a couple of days. Prepare your kids by letting them know it’s not instant gratification but a rewarding process!
2. Safety and Non-Toxicity of Materials
In paper mache projects, it’s essential to use non-toxic and safe materials. This is especially vital if younger kids are involved who might inadvertently ingest small amounts of materials. All ingredients for the paper mache mix and the volcano eruption are common kitchen items, ensuring safety and ease of clean-up.
3. Supervision is Key
While encouraging independence is excellent, close supervision is critical throughout the project. This will ensure that the activity is carried out safely and help address any questions or issues that may arise as kids engage with the task.
4. Embrace Creativity Beyond the Instructions
While following the guide is great for structure, allowing kids to add their personal touch can make the activity more engaging. Encourage them to paint the volcano with their choice of colors or to add features like faux trees or dinosaurs for added fun. Creativity in this project can enhance their learning and pride in the finished product.
5. The Educational Aspect
This paper mache volcano project isn’t merely about crafting; it’s a wonderful opportunity to teach geological and chemical concepts. Prepare to explain how real volcanoes work and why the combination of vinegar and baking soda creates an “eruption.” It’s hands-on learning at its best!
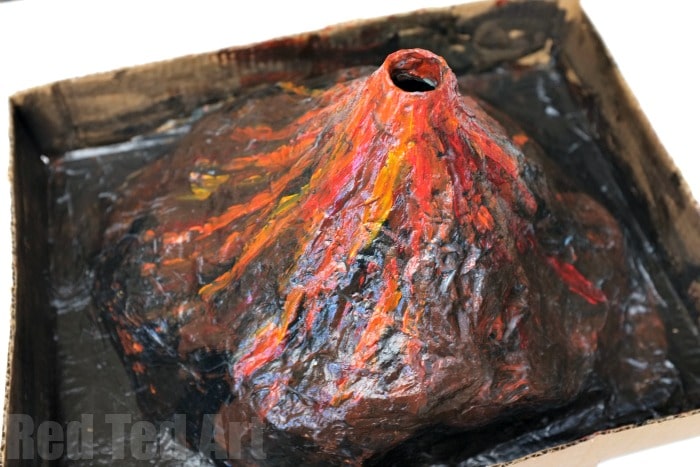
Step 6: Painting Your Volcano
Once your paper mache volcano is completely dry, it’s time for the artists in your family to shine! Start by painting the entire volcano with a base color. Earth tones like brown or gray work perfectly. Let it dry, and then add additional colors to create depth and realism. Lush green for grassy areas, black, and red for charred and lava flows will bring your paper mache volcano to life.
Step 7: Making the Volcano Erupt
For the grand finale, it’s time to mimic a volcanic eruption. Place the volcano on a surface that can get a bit messy or outside if the weather allows. Fill the crater of the volcano with a few spoonfuls of baking soda. In a separate cup, mix vinegar with food coloring, and when you’re ready for action, pour the colorful vinegar into the crater and watch your volcano come alive!
Step 8: Explaining the Science
While your kids marvel at the fizzy eruption, explain the science behind it. The reaction between the vinegar (an acid) and the baking soda (a base) creates carbon dioxide gas, which bubbles up and pushes the colored liquid out of the top of the volcano. It’s a small-scale example of how pressure builds up in a real volcano until it erupts.
Engaging in such a creative and multi-faceted project will spark the imagination and curiosity of your children. They not only get to work with their hands and see a project through from start to finish, but they also glean insights into art, chemistry, and earth science. It’s a comprehensive learning experience wrapped up in a whole lot of fun.
Remember to take pictures or videos, applaud their efforts, and most importantly, cherish the time spent together. Such hands-on activities can foster a love of learning and creativity that will last a lifetime. Relish in the laughter, delight in the chaos, and create magnificent eruptions of joy and knowledge with your homemade volcano paper mache!
See more great Things to Do with Kids in New Zealand here. For more information see here
Disclaimer
The articles available via our website provide general information only and we strongly urge readers to exercise caution and conduct their own thorough research and fact-checking. The information presented should not be taken as absolute truth, and, to the maximum extent permitted by law, we will not be held liable for any inaccuracies or errors in the content. It is essential for individuals to independently verify and validate the information before making any decisions or taking any actions based on the articles.
